Fenders, Lines and Dock Protection
Always learning is a good motto, right? So there was more to do… we got our slip, boat to come soon-ish, but I needed to sort how to make her ‘safe’ once in the slip.Again, I’ve been on various boats, but when it came to what size and length lines or fenders, I was starting from scratch.
Fenders
Is it here YET?!?
Boat fenders protect your boat from rubbing against the dock or slip, as well as other boats when anchoring or tying up together or as a backup in case someone truly gets ‘too close’ when manuevering in and out of a slip. Everyone’s seen ‘em, even if you don’t know what they’re called.
They’re tied to a fender whip, which is just a fancy name for a rope or line, which may come with a loop at one end. Fenders can be used veritcally (typical for tying up to other boats and at most docsk), or horizontally with or without a fender board if tying up to pilings or other situations. One end of the whip is attached to the fender and the other to a cleat or railing on your boat. More or less for the boat sizes mine is, and plus or minus a bit, most not-for-rich-people sized boats usually use 2 fenders per side, sometimes 3 per side.
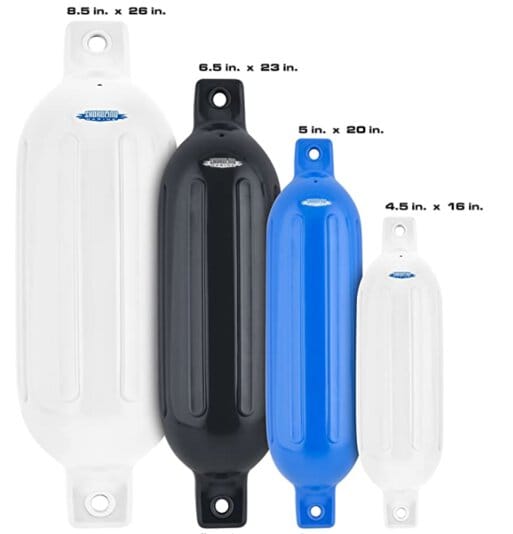
You’ll notice something pretty obvious in the pic above, beyond yes, they come in colors, although white or black are by far the most common and easiest to find. The widths and lengths vary, while of course the price goes up a bit as you go upwards in size.
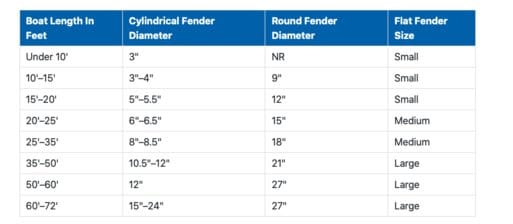
There’s different guidance out there from different sources, whereby some sizes may overlap, e.g. one mentions a 6.5” x 23” being suitable for a 20’-30’ boat, while the 8.5” x 26” is suitable for boats 25-35’ in length. Check with the manufacturer and go with what you’re feeling, or ask someone with some experience, while also considering your specific situation - if you trailer and never tie up to other boats or more tenuous or tight slip or dock situations, any are better than none. Here’s a quick chart from West Marine:
There are lots of brands out there - Attwood, Taylor Made, and dozens of others. Taylor Made has been around for a long time in the industry, and also happened to offer a color combo I was up for - as the boat is going to have it’s green/aqua top and lettering redone in favor of tan, I found a set of tan Super Gard fenders which have black ends to and bottom.
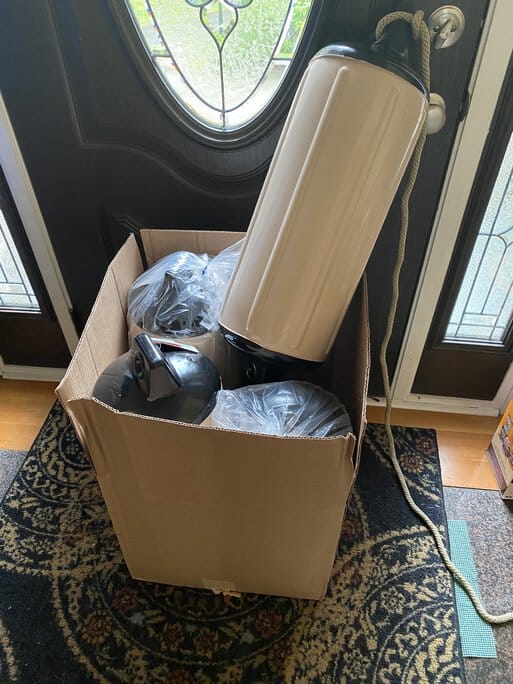
Here’s what a box of them look like below, along with Taylor Made Fender-loc whips attached. The Fender-Loc lines come with a loop on one end, allowing a simple loop to connect to the fender eye, and they’re cheap enough, so why not make life a bit easier vs a straight piece of line?
Note - when they come out of the plastic, the fenders definitely stink a bit, presumably from mold release compound of some kind, but they’ll air out pretty quickly.
The fenders came inflated, but can be inflated manually if need be - note the manufacturer recommends 2 PIS (two; not a typo) - this is quite low, so I’d advise using a manual pump vs an air compressor, or set the regulator down to 2PSI (if your reguilator is actually that precise…). Most fenders use a football type valve so need a needle adapter to inflate.

Attaching fenders to the boat
You need one fender whip per fender for vertical (hanging) configuration, with the fender lines typically being 6’ long. Double the number of whips if hanging fenders horizontally and they have an eye on each end of the fdender to tie through.
Fender whips come in different line sizes, with 3/8” diameter being the most common. They also come in different colors, again with white and black being the most common. I went with the Taylor Made Fender Loc whips, both because they have the loop on one end, leaving my knot-tying less to chance to attach to the fender, but also because I went with a tan-colored whip.
Finally, there is the standard way of tying off the fender to the boat rail or cleat, and a plethora of ‘gadgets’ out there to save you from the woes of…tying knots. There are lots of opinions out there, including - don’t bother, just tie them to the boat’s rail, cleat or stanchion and be done. Move them higher or lower if/when needed.
Consider how often you’ll need to be raising and lowering your fender height for you/your boat’s specific use. Those rafting or tying up to other boats often, or on floating docks, or going in and out of different docks and piers might benefit from one of the ‘gadgets’ to quickly raise or lower fender height or reposition them along the boat, while someone at a slip in their backyard or always tying up to the same location which isn’t fixed, meaning it raises and lowers with the water level - probably doesn’t ‘need’ one of the gadgets.
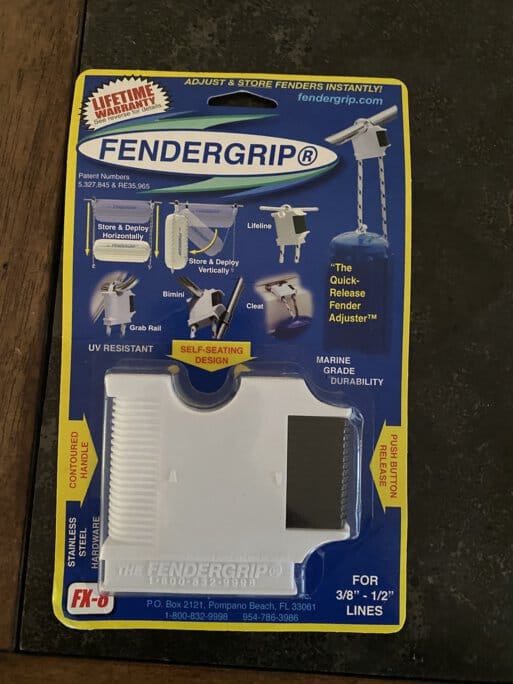
I kind of like gadgets, but even there, some of the options had me wondering on the ‘need’ of them. I didn’t want to drill new holes in my boat’s hull, although those options exist, so eventually settled on what seems to be among the most tried and true in the ‘gadget’ category, FenderGrips. Did I need them? Well, probably not, but they do allow you a bit of flexibility in how to attach to your boat, including cleats and rails, and while we’re getting into the whole ‘we now own a boat and have much to learn’ mode - I figured it couldn’t hurt, and I do like them.
Fender Attachment and Positioning
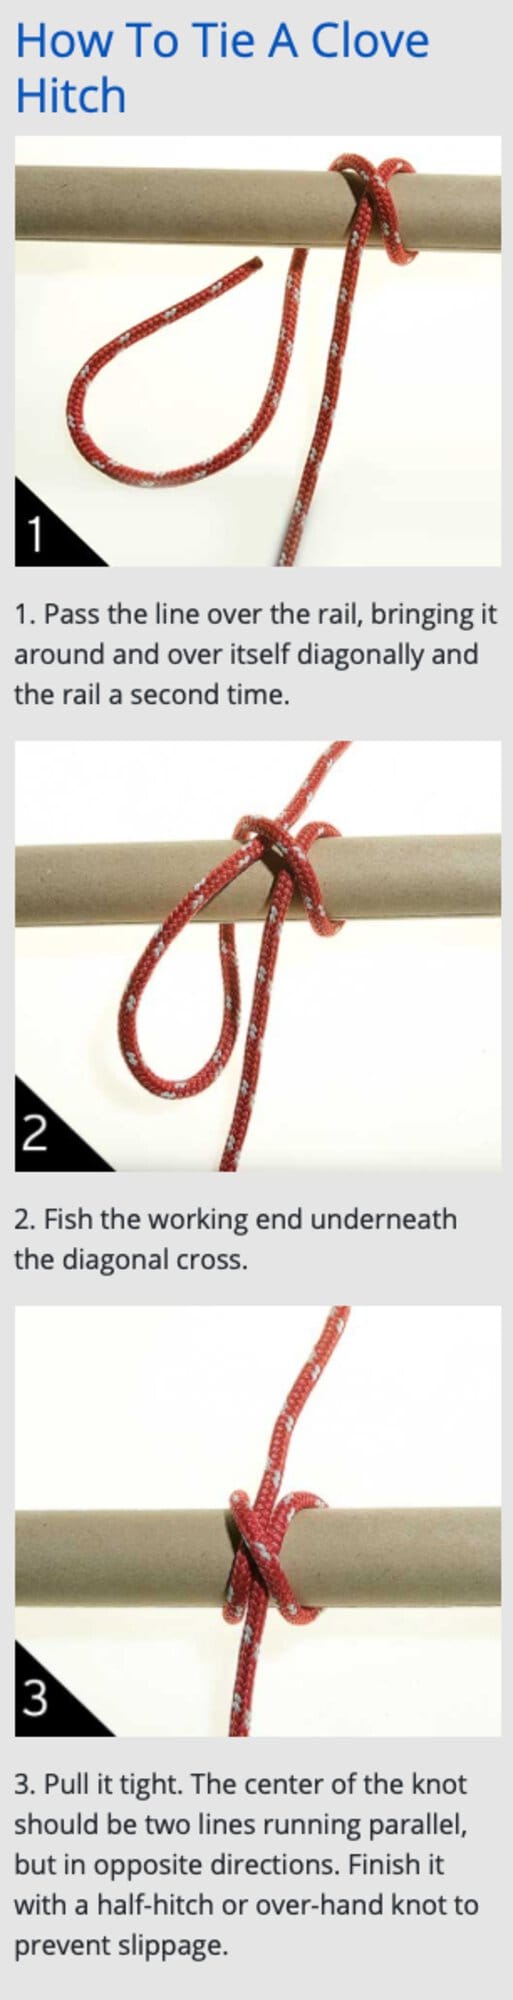
Generally, you want to place a fender at minimum at the widest spot of your boat. Most boats use a minimum of 2-3 fenders at least on the side facing the pier/slip/dock. If not using something like the FenderGrips mentioned previously, a clove hitch is often used to attach the fenders to the boat’s rail or cleats as shown below. Boat.us and Polyform US have some good images, linked to and reproduced below.
Dock Lines
So, now the boat is more or less ‘protected,’ right?
Well, sort of. We still need to make sure we have appropriate lines, as well as possibly additional protection that stays on the dock/slip in the form of some additional bumpers or guards.
The lines are much easier. With the boat still hours away, I know it had at least a bow line, and I thought there were some extra lines, but I figured both ‘color change to happen’ and don’t want to get stuck coming up short versus the prior owners likely simpler personal dock.
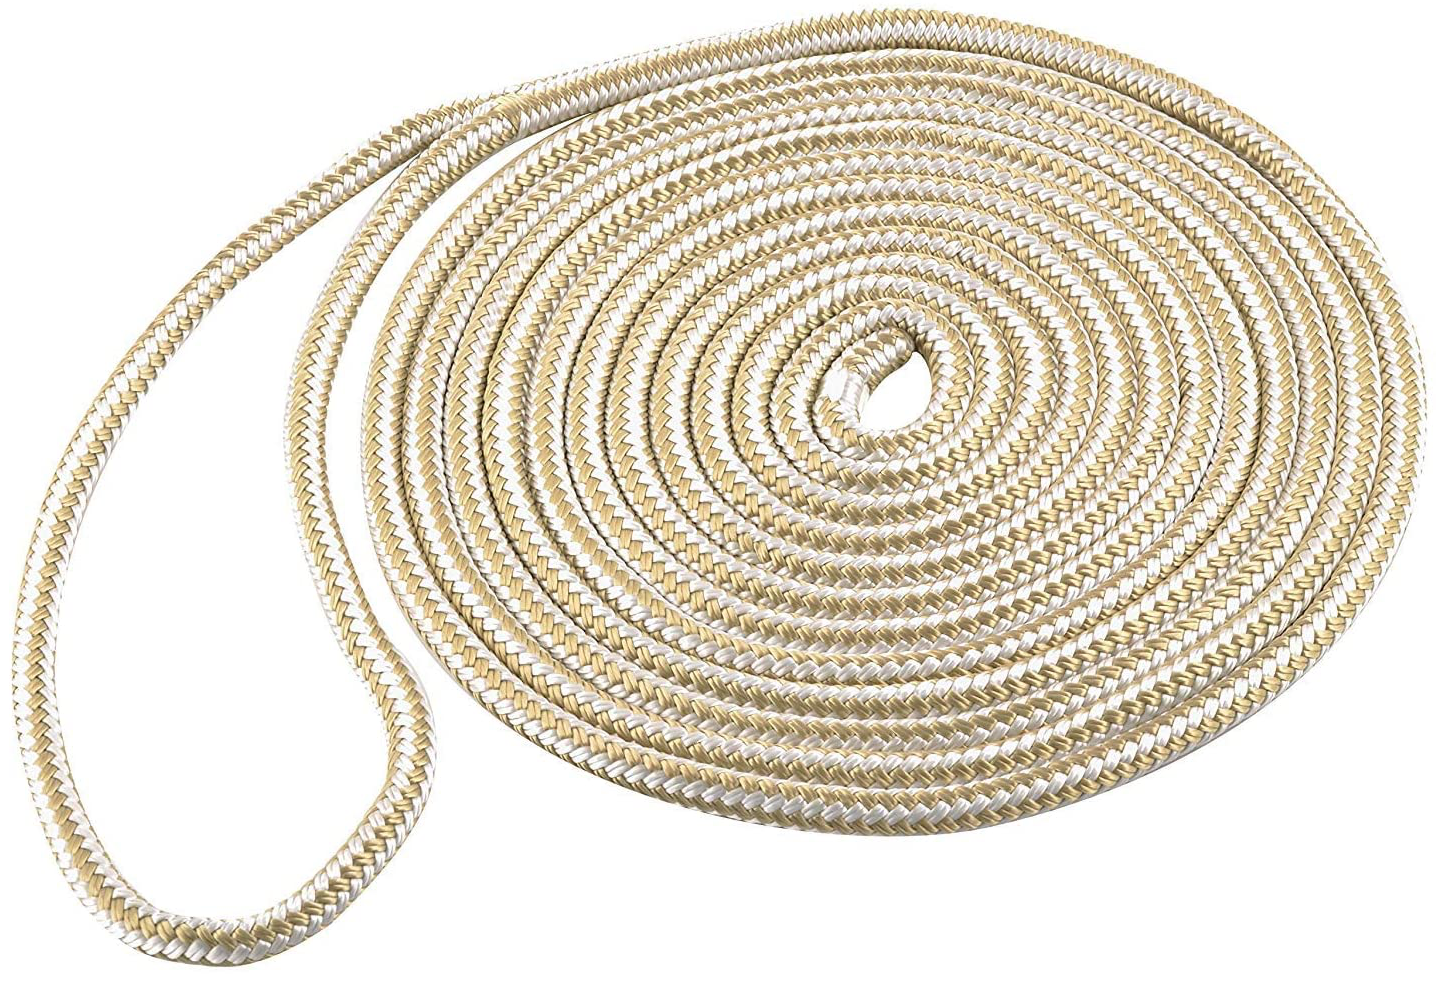
The easiest to get your hands on are by far 3/8” dock lines, which some will swear are all that’s needed to 40’ or more. Others go to 1/2” for over 30’ but make sure to check tensile strength. General consensus seems to be go with a double braided nylon line, which is what I wound up going with. Modern lines are pretty strong, but some general guidance from others is captured below. Each mooring situation is different for different owners, locations, and boats, so choose what seems right for you, or look at others with similar boats in similar locations or at the same marina, etc. Consider your relative dock/marina conditions and environment as well - if you get frequent or bad storms, consider going larger than the below and look at your fellow marina-mates’ setups if in doubt.
In my case, I had picked up 4 20’ 3/8” lines in tan/gold and white, and decided I’d make it work, along with some of the existing lines if need be. In reality, due to my slip arrangement, the main spring line at 20’ is adequate but could have been longer, while the bow and stern lines certainly could have been shorter than 20’.
| Boat Length | Up to 27' | 28-31' | 32=36' | 37-45' | 46-54' |
|---|---|---|---|---|---|
| Dock Line Diameter | 3/8" | 7/16" | 1/2" |
5/8" | 3/4" |
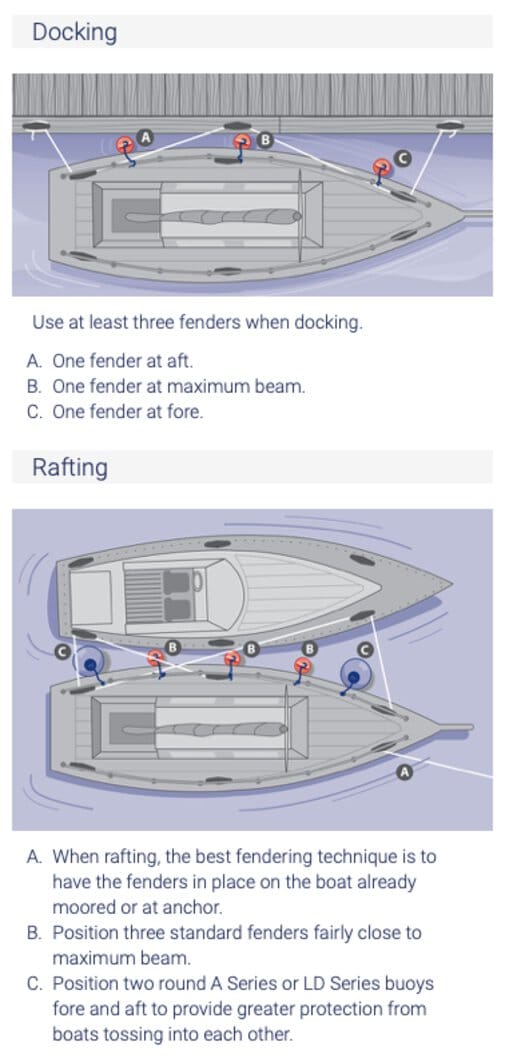
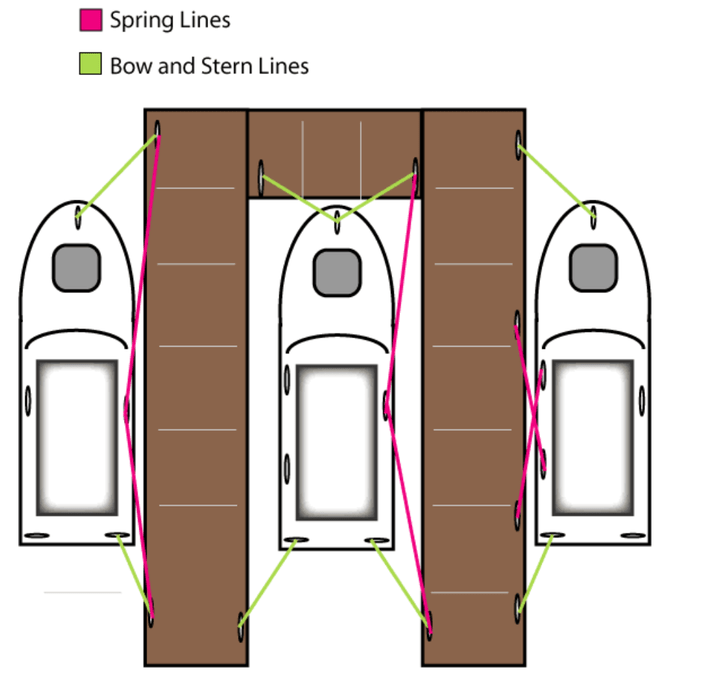
Here’s a good diagram showing some common mooring scenarios, this time from Anchoring.com.
Dock bumpers and other protective gear
Dock bumpers and such are a sight more difficult to figure out. Some slips may already have something like the simpler ‘rub rails’ made out of vinyl or other material, or cushions on the corners or straights, or nothing at all. There is a pretty wide set of options out there…to the point of mind-numbing-ness. Worse, for every positive review or experience, there are also a fair number of not-so-positive reviews in many cases. Surely my personal needs are ‘simple,’ right, and someone has the defintiive answer on dock bumpers? Sadly, not so much.
In our case, considering our boat and slip lengths, the ideal is to back the boat in, which will undoubtedly be more challenging for me as a learning-this-size boat captain, but also leaves me wanting to have at least some cushioning on the slip in case the swim platform were to nudge up against it. I didn’t have any strong predisposition towards one kind over the other, from tying up some ball fenders, to longer pads, although for the purpose, I felt like the typical 1/2” thick or less ‘rub rail’ type wasn’t what I was looking for.
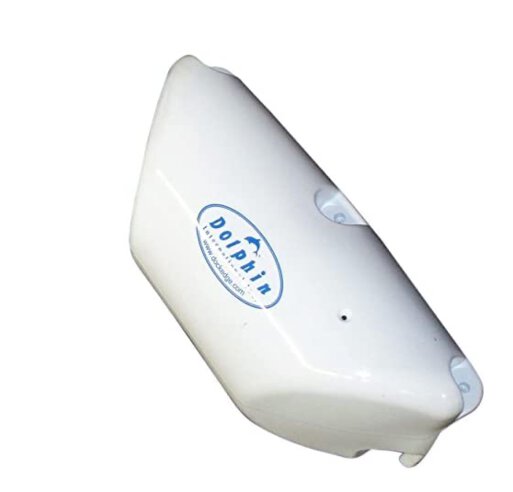
After much debate, I wound up deciding to give a pair of these a try, Dophin Dock Edge Protectors. They come in different sizes, but the price difference between 7” x 16”L and 8.5 x 24” L was more than double, so I went with two of the 7”x16”s to see how it worked out, at around $30 each. Note - you’ll want some stainless self-tapping screws as well as some washers to mount these.
Note there are a ton of different options out there, including hanging mats and others. Most of the mats I’ve seen have questionable longevity, but find what works for you. For most installations, you’ll want some stainless washers and self-threading screws (I generally use 1” or longer, pan head).