Wheelbuilding - Components and Selection
What do I need to build my own wheels?
We covered tools and the basics previously, so if you didn’t read that, it’s probably worth doing so now.
Beyond the tools, wheels don’t have all that many components - rims, hubs, spokes, spoke nipples, followed by tires, tubeless tape and valves if going tubeless.
Of course, each of these choices should be guided as to the specific type of riding you do or plan to be doing, and if there are any specific goals (e.g. lightest possible weight, strength/durability, etc.), as well as the bike type/model/specs the wheels are going on.
As an eMTB rider, I’ll be focusing on MTB/eMTB over others but some of the same advice applies...
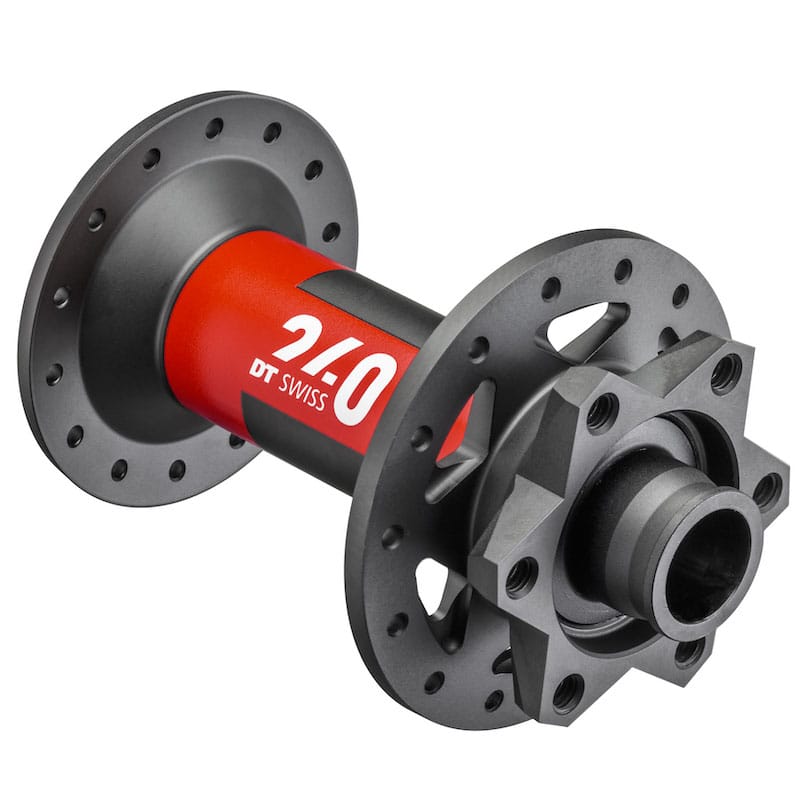
Hubs
There’s a reason we’re starting with hubs, as hubs MUST match your frame and forks properly.
Most modern MTB and eMTB frames use ‘Boost’ spacing (115mm front and 148mm rear), while fat tire bikes can use 170mm or 197mm wide rear hubs. This is critical to get right, so if in doubt, check your frame specs or measure if you must!
Beyond hub width, a few other basics need to be sorted. Quick-release or through-axle for front and rear, with most but not all mtbs and eMTBs using through-axles (or thru-axles). The most common are 12mm in the rear and 15mm up front, but a handful of bikes may use 20mm up front. In general, thru-axles are stronger, more secure and more durable than quick-release skewers. Your frame usually dictates the rear hub width as well as axle type and size, while your front forks dictate the front hub width and axle type and size.
Most current MTB and eMTBs today use 15x110mm thru-axles in front, and 12x148mm thru-axles in rear, but always confirm before ordering your hubs!
You will also need to decide on which disc brake interface you need or prefer, with the choice being either ISO 6 bolt, which uses 6 small Torx screws to hold the brake rotor on, or centerlock, which is a splined rotor which mates up to it’s counterpart spline on the hub. If building wheels for a pre-existing fully built bike, just check the rotors and see if there are 6 small screws (ISO) visible at the innermost portion of the rotor. Hubs are often marked as ISO (6 bolt) or CL (Centerlock) for part numbers when ordering. Brake rotor size on the other hand, current or desired, is not a hub requirement but relevant for frame and fork mounting brackets (which can usually be changed).
Hub Construction
I’m intentionally ignoring IGH (Internally Geared Hubs) in this article, not that I don’t think they have a lot of potential as they do, but they’re quite expensive, especially when considering something like the Kindernay VII or Rohloff which are more suitable and able to hold up to ebike use.
Many rear hubs use a ‘pawl’ system, which are effectively a set of steel pins, which are sprung to lever outwards, to press into splines on the inside circumference of the hub. As they press outwards, they ‘lock’ into place, allowing rider (or motor) input to grab the hub and provide forward/clockwise movement, while allowing freely spinning in the opposite direction, or ‘freewheel’ behavior. Indeed it’s the sound of the rear hub internals clicking against the outer splines whena bike is coasting that’s become so familiar to all of us (although a few hubs are very very quiet, and some annoyingly loud).
You can see to the right how this would work, although note the picture is for a 6 pawl hub, while many MTB and even eMTB hubs are still 3 pawl. This arrangement allows force to be applied in one direction (forward) and free spinning (with the ‘clicking’/buzzing) in the other.
Other than the pawls and outer ring spline, there’s nominally a tube the axle slides through, bearings the outer portion of the hub spins on (the inner silver/black circle in the preceding picture is a bearing), usually a few dust/grease seals, and the freehub/hub driver, which the cassette (rear sprockets the chain sits on and changes gears..).
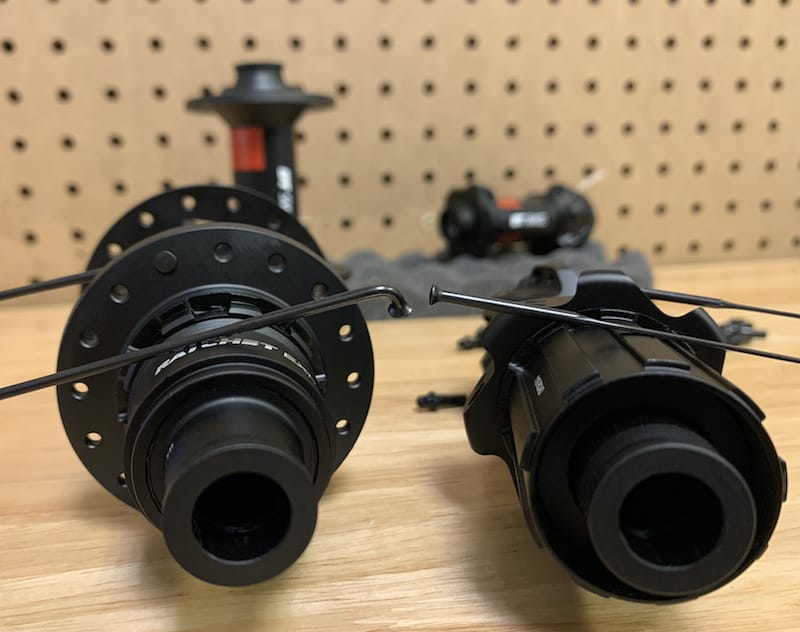
The cassette/driver interface is also quite important when ordering a hub, as they are not compatible with each other. Further confusing the matter, SRAM does make some parts, such as the SX and NX lineup, including cassettes in 11s and 12s that fit on Shimano HG, while Shimano 8-11 speed cassettes work on Shimano HG, but require Shimano Microspline if you want a Shimano 12 speed drive system. Meanwhile, SRAM XD fits higher end SRAM drivetrain offerings like the GX and higher in 12s configurations. Note in the picture all 3 of these hubs are ’straight-pull’ hubs, not for J-bend spokes - this will become obvious a bit later in the article.
The good news is if building a wheelset for an existing bike, you can either look it up in your manual, or by looking up the specific derailleur and/or shifter on your bike, or in the worst case, pulling the rear wheel and removing the cassette.
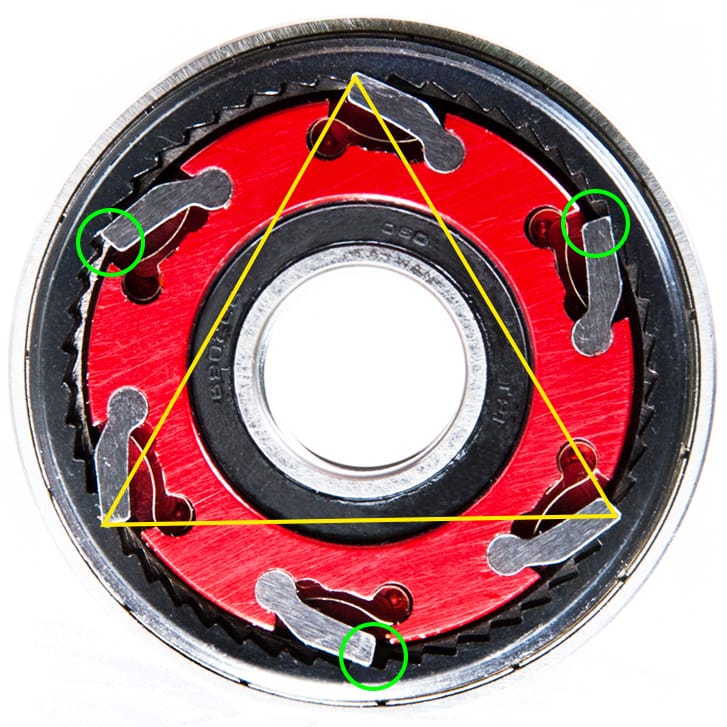

There are some other systems - pawl counts can be different, and some may still look like a 3 pawl, but each of the 3 pawls is ‘doubled up’ so it’s really 6 pawls, but 3 angular points of engagement.
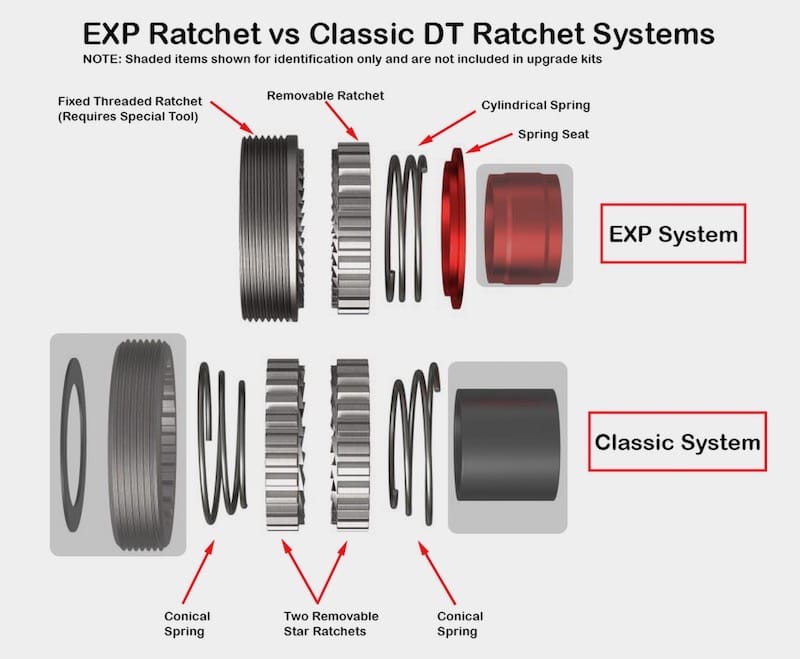
DT Swiss has a patented ‘star ratchet’ system, where two steel gears mesh together both on their faces, with full engagement aroud the entire surface, while the outer circumference of the ‘ratchets’ is already slotted in and locked to the outer splines, and this have proven to be nearly bulletproof for rear hubs. Chris King hubs also use a star ratchet mechanism, while many brands such as Giant, Bontrager/Trek and others have licensed the design from DT Swiss. The patent has I believe recently expired, so there are already some Chinese company clones starting to surface. The EXP system shown uses one ratchet and a screwed-in second one, while the Classic system uses two easily-swapped matching ratchets.
Finally, Onyx uses a ‘sprag clutch’ which is somewhat similar in nature to pawl hubs, but there are many more of them and they’re smaller - sprag clutches are used elsewhere in automotive and other applications for allowing one-way movement (and spinning in the other).
One thing to note is it’s generally the number of splines cut into the outer hub portion (where the pawls engage), or the number of teeth on the ratchets for star ratchet hubs, which determines how far the cranks will need to move before you feel ‘engagement,’ that is your human (or electric) power is starting to move the rear wheel. The higher the spline count, the smaller distance the crank needs to move before positive engagement. Some hubs, like DT Swiss, allow swapping out of the ratchets, e.g. from 18T(eeth) to 54T and a few in-between. The downside in many cases, particularly relevant for an e-bike, is the higher the number of splines become, typically the engagement points become smaller and smaller, and often as a result - less strong/durable.
DT Swiss rear star ratchet hubs (350, 240, 180) hubs come standard with an 18T, 24T or 36T ratchet system, depending on the model (350, Hybrid 350 or 240, 240), while ratchet sets can be purchased and swapped out easily.
So, as in most things - there are compromises to be considered. There is much debate on just how important, or not, the ‘quickest engagement’ is for different types of riding, as well as rider preference. Most casual riders and those short of near-professional may not be bothered at all. I’ve been fairly happy with moving to the 18T in my current DT Swiss hub wheelset (from a doubled up 3 pawl hub).
What about spoke count?
This is the last big decision other than price needed when ordering a hub. Typical spoke holes for MTBs and eMTBs was 28 spokes(aka 28h) for some time. Newer hubs and rims, which must match in their spoke hole count, are available in 32h and sometimes 36h or higher. The more spokes a wheelset has, it will be slightly heavier, although for most the weight difference is minimal. A general simplified rule is lighter and more casual riders can likely still do fine with 28h for most uses, while 32h or even 36h may make more sense as the ‘default’ or for heavier or more aggressive riders. At least at the time of writing, not all manufacturers have 36h options readily available, so 32h is my current happy default.
One other item to note if building wheels for an e-bike - many freehubs are aluminum, and these can get chewed up over time, while some manufacturers offer steel freehubs - which I’d recommend for any/all e-bike use.
Front hubs and bearing choices
You’ll notice I have yet to talk about front hubs. Well, the short version is - they’re simpler. They need to carry the bike and rider’s weight, and handle the shock from whatever riding is done, but they don’t need to deal directly with the power from a human and/or electric motor, other than the added weight and perhaps additional loads as a result of higher speeds. Front hubs are pretty much a spindle the axle goes through, a set of bearings, a disc brake interface (IS 6 both or CL/center-lock), and end caps matching up to your fork width, typically for Boost 15x115mm thru-axles on most bikes. If you’re riding a ‘mountain bike,’ let along an eMTB that has forks using a qurick-release, honestly I might be looking at replacing the forks with a 15mm thru-axle before building a new front wheel.
There are some differences in front hubs - porimarily down to the weight, or bearing types used. Steel sealed bearings are the standard for most modern rear and front hubs, with various other options like ceramics or ‘hybrid; (ceramic bearings, steel race) available, often at rather large price increases. Note that you can always go aftermarket for replacement bearings, sometimes at much more reasonable cost, but also, at least for most of us, I’m not convinced of the need of the much more expensive bearing options other than steel. YMMV.
Hubs - so how do I choose?
The big items here are really this - purpose, meaning bike type, riding surfaces, type of riding along with casual vs aggressive in the case of ‘mountain bike,’ traill, downhill, enduro etc. type of riding, and rider weight, along with if it’s human powered only, or an e-bike. This, along with the existing or target bike (e.g. width, axles/type), and your budget all come together.
More casual and lighter riders, pick a 28h or 32h hub in the apprpriate width and axles/brake interface. More aggressive or riding more challenging terrain and/or heavier riders, choose a 32h hub with approipriate width/axles/brake interface.
Those on e-bikes, especially higher-powered ones, or very strong ‘analog’ riders - should just assume at least a 32h hub, and assume that the ‘discount’ hubs with simple 3 pawl systems are going to be disposable, or look for something better.
I personally have an unabashed affinity for DT Swiss hubs, both for reliability but also customer service and general affordability. Their DT 250 hubs are well-respected, durable, and hold up well to aggressive riders as well as e-bikes, and parts are available. I had purchased a set of used wheels with DT350 hubs, but in SRAM XD, and was having some initial difficulty in chasing down the right specific part needed to convert to Shimano HG, preferably the steel freehub version. I finally found the right part, but it came without the endcap needed (DT Swiss hubs can covnert across different freehubs and in most cases, hub widths as well), so in frustration, I sent an email to DT support - I’d also sent other emails recently to various businesses, as I was considering building an eMTB fully DIY from parts, and wanted some paint and ceracote prices, and some other inquiries. Not a single one of them responded, but I had a response literally within hours from DT Swiss. We identifies the right part I needed, and the CS rep dropped one from the shop into the mail to me - at no charge. I would have happily paid for it, but will just leave it as - customer service matters. Hopefully it’s never needed, but when it is, they were there, have always reqponded to inquiries, and they got my business. Plus they also make some darned good hubs.
Now, you can spent some bigger $ on 240 and 180 series hubs, but for an ebike, which is already relatively heavy, the differences in weight vs price across DT350, 240 and 180 - start to make less sense. Likewise I might consider a 54T ratchet upgrade for an analog bike, but would stick in the 18T or 36T range for e-bike use from an abundance of caution. DT Swiss now makes ‘Hybrid’ hubs, which are ebike specific - they use slightly larger bearings and beefier parts, and probably through no coincidence, come with 24T ratchets.
I’d certainly be interested in trying a Chris King Star Ratchet hub, or Onyx hub, and probably will at some point. Industry 9 Hydra hubs also get a good reputation (but sound like crazy bees, some like it, some not), but I’m unsure if they hold up to aggressive ebike usage with 3 pawls and pushing the number of outer spline engagement points, and when it comes down to it, for me - it’s tough to beat a pair of DT350 hubs for a few hundred vs 2x or more for the other options. A pair of DT350 Hybrid hubs with steel HG freewheel/driver will run around $400, sometimes less, Chris King will run a bit over $700, Onyx just under $700 and finally i9 Hydras, still using a 3 pawl system, come in at $700. I do like the color selection and I may give Onyx a try on my next build, but it’s not worth doubling the cost for a Chris King or Onyx setup to save150grams or so - to me. YMMV.
Rims
This part should be easy, right? :)
The good news is there are a lot of rim manufacturers out there, and in normal times, a good selection to choose from. The things you must decide on are simple-ish: size, width and number of spoke holes, tubeless or tubed, and Presta valve or Shrader valve?
Beyond that, you’ve got choices between carbon fiber or aluminum alloy wheels, how much you will concern yourself with weight, and that’s about it other than durability - which is usually a mixture of rim construction and specific alloy being used for aluminum, or thickness of the wheel for carbon fiber wheels along with general quality.
Spoke hole count can be simplified as mentioned previously - for most MTB and eMTB or ebike use, go with 32h as the default, 36h (or higher) if you have extreme needs, it’s for a cargo bike or similar, although note it can be somewhat difficult to find 36h rims in similar selection as compared to 28h and 32h rims, and not all hub manufactures offer 36h (or higher) variants on their hubs - and of cours,e spoke hole count must match between hub and rim.
Rim width really has two numbers to it - the inside dimensions is what’s relevant for how the tires will fit on the rim, with trends going towards wider rims. This dimension is sometimes abbreviated as the letter ‘i’ followed by a number, e.g. i30 is a 30mm inner diameter rim.
Spoke Wrench and Nipple Driver
The other is the actual external rim width, which isn’t as much of a concern as how a given tire may sit on a given rim, from the standpoint of ‘will it rub on anything?’ Frame and fork manufacturers usually list max compatible tire sizes, which are a bit of a ‘fudgy’ measurement, as putting a tire on a too-narrow rim may make the tire bulbous and run wider than on a proper width rim. You can also check your existing tire sizes and do a bit of measuring for clearances, mostly to the seatstay and chainstay.
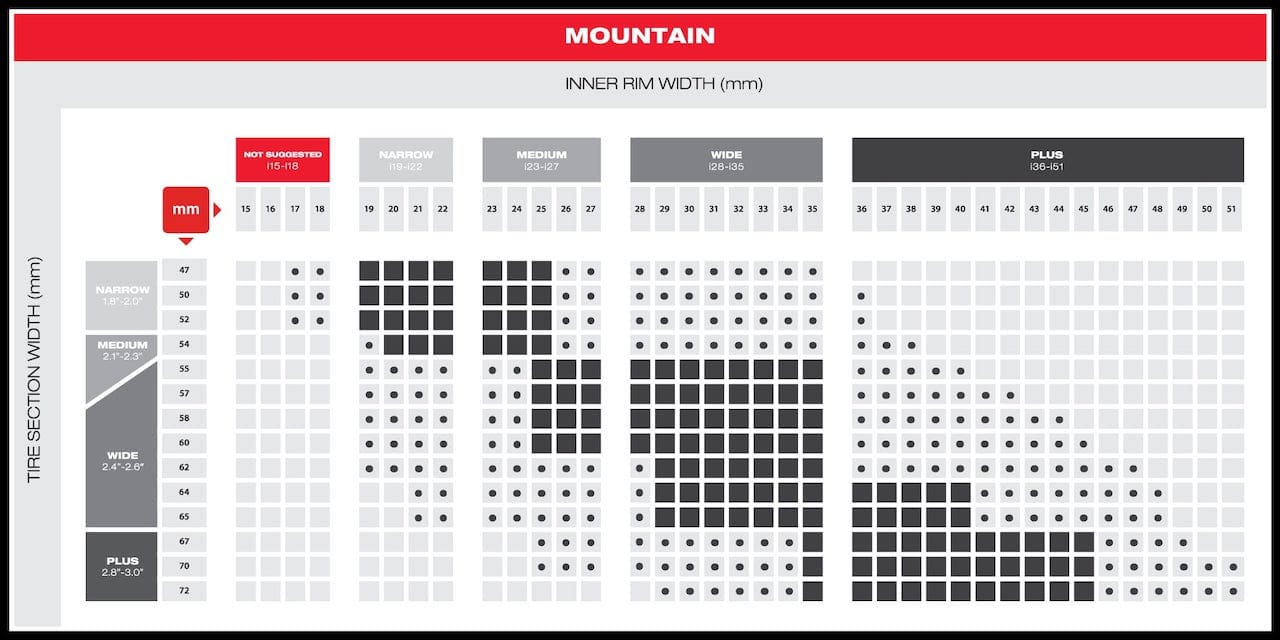
Once upon a time, ’standard’ MTB rims were along the lines of i24/24mm or so, while many today are more typically i30. ‘Plus’ tires have become a thing, which can also be somewhat taller but also generally run much wider than the older, skinner e.g. 2.2-2.4” tires. This is before we get into ‘fat tires,’ which are essentially anything at 4” wide or larger, and while great for snow or sand/beach, not really ‘mountain bike’ tires. You can see in WTB’s chart there’s a reasonable range of sizes a given rim width can fit, with the solid squares being ‘ideal’ and the single dots indicating ‘compatible’/safe but maybe not ‘ideal’. An i30 rim per WTB can run anywhere from a 2.2” to 2.8” width tire as an ‘optimized’ configuration.
Note that each manufacturer may have slightly different takes on the tire width vs suitable rim width, as do individual riders.
Wider tires generally feel a bit more planted and grippy, give a bit more cushion to the ride, while being slightly less ‘agile’ to turn from the bars. A lot of riders have wound up in the 2.4-2.8” range as ‘the new norm,’ while fat tires can be so fat they can make up for lack of suspension to a point, but also tend to be slugs to turn in comparison and can tend to self-steer a bit depending on the tire, width and pressures.
I’ve run tires between 2.6”-3.0”, as well as fat tires 4” and 4.5”(the last one was on a rental, and I indeed could feel the ‘self-steering.’). On a full suspension bike, short of snow or deep sand riding, I don’t see much point in the fat tires. or a hard-tail casual all-arounded or beach cruiser - maybe, but not for a MTB with suspension. Note that fat tire rims aren’t even listed in the chart above, but they’re typically 80-100mm or even wider (and heavier).
Your bike may have 29” tires, 29” front and 27.5 rear (aka a mullet), 27.5 front and rear, or in some cases, 26” or smaller. Check your existing tire sizes, as in most cases you’ll want to keep the same general rim diameter (unless converting to a mullet and you’re sure you can get a 29” up front and have fork/fork brace clearance).
I've more or less stabilized on tires in the 2.6-2.8” range, in 27.5”/650B diameter. For many MTBs and eMTBs, an i30 rim width is a safe bet. I’ve run i30-040, the latter with 2.8” tires, and for my next wheelset, will be building a set of i35, again running 2.8” wide 27.5” tires, an ‘in-between’ Schwalbe Johnny Watts for a mixture of on and off-road, although I have some 2.8” Minion DHFs in backup. Tire choice can be a personal thing - in my case, we ride a xture of single and doubletrack trails, greenways, and some road/pavement rides. Other purely off-road tires might be a better choice if we did purely single-track, and you certainly can ride offorad focused tires on the street, but the knobby hum gets loud and they can be a bit squishy/squirrely on the street, as well as wearing down harder, so decide what kind of tire you’ll mostly be running, and check available sizes, as if you have a specific ‘favorite’ tire, and for example, it only comes in 2.4” or 2.6” widths - part of the rim width decision may have been made for you.
Wider rims are of course generally heavier than narrower rims with all else being equal. It’s up to you howu much weight matters for your specific build. On ebikes and eMTBs, I won’t go out of my way to add weight, but I’m not going to stress out over 100g here and there either.
Tubeless and Presta or Schrader Valves?
The good news is nearly all MTB-oriented rims today can be run tubeless, which both saves a bit of weight and significantly reduces the chances of flats on the trails. See my article on Tubeless Tires for what’s entailed and needed, and don’t get too caught up in various manufacturers naming - TCS, tubeless ready and others, of what amounts to - can use tubes or go tubeless.
For MTB/eMTB use, personally - the only answer is tubeless, although still having a single spare inner tube in the emergency kit makes sense, as there are some cases like long gashes, that are beyond the ability of tubeless sealant to save your tire.
Nearly all MTB rims outside of discount bin will be set up for Presta valves. Yeah, these are ‘funny’ things if you’re from the US or perhaps a few other places. They’re skinnier than Shrader valves, and the end of the valve unscrews by hand to allow airing up. They will need a different tire pump or an adapter, but those are low cost.
Basically, it’s a lot easier to accept Presta valves as the norm versus trying to find decent MTB rims set up for Schrader valves, so unless there’s some strong reason, might as well just go with it. Note - even if planning on running tubes, you’ll still want to check if the rim is set up for Presta or Schrader valves and get the proper tube.
What about asymetric or offset rims?
So this one, IMO, is where some things get interesting. Modern bikes, between the cassette on the right and disc brakes on the left, have some challenges in that the hub-side spoke flanges wind up being located non-ideally, in that the two sides of the hub have different angles from the hub to the rim. As a result of this, for a properly trued wheel, the non-drive-side (disc side for rear, or non-disc-side for front) spokes wind up being under-tensioned in comparison to the drive side. This is a compromise due to the typical wheel, rim and rear triangle dimensions (e.g. chainstay or fork widths), one which things like Boost standards do make some improvement on, but with modern drivetrain 10-12s cassettes, the differences in tension can still be fairly significant.
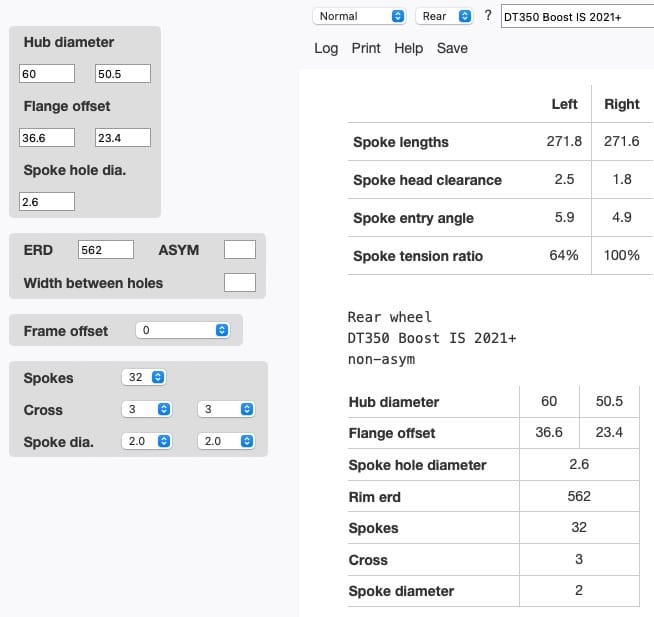
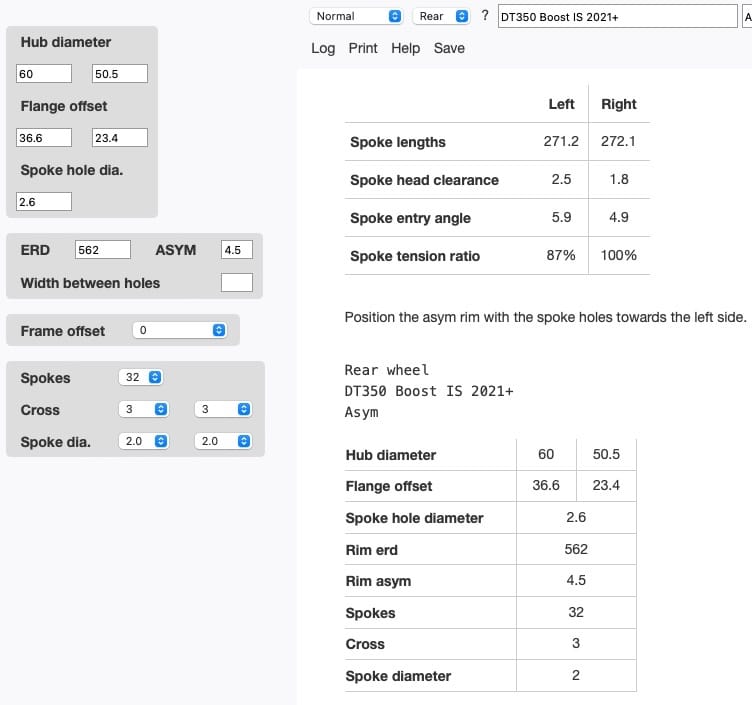
Compare the two calculator outputs below (wheelpro.co.uk calculator). Both are using a standard DT Swiss DT 350 Boost rear hub - the one on the left is for a standard rim where the rim’s spoke holes are centered, and you can see a tension difference of 100% being the drive side, compared to only 64% on the non-drive-side. Rims typically have a max spoke tension of ~120KgF, which would mean for example, ~120KgF on the right hand spokes and only ~77KgF on the left. For those leaning in to the use of spoke prep or locking compounds, well, were I to use it at all, I’d be more concerned with the non-drive-side/NDS side spokes than the drive side ones at higher tension.
Now, of course, this has effectively been the case for some time, and one might say - if it hasn’t been ‘broke,’ why fix it, but indeed, the reasoning behind Boost spacing was to try to improve this condition. As you can see below, well - it’s still a fairly big difference.
Along come asymmetric or ‘offset’ rims. These wheels are purpose-built to further compensate and improve the tension ratio, and it does as you can see from the second calculator - with a 4.5mm offset from center, the spokes on both sides are much closer to forming equal angles, and thus more similar tension of 87% NDS to 100% DS tension.
DT350 Boost rear hub tension ratios with standard rim
DT350 Boost rear hub tension ratio with asym/offset rim
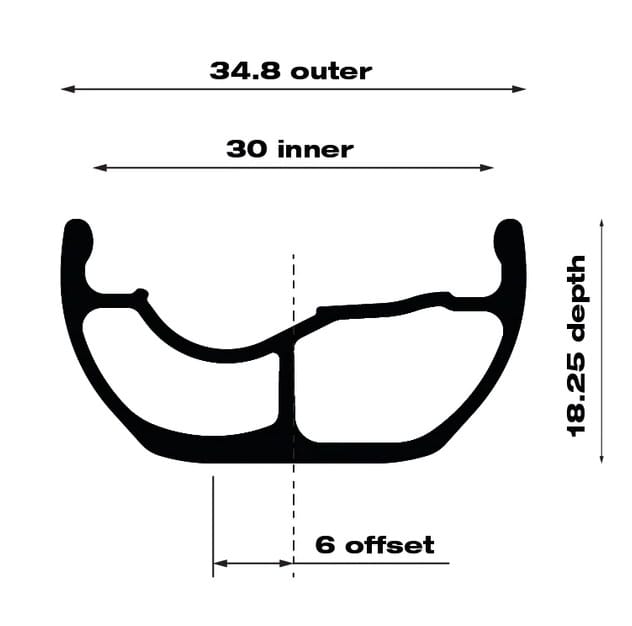
You can play around with the calculator, which for a 27.5 wheel to get to ‘perfect’ equalibrium for tension on both sides, the ideal offset would be ~6.7mm, but the 4.5mm offset still does a pretty good job of bringing the NDS up over 20% towards the DS tension. You can mostly see in the images below of a WTB ebike HTZ i30 rim - how the spoke holes aren’t centered, and in the case of this specific rim, they have a 6mm offset from center, which would be quite close to approaching equal tension on both sides.
Of course, many things are tradeoffs. The WTB is a rather heavy rim at ~678g for i30 versus for example, ~525g for a RaceFace Arc30 which is also offset to 4.5mm. (1lb is ~454g, so ~1/4lb difference per wheel). Wheel construction, design and material also play factors into overall durability, so each builder will need to decide what their highest priorities are.
Again, especially for ebike/eMTB purposes, weight isn’t quite the same level of concern as for analog bikes, so the tradeoff may be right for you. You can also find some carbon fiber wheels with asym/offset patterns with a bit of searching. Meanwhile, there are lots of quality rims out there that are not asym/offset from DT Swiss, Spank, and others - pick your compromise and go with it!
WTB HTZ i30 - you can see the spoke holes offset
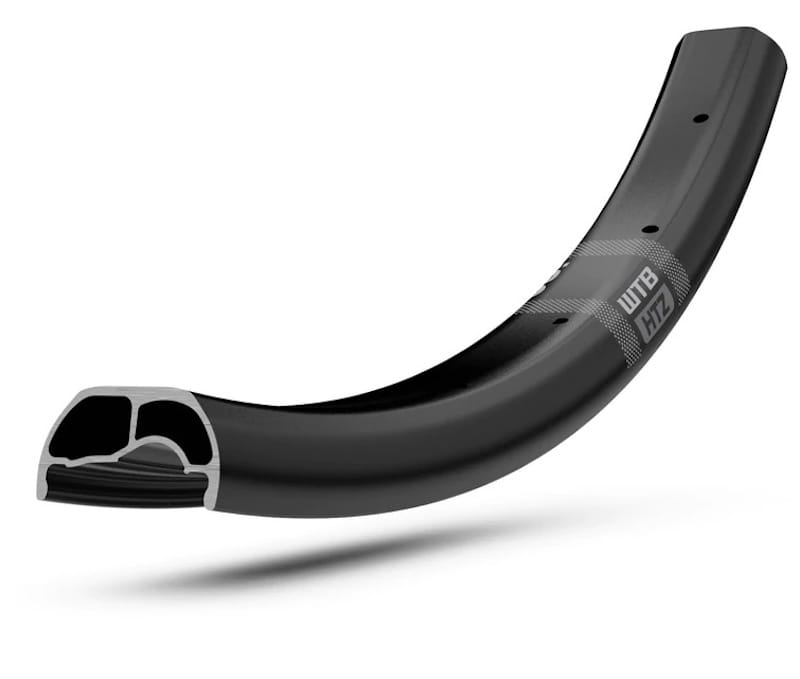
WTB HTZ i30 showing asym/offset spoke holes
Any rim Manufacturer preferences?
This can get into one of those seemingly semi-religious wars. DT Swiss has a long history of producing quality rims, hubs, and complete wheelsets, so they’re always a solid option for most purposes. Others like WTB, RaceFace, Spank, and others have in general a dood number of satisfied customers. Do the best you can on proper sizing and purpose, e.g. don’t look for the lightest weight wheel if you’re over 100kg/200lbs thrashing crazy downhills and/or on an ebike, and check for specific rim reviews, and occasionally some manufacturers may get a ‘lemon’ rim model but may also have corrected it over time.
I’ve been running for a while on a set of RaceFace ARC40s, with DT350 hubs, but 28 hole rims, and have been happy with them to date, but without any large jumps to date. I’ll be going with a set of DT Swiss Hybrid hubs this time through, and a set of RaceFace ARC35s and will see how it goes. I had also considered DT Swiss HX581, DT Swiss XM 551, XM 521, Spank Oozy 395, and WTB KOM Tough i35 and WTB HTZ i35. YMMV.
If still in doubt on rim size, get the appropriate diameter (29” or 27.5”/650B in most cases) in i30 as it will allow running tires from 2.4-2’8” wide
Spokes and Spoke Nipples
Spokes are typically made of stainless steel, and are pretty simple - they connect to the hub on one end, and are threaded into spoke nipples which sit inside the rim and protrude downwards through the holes in the rim. Spokes and brass spoke nipples are generally available in either silver or black, while aluminum spoke nipples can come in other colors but many builders claim the aluminum nipples aren’t as durable/long-lived as brass, especially where high humidity or saltwater may be involved.
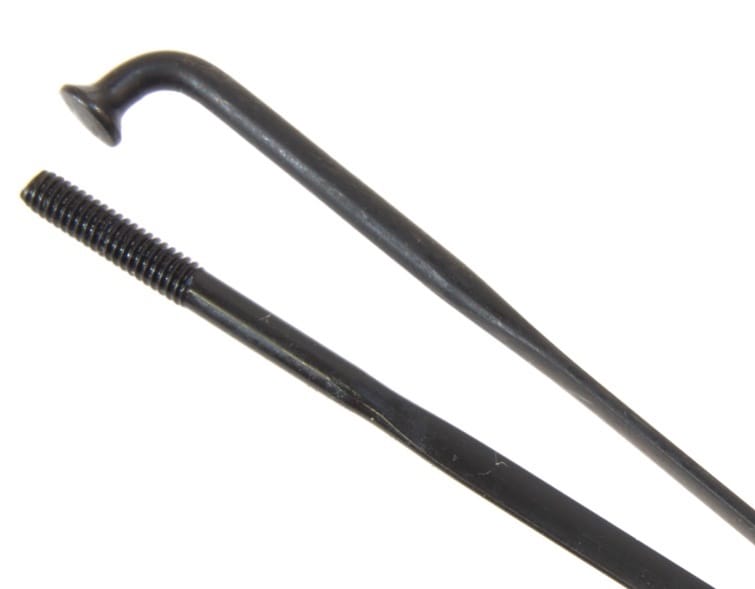
There are a few things relevant when it comes to spokes - J-bend or straight refers to how they connect to the hub, spoke thickness or gauge, selection of single gauge, double or triple-butted, and finally length.
J-bend spokes have a ~90* bend at the hub end, with a wider head - these are dropped into the hub threaded end first, then the head end with the bend sits up against the hub while the threaded end goes into the spoke nipple. These are ‘old reliable’ as they’ve been around for quite some time and are tried and true. They’re much easier to find in the event you need an on-rod/trip repair, and most will recommend them for at least your first few wheel builds.
Straight-pull spokes are, well - straight, with a flat on the hub end and threaded on the rim end. Many consider them a solution in search of a problem. They have one advantage in that if you break a spoke, you usually don’t need to remove the wheel and sometimes cassette or disc from the bike to replace…but meanwhile, properly built wheels usually aren’t snapping spokes. A downside is they are much more likley to ‘wind up’ when building the wheel, that is twisting as you are tensioning them, so a pair of non-scratch pliers may almost become a requirement to clamp down the spoke to stop it from twisting and turning when building your wheels. You can also choosed an 'aero’ spoke like Sapim CX-Ray spokes which are bladed, with a tool to engage the spoke blade/flat - although be aware the aero/bladed spokes are 2-3x the cost of more traditional spokes.
In this case, I’ve talked to a few experienced builders, and just don’t see the problem being ’solved’ by straight-pull hubs and spokes, so I’ll be sticking with J-bends until/if some future reason convinces me otherwise.
IMPORTANT: Your hub type must match your spoke type selection - J-bend or straight-pull
Spoke gauges and butting
Most MTB-approproate spokes are 14 gauge spokes, or ~2.0mm. They come in plain, or single gauge, meaning the spoke width or gauge is constant from the head all the way to the threads, double-butted or swaged spokes, which typically have a common thread and head end gauge, and a thinner center gauge, such as DT Competitions which are 2.0-1.8-2.0 (thread, center, head) - meaning 2mm on each end and a thinner 1.8mm section in the middle, or even triple-butted, which have 3 different gauges for thread end, center section and head.
There are also some ‘over-sized’ spokes for special purposes, or spokes that are double or triple-butted but are higher than 2.0mm, such as DT Swiss Alpine III at 2.34-1.8-2.0 (triple butted) or Sapim Strong with 2.34mm heads and 2mm threads. These spokes are generally targeted for ‘extreme’ typoes of use, or use on ebikes, tandem and cargo bikes and the like.
Double and triple-butted spokes allow for a bit of flexibility or ‘transient stretch’ to occur in normal riding, which is within the tolerances and ability to recover of the spoke, which otherwise on a purely straight gauge spoke could lead to spoke failure at the elbow. Sounds scary perhaps, but bike rims and spokes do expand, contract, and ‘squish’ a bit even under normal riding - the goal is to choose appropriately for the riding and loads to ensure nothing goes beyond or into fatuge levels of the materials. The over-sized single gauge spokes take a different tact, simply - ‘bigger is better.’
Except for perhaps true specialty purposes (e.g. tandems, cargo or bike/ebike taxis), spoke technology and material choice has progressed quite a bit over time, and in most cases a quality double-butted 2.0-1.8-2.0 spoke should be up to the task.
It’s worth noting that the hub and spoke head gauges aren’t exact matches. Typical (J-bend) hubs have spoke holes of 2.4-2.6mm, while for example DT Swiss Hybrid hubs have spoke holes of 2.8mm, intended for usig one of their ‘hybrid’ or ebike specific spokes. In most cases, there aren’t any issues, but using some superlight road type spokes on hubs meant for thicker gauge spokes may cause issues or the use of spoke head washers. Stick with more or less standard MTB appropriate components and there should be few issues.
So what the heck is an ‘aero’ or ‘bladed' spoke’?
Well, for ‘weight weenies,’ a not-always-affectionate term for those looking for the abolutely lightest components and every possible speed advantage like for professional or near professional road racing, there is a way for them to spend more money for possible small gains. One of those is via aero or bladed spokes.
They do look neat, and in most cases are pretty strong, but at ~3x the cost or more per spoke, I’m personally taking a pass on them for MTB/eMTB use. If you do decide to build with them, getting something like the Park Tool Bladed Spoke Holder will help to avoid spoke windup when tensioning.
Spoke Brands
If you’re going through the time and effort to build your own wheelset, or the expense of paying someone to build a custom wheelset - stick with known quality brands. DT Swiss and Sapim are both top notch, and in many cases, offer very similar to identical specced spokes with their own brand names/models. Pillar is also relatively well-known and liked, although not to the extent of DT Swiss and Sapim.
The same applies to spoke nipples - why buy qualityrims, hubs and spokes, to be let down by cheap spoke nipples?
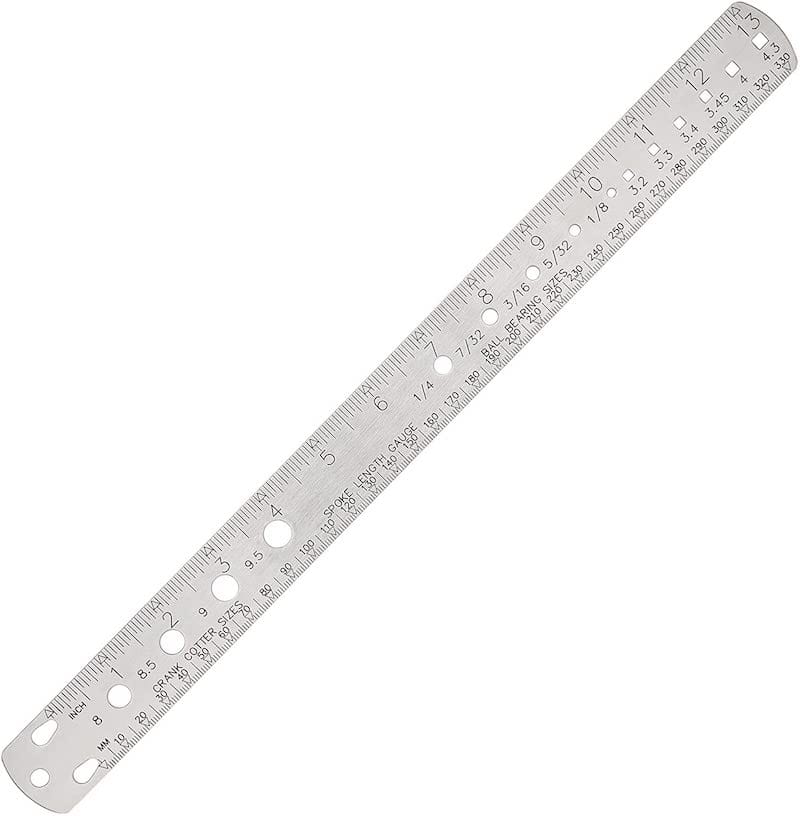
ALso worth calling out - spokes unless custom cut are usually offered in even #s/meaning e.g. 270mm, 272mm, 274mm etc. Occasionally you can find in odd sizes (e.g. 271mm, 273mm, 275mm) but always in full millilmeter increments. Once you’re doing your spoke calculations after measuring your rim ERD, you’ll want to keep within 1mm of calculated spoke lengths whenever possible.
Spoke Nipples
We’re in the home stretch now!
Spoke nipples for most of our purposes, special exotic wheels excluded, in two forms - slotted nipple head or ‘extended nipple head’ which allows the use of a more positively-engaged tool such as a Torx bit (DT Swiss Squorx nipples) or a sqqare bit (Sapim Double-Square), each of which have their own specific (relatively inexpensive) tools.
Spoke nipples come in either brass or aluminum, with brass being generally preferred as being a sbit stronger and less likley to suffer from corrosion issues over time. Brass nipples come in silver or black, while aluminum (sometimes incorrectly called ‘alloy,’ as, well - brass nipples are also an alloy).
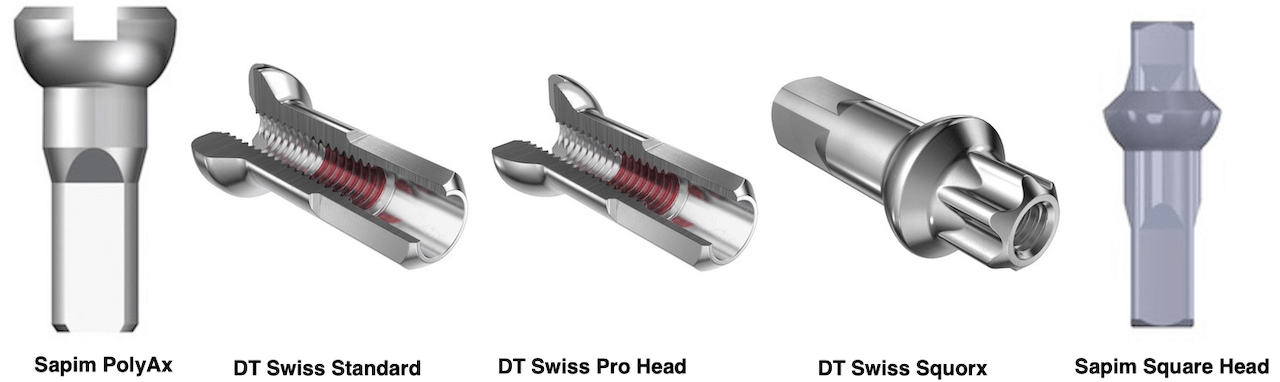
They come in different lengths, which depending on the brand may impact your spoke length calculations, with 12mm being the standard (and is common/interchangeable across brands for calculations). Note the collage I put together below - Sapim also makes a ‘standard’ head equivalent, while the PolyAx and the DT Swiss Pro Head use the same slotted interface, along with having the rounded nipple/rim interface, which allows for better spoke/hub alignment. Meanwhile the DT Swiss Squorx and Sapim Square head (both also with the tapered base for rim/nipple interface) make life a bit more ‘secure’ when building up the wheelset using either a Torx driver or bit for the DT Swiss Squorx nipples (these are 15mm in actual length but same as 12mm for spoke calculators, although they are threaded all the way through)
Sapim and DT Swiss common spoke nipple types
A few more options to decide on
Besides material (brass or aluminum), length (12mm is standard) and head type, both DT Swiss and Sapim offer their own takes on spoke locking methods as an option. DT Swiss offers pre-spoke-prepped nipples (the red in the preceding pictures), called ‘Pro Lock’, although their entire nipple lineup can be had with or without it, while Sapim offers something the call Sapim Secure-Lock, which uses slightly deformed threads to make the spokes more difficult to both loosen - and to tighten. I’m not alone in being unconvinced of the ‘need’ for spoke prep, whether it’s bought separately or part of the nipple itself, but YMMV as always.
All of the nipples mentioned use a ‘standard’ spoke wrench on the spoke-side of the rim, while the nipple driver for assembly is either standard for slotted, DT Swiss or Torx driver for Squorx head, or a square driver for Sapim Square head. When building a wheel set, you’ll want to drive using a nipple driver until you get to final truing.
Note: Spoke nipples do come in different gauges - the most common is 2mm/14g, but be certain to check that spokes and spoke nipples match!
What about washers?
Technically, there are two types of ‘wheelbuilding washers’ - spoke washers are used at the head of the spoke, usually when budget hubs or spokes are involved, or in some cases, if a hub has much larger holes than the spoke gauge, or for some, as preventative assurance where severe loads are expected. If buying new wheel components that are all suitable for e.g. a set of MTB or eMTB/ebike wheels - they are not likley to be needed. (I might consider using if for example, you had DT Swiss Hybrid hubs and had only 2mm spokes)
The other type are spoke nipple washers, which sit underneath the nipple, between the spoke nipple head and the rim itself.
Spoke nipple washers are all about two things - either strengthening the rim/nipple interface, thereby reducting the chances of spoke hole or rim bed cracking, allowing the nipples and spokes to angle themselves better towards their respective hub flange holes, or both. Note: Some rimes may have ‘eyelets’ or embedded/added addiitonal metal rings around the spoke holes - if you have a rim with eyelets, do NOT use any added spoke washers!
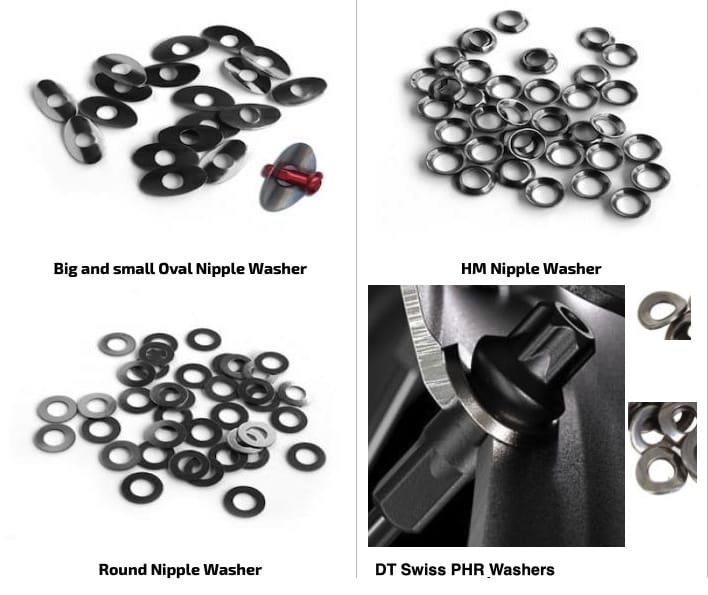
You can see in the preceding picture there are several styles of spoke washers. DT Swiss includes their PHR washers, which are a curved washer, with some of their wheelsets - the washers are curved to mate up to the curvature of DT Swiss rims. If using DT Swiss rims which come with PHR washers, use them. Some of those wheels will also come with aluminum Pro head spoke nippled - you can use them, or replace them with brass Pro Head or Squorx nipples, or even Sapim PolyAx if you’d prefer.
The (Sapim) oval nipple washers in the upper left of the picture are similar to the DT PHR washers, although thinner. In the case of curved washers, they need to be used only when the rim bed, where the nipple head and rim meet, match the curve, like shown for the DT PHR washers, or they may not have the desired effect to reinforce the spoke holes. Likewise, flat washers should only be used when the rim bed is flat. The HM type of washer doesn’t spread force much, but can help to decrease nipple friction, allowng for potentially better spoke nipple/spoke/hub alignment. Finally, there is another stype of spoke washer, Sapim MG, which are flat and thicker than other Sapim washers, but are also beveled, so for flat rims, can both strengthen the rim/spoke hole area as well as helping alignment of spoke nipple/spoke/hub.
Ok, but do I need to use them?
Other than the DT Swiss rims which come with PHR washers, as a general rule - no, but always check the details for your specific rim.
As long as spoke washers properly mate to the rim surface, there is no harm in using them, but many builders believe them to be un-nescessary. If you are a heavier, more aggressive rider and the only rims you can lay hands on are known to be on the flexible or weak side - it may make sense to use them, but be aware - using spoke washers will affect your rim’s ERD(Effective Rim Diameter) which is a value needed when determining required spoke lengths. (Refer to prior article covering ERD).
There is one case which may ‘force’ the use of washers - in the event you didn’t measure ERD (perhaps you assumed the rim manufacturer published # was correct?) or measured incorrectly, and your spokes in hand are ‘too long’, you can use spoke washers to add another .5-2mm per side to the ERD depending on washer thickness.
Tubeless Tape and Sealant (optional)
It’s a good time to make sure you have tubeless rim tape and sealant (and tires) on hand if planning on running tubeless on your new wheel build. I did a separate article on Tubeless tire conversion, which applies equally for new wheel builds. In some cases the rim manufacturer may supply their own tubeless tape with the tim purchase, but I’ve yet to see one supplying sealant or valve stems with rims.
Tubeless tape width recommendations vary a bit, but at minimum they must cover all spoke holes (which may be offset or not centered on the rim, or even staggered), valve stem hole, and should extend at least to or close to the rim ‘lip’ or wall. WTB seems to recommend tape +5mm over the internal rim width, at which point the ‘extra’ tape would also cover the inside lip of the rim. I’ve used tape a bit less than or equal to the rim inside width without issue.

Is THAT it?
For the most typical scenarios, and then a few - yeah, that’s it. Pick your choice of tire or at least diameter and width, hub spacing and hub, rim and spoke nipples. Once you get the rims, nipples (and washers if using), and a few measuring spokes in hand, measure the ERD, plug your numbers into a decent spoke calculator and then you can order your spokes.
Can you make it any easier?
Ok. I’ll try anyways.
For a typical MTB, get a set of DT Swiss DT 350 J-bend hubs with proper brake interface and width for your bike, choose the right diameter (e.g. 29” or 27.5”) 32-hole rim of either DT Swiss XM421 or EX511, RaceFace Arc30, or WTB KOM Tough i30 rim, brass DT Squorx spoke nipples, 30mm tubeless tape, Presta valves, and tire sealant, and 2 250mm J-bend ‘measuring spokes. You can go to 35mm internal width rims if planning on running 2.8” tires. Get the parts minus final spokes, measure ERD then order 78 proper spokes - suggest DT Competition or Sapim Race.
For a ‘monster’ or eMTB build, get a set of DT Swiss DT 350 Hybrid J-bend hubs with proper brake interface and width for your bike, choose the right diameter (e.g. 29” or 27.5”) 32-hole rim of either DT Swiss HX 581 or WTB HTZ i35 rim, with EX511, FR560 as backup rim choices, brass DT Squorx spoke nipples, 35mm tubeless tape, Presta valves, and tire sealant, and 2 250mm J-bend ‘measuring spokes. Get the parts minus final spokes, measure ERD then order 78 proper spokes - suggest DT Alpine III, Sapim Force or Sapim Strong.
On to a build...