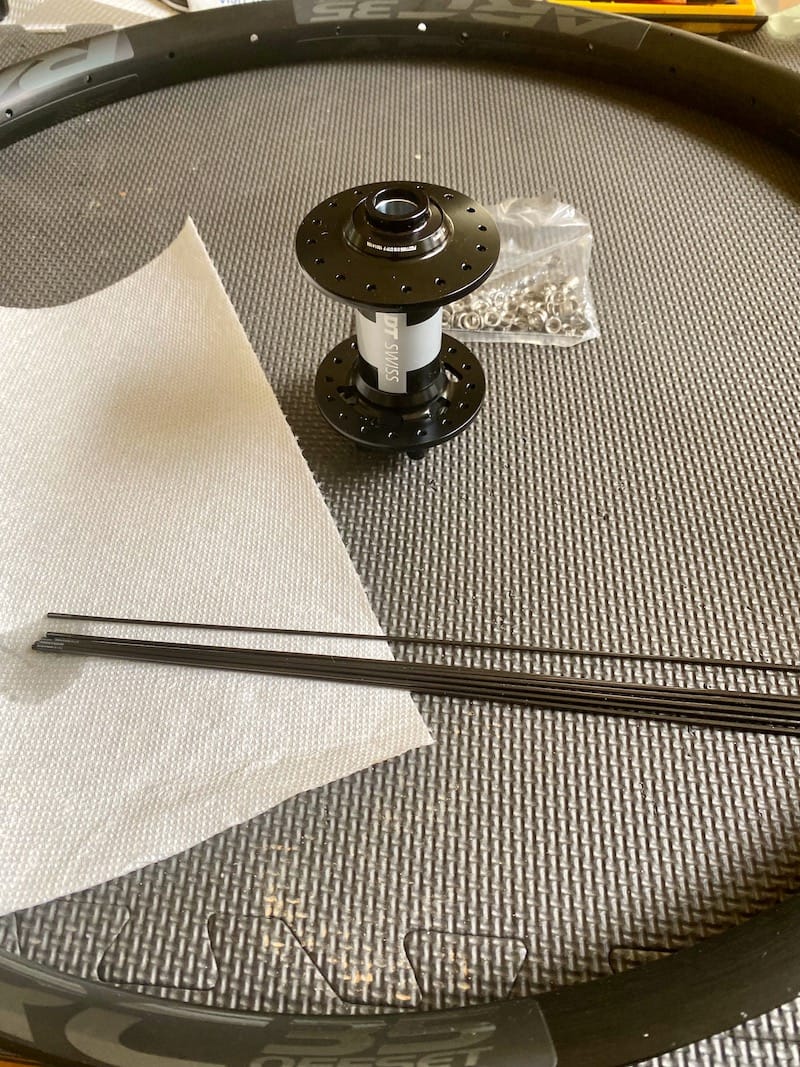
Building a wheelset - DT Swiss Hybrid Hubs and ARC 35
Component Selection
You can review the section on components as well as the intro to wheelbuilding including tools needed if you’re new to wheel building.
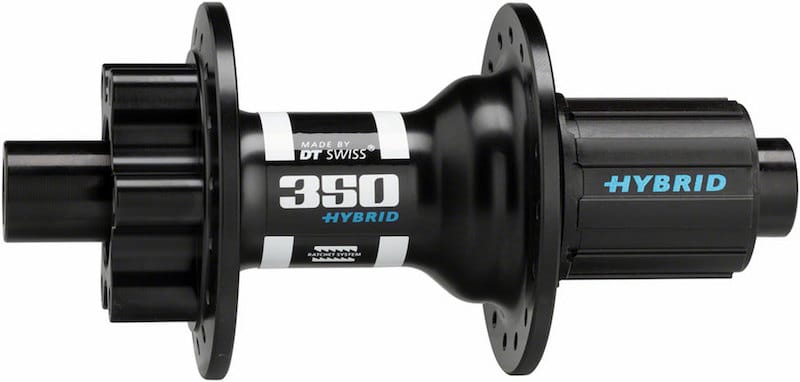
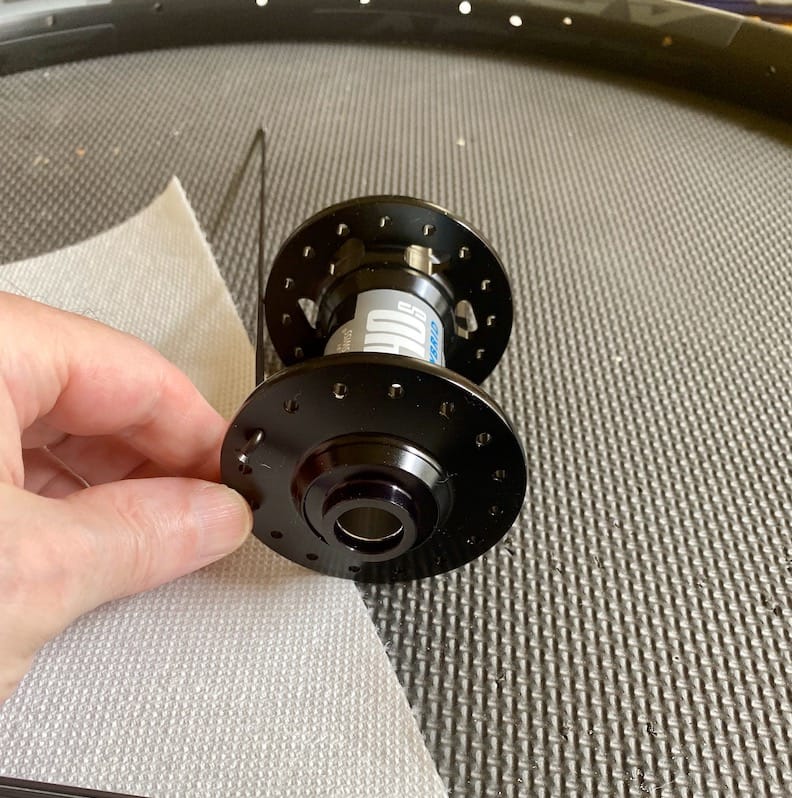
In my case, I’m building for a medium-weight ~50lb eMTB, my Luna X2. I’d been running a set of ARC40 (inner rim width 40mm) rims with DT 350 Classic hubs. They were 28h(ole) and I’d converted the freehub from SRAM XD to a steel Shimano HG driver, and have had stellar customer support from DT Swiss in the past (and again recently - literally same day answers whenever I’ve reached out to them), so I’ll just be open that I’m a DT Swiss fan, so my component selection was influenced by this. When it comes to ebikes, they add additional motor/torque-induced stress to the freehub and pawl or engagement system, as well as from the added weight of the ebike. DT 350 star ratchet hubs are known for being nearly indestructible and are reasonably inexpensive overall.
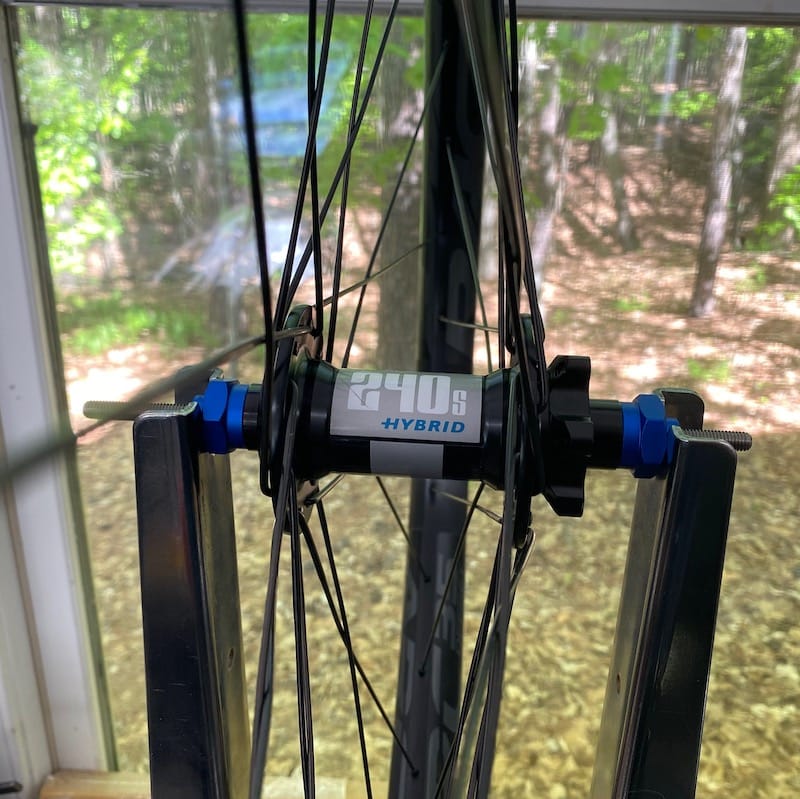
DT Swiss has a growing line of ‘Hybrid’ components and wheelsets, with the hubs being moderately strengthened DT Classic hubs, with bigger bearings and able to take a bit more loading. The drivers are steel versus aluminum as well.
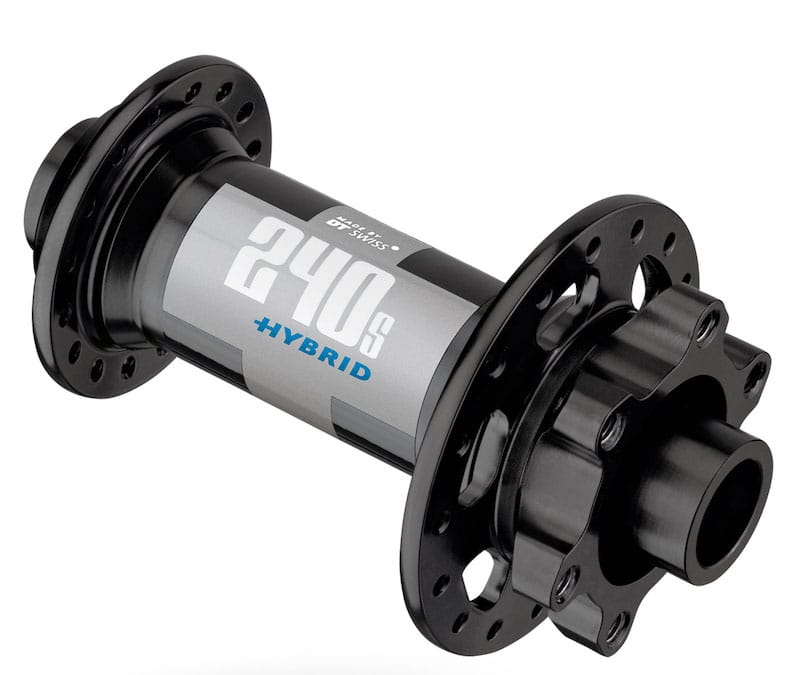
Their wheelsets also seem to use purpose-built ‘Hybrid’ spokes, but they seem to not be available to consumers or shops at this point. I wouldn’t have had any issues going with standard DT 350 Classic hubs, but was able to source a DT 350 Hybrid rear hub along with a DT 240S Hybrid front hub for reasonable $, so figured I’d go ahead and give them a shot.
One thing I found interesting - DT Swiss rear hubs can have their star ratchets upgraded to a larger number of engagement points - at least to 54T or 60T nowadays, which reduces the distance the pedal needs to turn for positive engagement, but it does reduce the depth of each spline/gear. Most hubs come factory with 18T ratchets, while the Hybrid series comes with a 24T ratchet, which seems to give a good indication that for e-bikes, you probably don’t want to go all the way to a 54T ratchet set if lookingfor durability, at least on ‘full powered’ ebikes.
I wouldn’t turn away a set of Chris King (also star ratchet) hubs, and one of these days will get around to giving an Onyx rear hub a try with it’s internal one-way sprag clutch.
IMPORTANT: Always check and double check your hub spoke hole count and dimensions for the wheel and frame YOU are building! The hybrid hubs, for example, require thicker spokes as part of their overall improved wheel strength. Measure twice, three times even, as it’s a pain if you’re ready to go and have the wrong set of parts across rim, spokes, nipples, hubs, etc.
Rims
Rims ultimately can be a pretty personal decision. Brand loyalty, marketing hype, and what your friends run may all come into play as well as in some cases, simply how they look.
Once I understood how much non-drive-side (non-cassette side for rear, non-disc-rotor side up front) wheel tension differed from drive-side tension for typical wheels, and the various arguments for and against spoke prep, LocTite and the like, I quickly jumped onto the asymmetric rim bandwagon. The differences in tension for a non-asym wheel can be only ~60% tension on the non-drive-side(NDS) versus the drive side (DS), compared to > 80% or more depending on the spoke hole offset distance of an asymetric rim. Yes, in some cases, asym rims can be slightly heavier versus standard rims, but it’s a relatively low cost to pay.
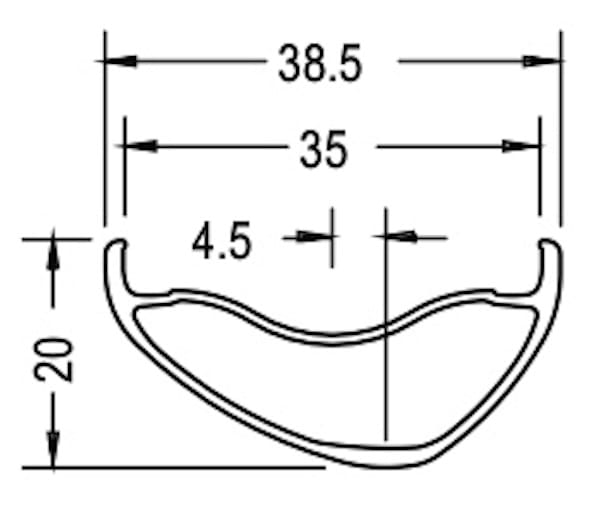
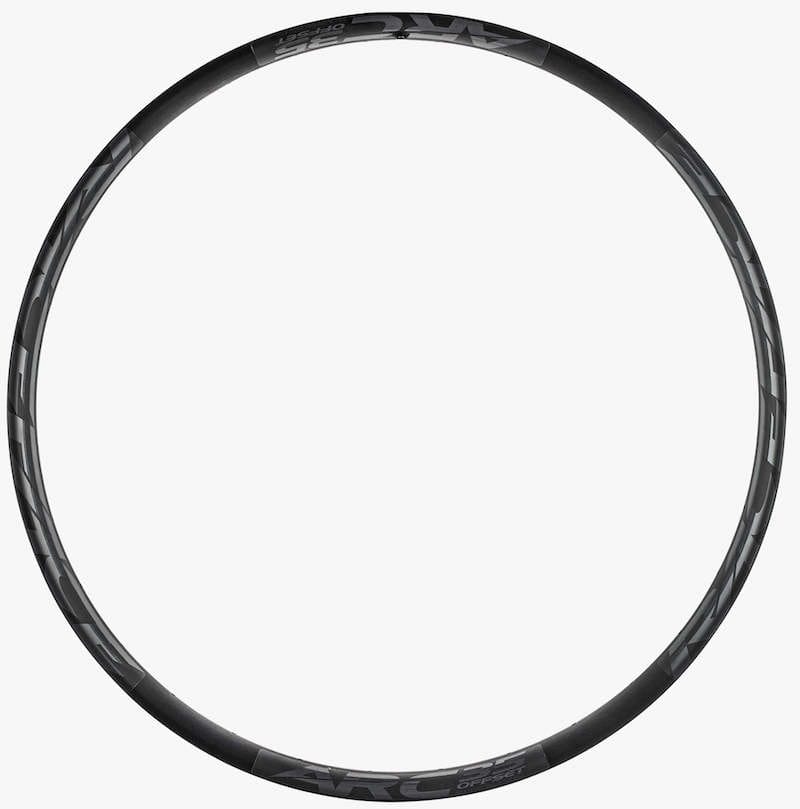
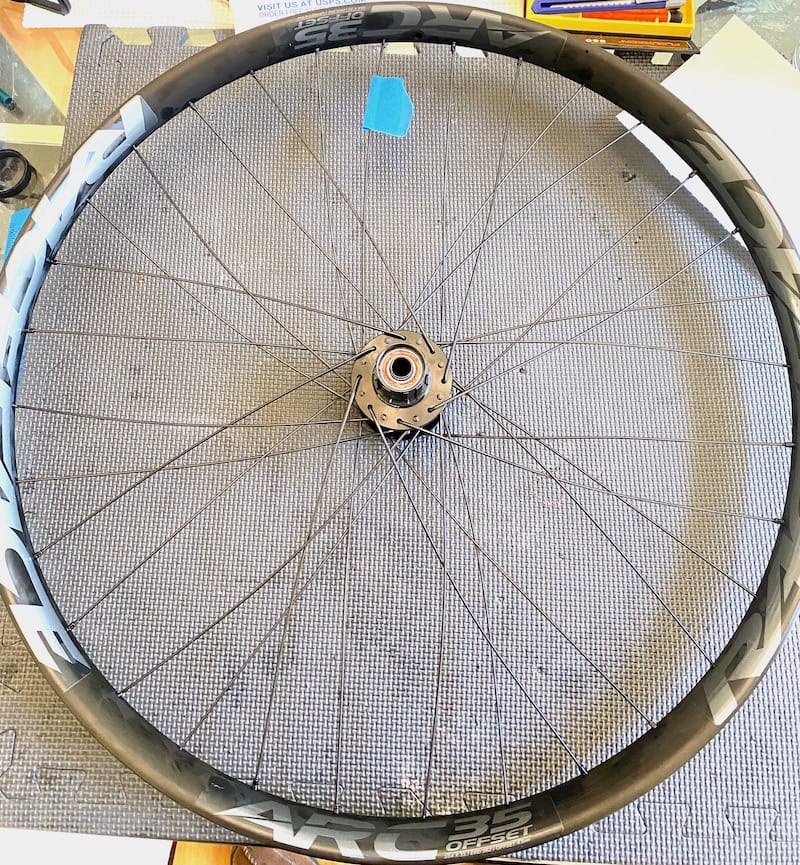
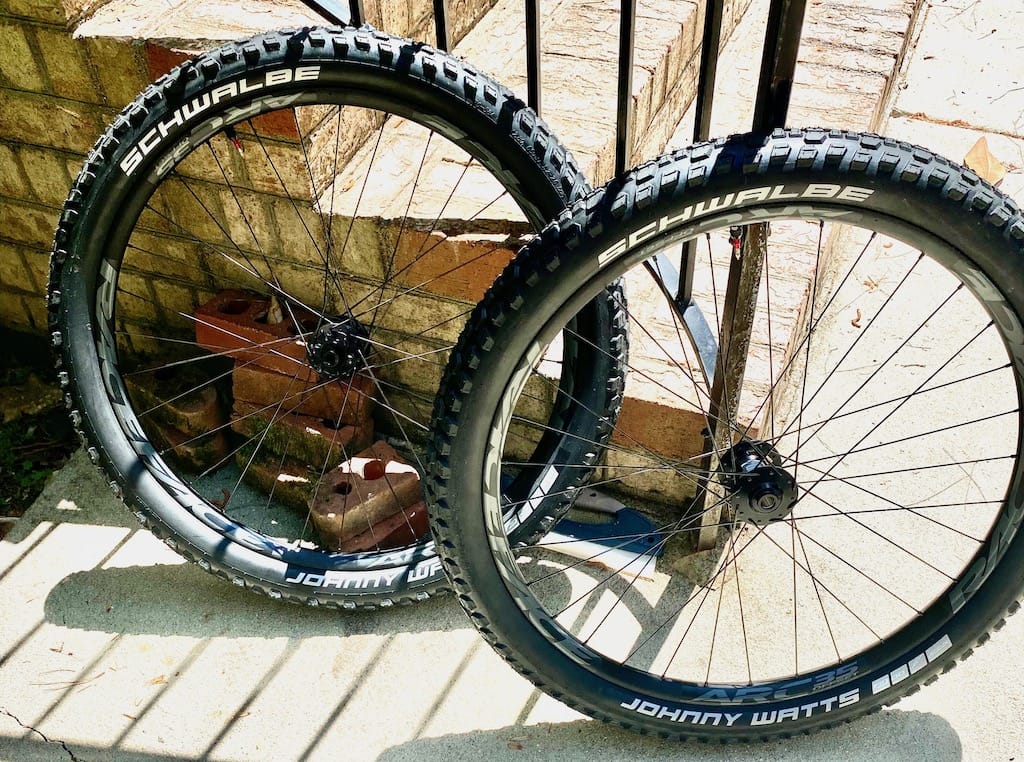
Unfortunately, there aren’t all that many choices out there still for asym wheels - I considered the DT Swiss Hybrid HX581 for a bit (non-asym), and a couple of others, before coming back to the Raceface ARC with a 4.5mm offset, giving me ~84% tension on the NDS. The ARC40s had held up well for me so far, but my riding is becoming more agressive, and while the ARC40 is rated for Trail and All-Mountain, the ARC35 is also Enduro-rated, so while I am still planning on running Schwalbe Johnny Watt 27.5x2.8” ‘dual sport’ tires, I settled on the ARC35s for this build - which should be fine for a 2.8” tire, but feel a bit different versus on the ARC40s I currently have.
There is also an ARC HD, which is downhill-rated, but those only come in i30 sizes, and there’s also an ARC Carbon 36, but a bit spendy at $500 each.
There is a growing number of rim/wheel/hub manufacturers doing ‘special’ components for eBikes, which has mixed responses on many forums at the moment. eBikes certainly do add another 20-30# of weight to the mix, as well as additional torque, speed, and even ‘patterns’ or torque ramp differences, especially for bikes with a throttle, along with the potential for some higher average speeds (not all that much IMO, if sticking to typical Class 1/2/3 definitions and not an e-motorcycle anyways). so there are some real differences. It’s also possible heavier riders who may not otherwise be riding a bike at all, are now riding, which again - can add some additional overall weight to the system.
One of the downsides of the e-bike specific rims is weight. The ARC35 in 27.5/650B weighs in at ~563g, which is reasonable-ish, the ARCHD at 603g (i30), while the DT HX 581 weighs in at 610g, and the WTB HTZ i35 weighs in at a whopping 718g, around 1/3rd of a pound difference. Having said that, the HTZ i35 looks to be a pretty beefy rim, and it’s on my short list for a future build at this point.
Other bits
The ARC rims, originally Easton before RaceFace acquired them, have somewhat of a mixed history which is a bit difficult to suss out overall. Best I can tell is prior RaceFace ARC rims used a softer alloy and some were complaining about it - dents, and a few spoke bed cracks. RaceFace changed the alloy to 6069, and in general it seems most consider them (now) to be a pretty bulletproof quality rim.
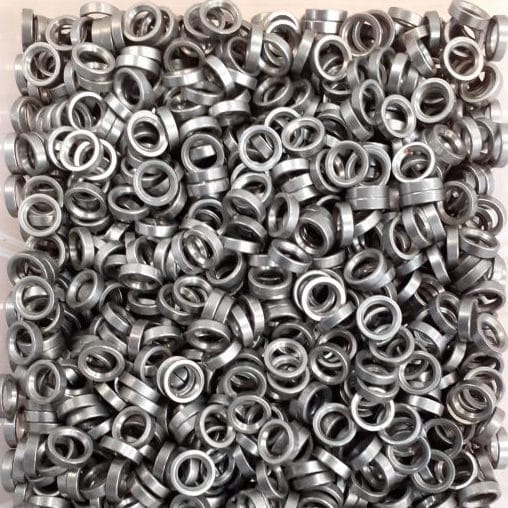
I decided for this build I was going to go ahead and use spoke nipple washers. Are they nescessary - probably not. Will they hurt anything? No, as long as the washer profile matches the spoke nipple bed inside the rim, which is flat - so I went ahead with Sapim MG washers, which add some spoke bed strength along with helping the spoke nipple to pivot to properly align with the hub. Most builders other than when using DT Swiss wheels (which come with their own PHR washers) don’t add spoke nipple washers, but I wanted this wheelset to be near-bulletproof so gave it a shot.
The DT Swiss Hybrid hubs have 2.8mm spoke head holes in them, compared to the more typical 2.5mm. While I probably could have still used something like DT Competition or Sapim’s equivalent Race spokes, I decided on using triple-butted DT Alpine IIIs, which are 2.3mm at the head-end, then down to 1.8mm, and 2mm at the spoke threads. Were DT Swiss’s ‘hybrid’ spokes they use for their Hybrid wheelsets, I might have used those, while Sapim also has the Strong and Force spokes which are generally similar.
Of course, I couldn’t order the spokes until I got all of the rest of the bits in hand to make sure of ERD.
Spoke Nipples - I prefer tooled heads with positive tool engagement, so went with DT Swiss Squorx in black brass, without any locking compound inside. The Sapim Polyax and DT Squorx or other ‘Pro Head’ DT nipples have the same rounded bottom to help with proper spoke alignment - I just prefer the torx head to the typical slotted one. I may go aluminum on the next build, mainly to do red nipples, but it can get rather humid here in summer, we do go to the beach, and brass is always a safe bet. The weight difference, honestly, simply isn’t worth worrying about. Meanwhile, the Squorx nipples measure out like a standard 12mm spoke nipple, but do have a bit more thread available at the top, while still being able to use the Squorx/Torx tool (while a standard nipple driver would start to be pushed out of the slot as the spokes start to push into the slot area), so - all around win IMO on DT Squorx.
There HAD to be a few surprises, right?
I had a few. First off, RaceFace’s published ERD for the rims was 562mm. Measuring with the Squorx nipples and with the added MG washers I was coming in at 567mm ERD. Now, the MG washers are around 2mm each, but they’re beveled to let the spoke nipple rotate, so I wasn’t expected an ERD impact of more than 1mm per side. Of course, using the Squorx nipples does let you more easily over-thread versus using a standard nipple driver and stopping as the spoke contacts the bottom of the slot, so I threaded them fully (above where a normal spoke nipple would be threaded to) and subtracted 2.5mm per side there for final calculations. Not that big a deal honestly - you can be +/- ~1-2mm or so and usually come out good, although not much more IMO. I suspect were I not using the MG washers, the published 562mm ERD is probably pretty close, maybe 1mm on the short side, but usable for normal spoke calculations when not using washers. Like the carpenter saying goes - measure twice, cut once, or in this case, I measured a half dozen times before finalizing on ERD to use. (You always do want to measure at least in a few places and take the average).
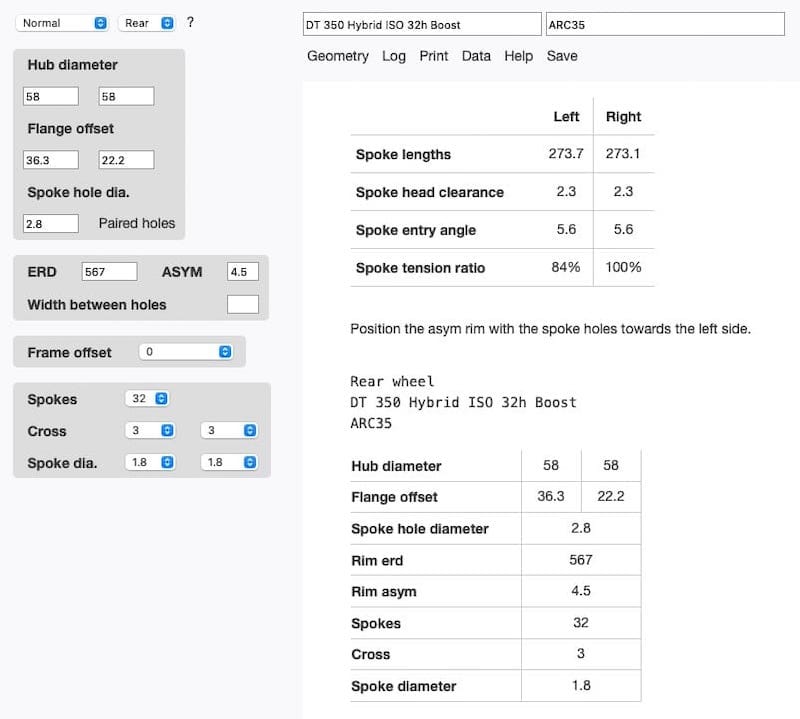
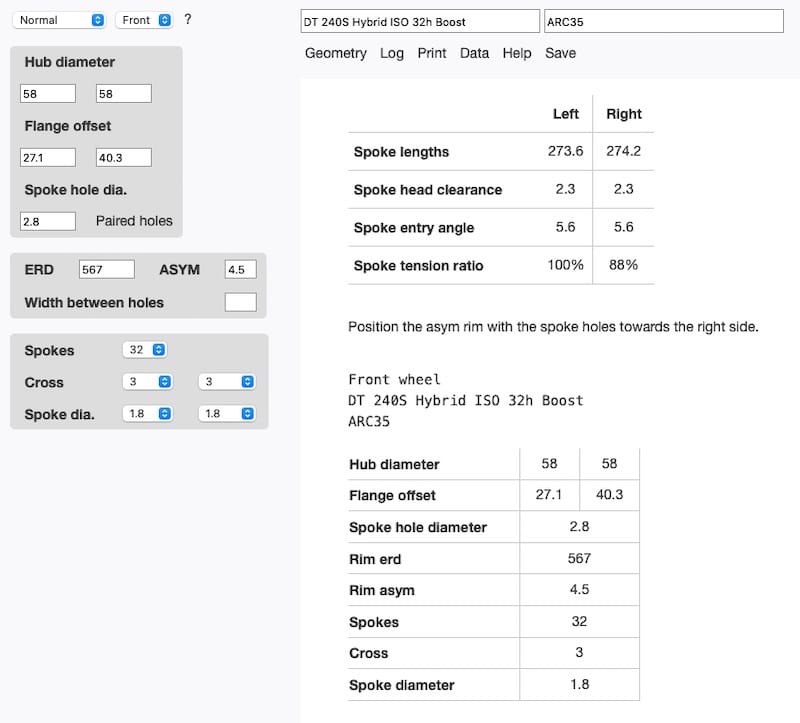
A nicer surprise was the combination of same-size diameter flanges on the DT hubs and the asym offset let me use the same size spokes for the DS and NDS/both sides. Further, it looked like I probably could use the same size front and rear as well. Remember, rounding to ~1mm is pretty much needed in most cases, and in my case it worked out well as it’s easier to find even-length spokes than odd-length, so I went ahead and ordered ~70 Alpine III 274mm spokes. These were a bit challenging to source, just like the hubs during the COVID/supply chain chaos, and I thought I’d need to order from overseas but was able to find them at Bikeman.
One more surprise nearly got me
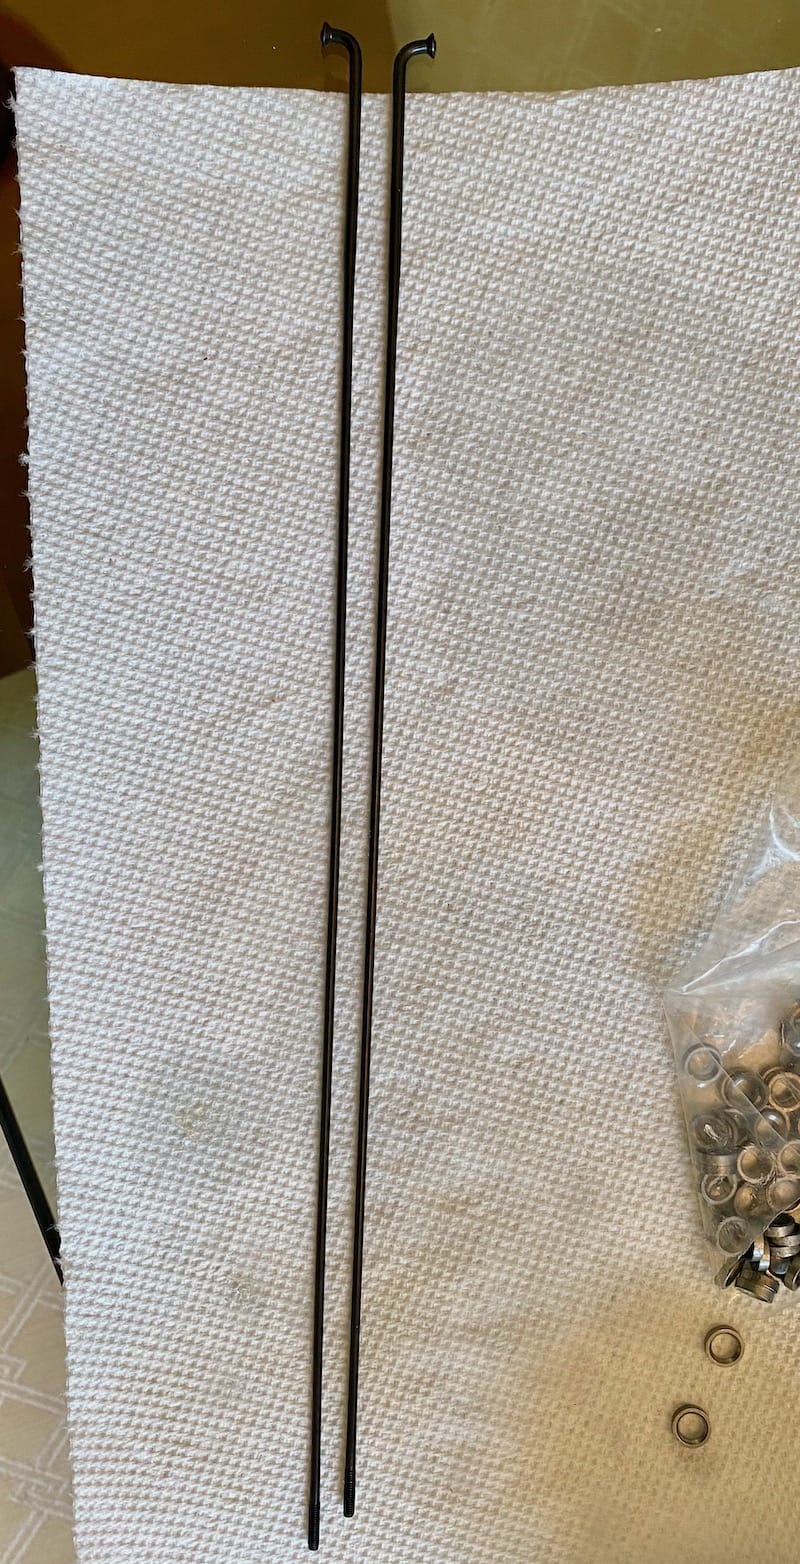
Once the spokes made it, I was ready to go. I did a quick check on the bag of spokes, and not going to lie - I did actually get burned here, but sorted pretty quicky. Out of the 70-something spokes I received, a half dozen were the wrong size!
They weren’t hugely off, and if buying in full bulk boxes of 100 spokes, this shouldn’t happen, but Alpine IIIs were tough enough to find in the first place, let alone in bulk boxes. I had managed to lace 3 into my front rim after doing 8 spokes on each side and starting on the third set before I finally pulled one and discovered it, then found 2 more in the wheel (nipples not sticking through when the hub was rotated properly), and 3 more in the bag. Easy enough to check, and normally caught sooner when left and right are using different length spokes, but - it happened. The seller was surprised but as with many, they order via distributor and in this case it may have been drop-shipped. Either way, found the issue, replaced the few long spokes and got credit for what turned out to be 6 280mm spokes.
Check your spoke lengths!
Time to build
Or almost, anyways. I don’t use spoke prep or spoke nipples with locking compound in them, but do believe in ‘the power of lube.’ Additionally, I like to put a dab of grease (e.g. Park Tool, Slickoleum, Mobil - whatever I have on hand for the most part, ensuring it won’t eat aluminum ;) ) on the rim interface where the nipple (or washer) sits against the rim - starting at the valve hole, I use a small brush or a Q-tip (brush is better) and put a dab of grease on the outer side of the rim’s spoke holes, just a tiny bit, and rotate around the wheel.
I also lube the nipples - there are neat ‘nipple boxes’ you can buy, but I just use a zip-lock bag the nipples or washers come in, add a few squirts of whatever lube I’m using and roll them around to coat - in this case I’m using Boeshield T9, which is sort of a mixture of ingredients like an oil/wax type of mixture going on wet but drying to a sort of wax-like finish. You can use Tri-Oil or numerous others - YMMV as usual.
When I’m putting the spoke nipples in wish washers, I’ll also add a tiny dab of grease to the top-side of the washer, or bottom-side of the spoke nipple to washer interface - this both holds the washer to the nipple, stopping the washer from dropping down into the rim, and gives a bit more lubrication to the ‘ball socket-like’ mating of the surfaces.
Finally, I’ll grab 16 spokes, 8 for each side for now, and libe the threads. You can dip half of the threads in grease (make sure no globs), or spoke prep, linseed oil or whatever your preference here is. For me, oil/lube is fine, making sure it’s a light vs globbed/dripping coat.
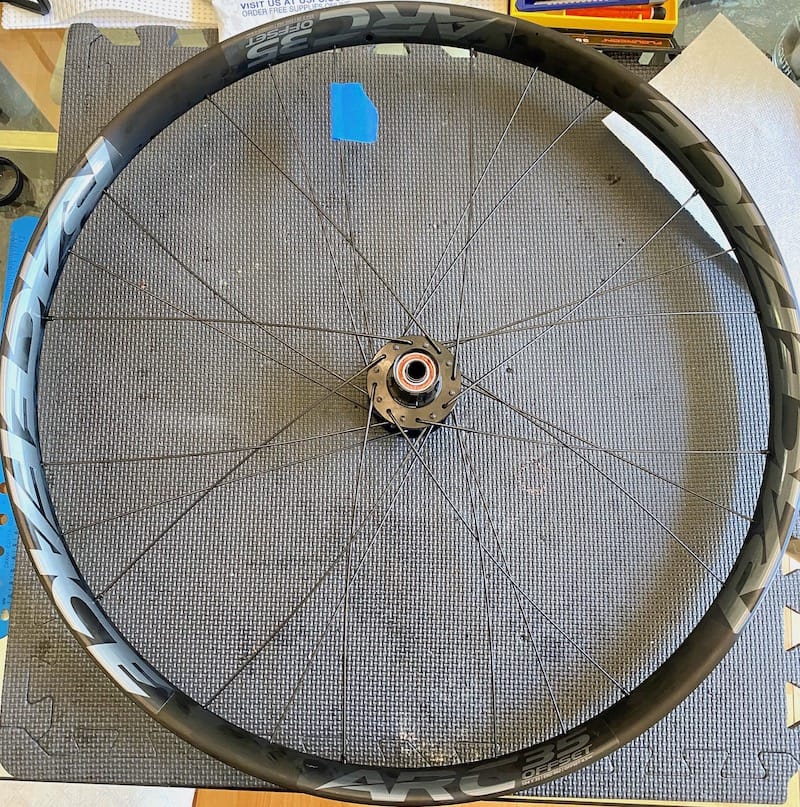
One note: I always start wheel builds ‘on the right hand side’ - which is the drive side/DS for the rear and the non-rotor-side/NDS for the front. When the wheels are laced and I start building up tension, it’s always the DS which is the tighter/higher-tensioned side. Some may always start on the drive-side, so cassette side rear and rotor-side front. YMMV. I will show a few pics of the front rim and hub below, while most will be of the rear - I just didn’t get enough clear pics of the rear, but the steps don’t change.
Type 1 vs Type 2 and angle-drilled rims: This is important, but MOST of us can ignore it. Some rimhave stagged holes, or the holes may be angle drilled. A majority of modern rims are ‘Type 1’ meaning the hole directly counter-clockwise from the valve stem hole is either higher or the same level as the hole next to it, or if the rim is angle-drilled, a spoke will be ‘aimed’ or tending to lean to the outside of the wheel/hub, or facing upwards towards you in the images below. You can confirm this using a spoke and a spoke nipple, seating the nipple to the rim, and feeling as you move the spoke around, which way the spoke wants to tend to orient itself in. If a spoke is drilled centrally it will feel natural moving to either side. In the unlikley event your chosen rims are ‘Type 2’ then you will start your guide/key spoke 2 holes from the left of the valve hole instead of the first one to the left as shown within this guide. Lacing a Type 2 rim with Type 1 lacing is possible, but it will add additional stress onto the nipple/spoke interface as it may have a less-than-ideal angle.
If you are using different length spokes for the left and right side, separate them in proper groups of 8 (assuming a 32 hole wheel build) and do not confuse them or you’ll very likely need to pull the wheel back apart and start over!
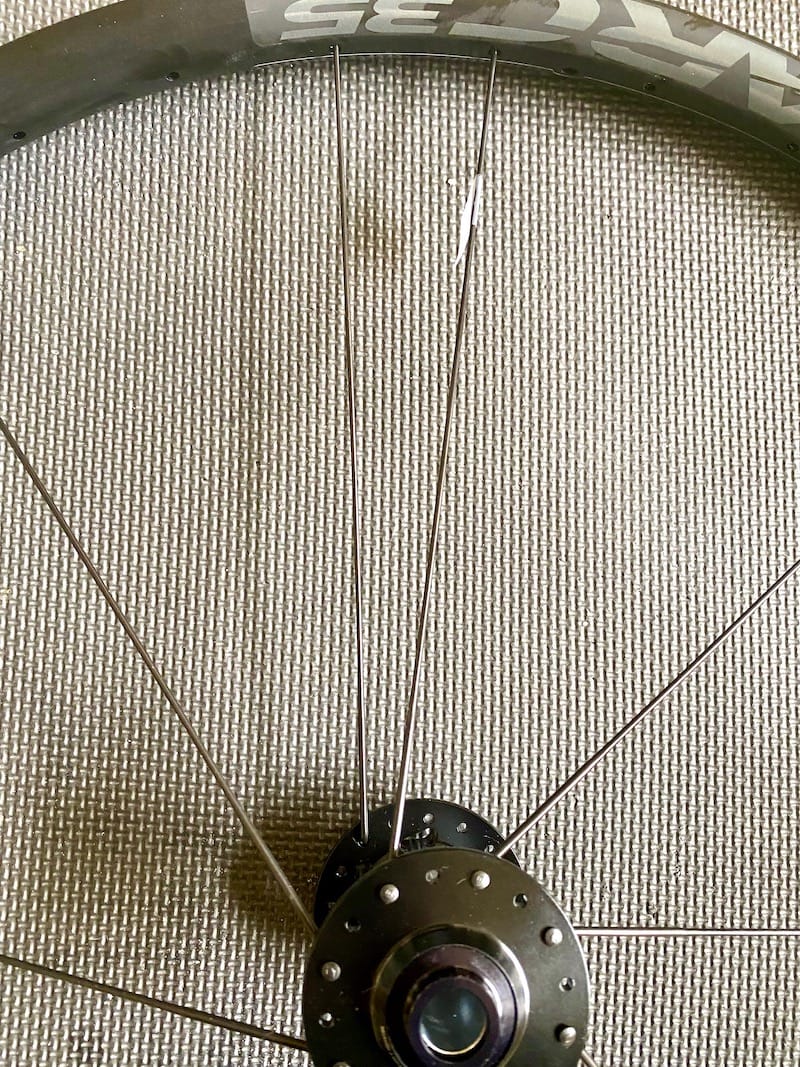
For the first spoke’s placement, this is an optional step, but it looks nice on the finished wheel when the valve stem, hub logo and tire logo all line up with each other. To line up the hub logo with the valve stem hole, put the valve hole at the north/12-o’clock position, line up the center of the logo, and if a wide logo spanning multiple spoke holes, mark the one just slightly to the left of logo center, then count over N holes, where N is the number of crosses in the wheel plan…in this case, I count over 3 and drop a spoke in from the outside. Add a tape ‘flag’ to this spoke, as this will be your ‘guide’ spoke used for reference throughout the build. Some like to tape/mark the valve hole, but this spoke will wind up going into the spoke hole immediately to the left of the valve hole, so I flag the spoke only.
For asym or offset rims, you can visually notice which side of the rim is ‘narrower’ from the spoke holes outward, and which is larger. For the front wheel, place the spoke holes further from the brake rotor, and for the rear, place them further from the cassette. In the pictures above with a front wheel, the spoke holes should be closer to the ‘top’ of the rim as shown.
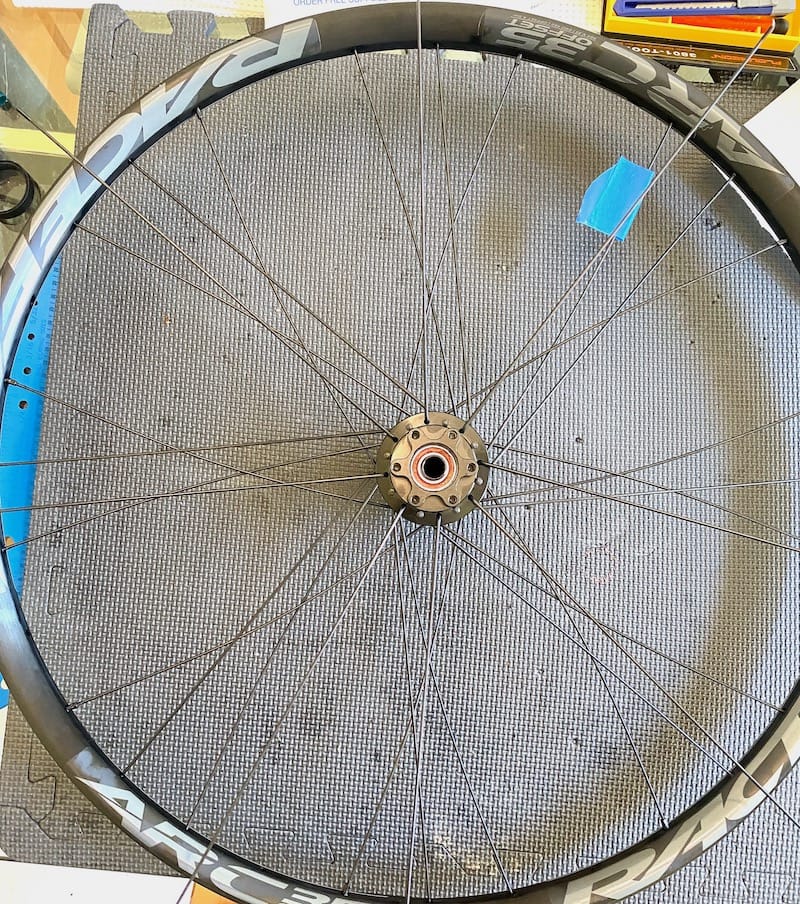
Once you’re sure the rim and hub is properly positioned, place the first spoke immediately to the left of the valve hole - you can push the spoke beyond the spoke hole, making it easy to put on the spoke nipple (and washer if using) - just spin it on a couple to a few turns, and leave at least half or more of the spoke threads showing. Don’t worry about hub/spoke orientation at this point. Drop another 7 spokes through every other hole from the outside of the hub flange, push the spoke through every 4th spoke hole, and add the spoke nipple on each, screwed in a few turns. At this point it’s much easier to go a spoke at a time - spoke in hub, count to 4th hole, put spoke in 4th rim hole, thread on the spoke nipple a couple of turns, then move on to the next until you have all 8 spokes in place on the one side as shown below. Don’t worry about this nipples not showing through - the hub isn’t rotated properly at this poinit, so this is normal.

Starting the other side
Make sure you have 8 spokes of the proper length, oiled or prepped. Without turning the rim and hub over, locate your first spoke placed, the one just to the left of the valve hole with the tape flag on it. Looking from the top down, sight across to the other side of the hub - the holes on the other side will be slightly offset, not lining up perfectly, closer to ‘in-between’ two holes on the side facing you. Sight down the hub, and select the first spoke hole to the left/counter-clockwise from your guide spoke on the opposite side. Put your finger on the hub’s spoke hole, lift the rim and hub and feed a spoke through from the outside of the other side into the noted hole. With the laced side facing you, put this new spoke in the rim’s hole directly to the left/counter-clockwise of your guide spoke, as shown in the pic above. Put the spoke nipple on and thread it a couple of turns.
Finishing ‘step 2’ on the other side of the rim
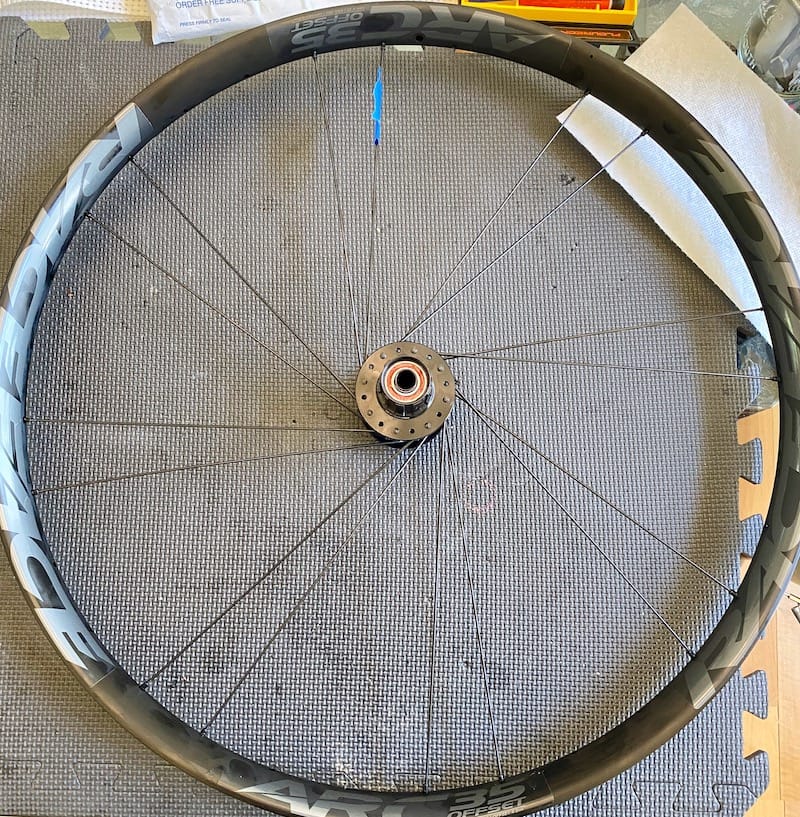
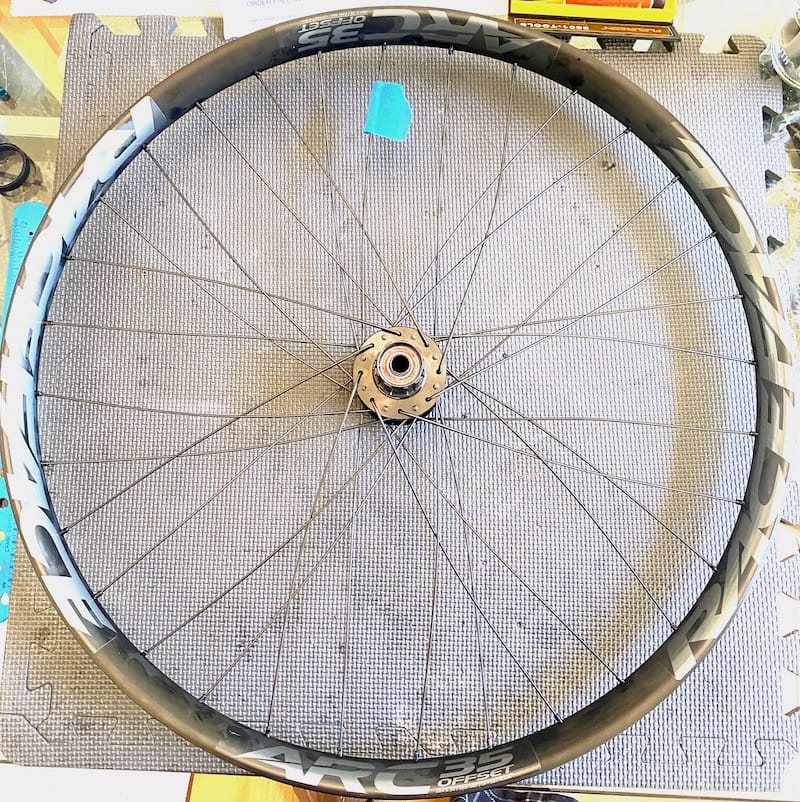
Now you can flip the wheel over so the side with 8 spokes already laced is facing down. Go ahead and lift the wheel a bit, and from the outside, add the 7 other spokes into every other hole. Pay attention which side of the spoke on the opposite side they fall on (they should hang to the right of the already laced spokes with them on the bottom) so you don’t have to remove and re-insert them. One at a time, rotate around the hub, putting the spoke in the 4th hole (one over from the spokes from the other side), threading a nipple on a couple of turns, then on to the next. Once done, flip the wheel back so the ‘right’ hand side is facing upwards (cassette side rear, non-disc-side for front). Your wheel may still have spokes and nipples sticking out - it’s fine. With the right side facing upwards, you’ll want to grab the rim firmly, and rotate the hub counter-clockwise. While doing this you may need to guide some of the nipples through the rim’s holes and your wheel will wind up looking something like the picture below. Note that the valve stem hole is not crossed by any of the spokes - if it is, you may have rotated the hub in the wrong direction.
Don’t worry too much if the hub ‘unwinds’ a bit - as we move on to the next steps and the next set of spokes, the hub and rim will become locked in. Use it as a sanity check to make sure the spokes are in the right holes, and the hub can be ‘clocked’/rotated with most or all of the spoke nipples at least close to being visible, and no spokes seem to be way too short or long etc.
Trailing Spokes - 3rd set of 8
We’ve got half of the wheel laced at this point, but now for the ‘cross’ part. This part may be difficult to explain or visualize, but it’s easy once you’ve done it.
Get the next set of spokes ready, 2 sets of 8 if different length, or 16 in total, along with nipples (and washers if using), and lube them if they aren’t already.
The next 2 ‘pair’ of spokes, 8 per side, will be going into the hub from the inside, using the remaining holes on each side of the hub, which should be every other hole for each side. It doesn’t matter where we start, although I prefer to start the ‘3rd set’ back on the right side (although the pic to the right is the rotor side - I had already laced the 3rd set before grabbing a pic).
Note that the remaining spokes are ’trailing’ spokes, with the ones laced so far being ‘leading’ spokes. Looking at the angle of the spokes on the preceding picture, you can see they are radiating out clockwise from the hub to where theygo into the rim and nipple. The next sets of spokes will instead angle or radiate in the opposite direction of the existing 16 spokes.
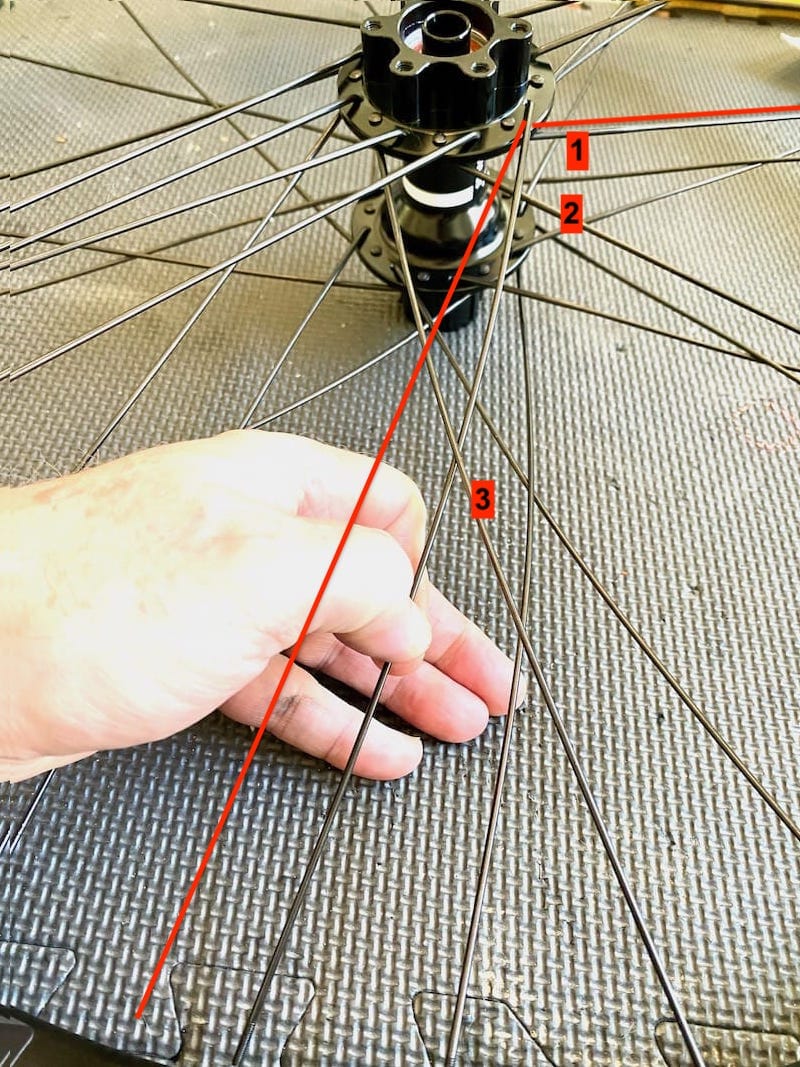
Pick any hole and insert a single spoke from the inside of the hub. Look at the picture to the right, and think to yourself ‘3 cross,’ possibly followed by ‘there’s a lot more spokes involved, I don’t get it!’ Now, ignore the spokes on the opposite side hub flange and pretend they don’t exist. The new spokes will cross over 2 spokes on the same hub flange, going in the opposite direction to the existing 8 spokes on that flange, then go under the third spoke coming from the same hub flange. You may think the spokes are too long, but they won’t be going in the same direction as the existing spokes. You may need to gently bend the spoke slightly to avoid scratching the rim and to weave it under the third spoke, and note the definition of ‘crossing’ over the first is a bit loose, as it does cross, but it certainly doesn’t touch spokes 1 or 2 in the cross. Look at the diagram to the right - you can see the spoke in my hand crossing over spokes 1 and 2, and then going under spoke 3. You can also see the angle of the spoke being added is radiating in a different direction, with a bit over a 90* angle being formed with it and spoke 1.
Once you feed the spoke under the third spoke, there will be 2 open spoke holes in the rim - look at spoke 3, and the next spoke from the same side of the hub from the full set of 8 - the new ‘crossed’ spoke will go to the spoke hole centered between those two spokes. If your hub is rotated properly and your spokes are the right length (check that most or all nipples from existing spokes are peeking through the inside of the rim as well), you shouldn’t have any issues, but note - you will need to use a nipple driver or tool to feed the spoke nipple through, as the position of the wheel and hub will now start to be ‘locked in’ as you place the first of this set of spokes. Once you have a spoke over 2 and under the third, push a spoke nipple through the spoke hole with a nipple driver - you can use a small dab of grease on the end of the driver to help to keep the spoke nipple from falling off the driver (they can be a pain to fish out from inside some rims).
It’s quicker to go ahead and drop the rest of the 7 more spokes for the side, but the first time you can do them one at a time if you’d like - feed from the opposite side through the inside of the flange - you can see in the marked-up picture I fed all 8 through, and pushed them out of the way except the one I’m working on in my hand.
Like before, just give the nipple a few turns on the threads; we’ll be tightening everything up later. Once you finish this side, expect some or all spokes to be loose and have some amount of ‘bowing’ in them still - it’s fine. At this point, the wheel should look something like the picture to the right with the blue tape flag towards the top.
Lacing the last set of spokes
Now you can feed the remaining 8 spokes through the 8 remaining holes in the opposite flange, from the inside, or do them one at a time. You can see when they’re more or less parallel to the existing spokes, they seem like they’re too long. You can swivel them together if you’d like - the bend from the spoke elbow andf the hub should keep them from rubbing against the rim, but be careful to not scratch the rim as you repeat the same process on the other side - radiate ‘the other direction’ from the laced set of spokes on that side, over 2 spokes, then under the third, then in the open hole between two same-side spokes, and feed a nipple through with a greased nipple driver and spin it on a couple/few turns.
The spokes at this point should still be pretty loose - if you find yourself needing to stretch or manhandle the spokes, it’s possible you over-tightened the spoke nipples on a prior step. If so, you can always back then off a turn or so, then continue. Do NOT tighten any of the spoke nipples at this point, just get all spokes laced up into the rim properly.
Sanity check
Now you can feed the remaining 8 spokes through the 8 remaining holes in the opposite flange, from the inside, or do them one at a time. You can see when they’re more or less parallel to the existing spokes, they seem like they’re too long. You can swivel them together if you’d like - the bend from the spoke elbow andf the hub should keep them from rubbing against the rim, but be careful to not scratch the rim as you repeat the same process on the other side - radiate ‘the other direction’ from the laced set of spokes on that side, over 2 spokes, then under the third, then in the open hole between two same-side spokes, and feed a nipple through with a greased nipple driver and spin it on a couple/few turns.
The spokes at this point should still be pretty loose - if you find yourself needing to stretch or manhandle the spokes, it’s possible you over-tightened the spoke nipples on a prior step. If so, you can always back then off a turn or so, then continue. Do NOT tighten any of the spoke nipples at this point, just get all spokes laced up into the rim properly. If you have any issues on the last spokes or any in this last set, make sure that the hub is fully rotated, and that no nipples are hung up/stuck and not going through the rim bed (they should be visible on the inside of the rim/hub side). It’s also possible your spokes are on the short side, which may mean loosening up all of the spokes a bit, finish lacing the wheel and you’ll have to see where they wind up as we continue on through truing, dishing and tensioning.
Check that your wheel spokes are all crossed, the space to the valve side of the guide spoke is a straight line/clear and not crossing spokes (so you can inflate the tire), and no spokes are super short or obviously long. You can also check to confirm the valve stem hole is indeed lined up with the hub’s logo if you followed the earlier step on selecting the position for the first guide spoke. If any spokes seem tight, check the position of the spoke nipples versus the spoke threads - you should be seeing spoke threads sticking past the nipples on every spoke still - if not, loosen them until you do.
Take up some slack
This step may require a little bit of thought, and consideration as we start to take up some of the slackness from the spokes.
Some people use spoke keys for this part, but again, I have a strong preference for solid tool engagement and prefer to reduce the risk of wearing the finish off the spoke nipples or the rim, so I really prefer using a nipple driver from the outside of the rim.
Note that tightening from the outside (using the head of the spoke nipples and a driver) follows the adage of ‘lefty loosen, righty tighten’ or simply put, clockwise to tighten, but - once you shift to a spoke key/wrench, this is reversed. Repeat this in your head a few times, and always before starting to adjust any spokes, as it’s easy to get crossed and be going the wrong way.
At this point, we’re looking to do one thing - reduce slack in the spokes while trying to keep the spokes more or less equally threaded. Why? If this is a new rim, short of UPS, FedEx or Bubba doing some damage, the rim is already pretty circular and reasonably true laterally (side to side). Once we start putting real tension onto the spokes, the tension will pull the rim in whichever direction the force is pulling, so if we ad-hoc tension spokes and to different thread lengths and forces, the wheel can become a bumpy mess. So again - we’re not looking to put real tension on the wheel, just remove a bit of slack and get all of the spokes/nipples more or less to the same starting point.
There are a few ways to do this, but it depends on spoke lengths vs actual rim ERD, and which tools you have. The simplest is to start at the valve stem hole, then either thread/tighten each spoke in turn (go clockwise or counter-clockwise but be consistent) each spoke nipple until there is a single thread left uncovered on the spoke, or the last thread is just covered on the spoke, by the spoke nipple. Pick one of those two and stick with it, not one spoke leaving one thread turn uncovered and the next completely covering the threads. Some tools, like the DT Swiss Squorx driver bit, or special nipple drivers like this Unior one, either let you adjust a pin in the center so you can set the exact threaded depth of the spoke nipple on the spoke (like the DT Swiss one), or with a specific length center pin (like the Unior tool), which should (always check first!) thread the nipples on to a common starting position such as just covering the spoke threads, without adding tension to the wheel. Or - you can drive the nipples by hand to just covering the threads. IMPORTANT: Do NOT use power tools with the nipple driver bits - once the center pin is pushed upward by the spoke while tightening, the pin will push the tool head off of the tol of the spoke nipple head; this is fine when going slowly and by hand (then stop, it’s to the expected/desired depth for now), but can damage the spoke nipple heads if using a power tool.
If you find that going for spoke threads covered is starting to tension the wheel, making the spoke nipples harder to turn, check that no nipples around the wheel are threaded past this point, and that your nipple/spoke threads are lubed. You can add a small drop of oil/lube from the top of the spoke nipple head and capillary action will help to lube the threads. If it’s down to your spokes being too short - even after loosening up tightened spokes, try setting all spokes to a consistent # of threads showing - if this still doesn’t allow taking up the slack without spokes getting tensioned/tight - you may need to go to longer spokes.
Assuming your spokes are proper length, it’s time to align the spokes
This is just a fancy way of saying - straightening the spokes out a bit. Looking at the wheel, it’s likely the ’outside’ spokes (those with the heads facing inwards inside the hub) will have a bit of bowing coming off of the hub flanges. The inner spokes won’t typically have this condition. If you are re-using spokes or the spokes fit very loosely inside the hub spoke holes, this may not occur (but you may need spoke head washers if too loose!). Assuming there is some bowing, take your thumb and starting at the valve stem hole again, go clockwise or counter-clockwise around the wheel, pressing down near the hub (within an inch or two), on each outside spoke. Be careful as you don’t want to press so hard that the spoke is dented against the hub flange, as this can cause some additional stress points - you just want to smooth out the natural bowing effect a bit - this will add additional fatigue strength to the spokes and also help reduce effort on subsequent rounds of tensioning.
Let’s mount the wheel in the stand and take up the rest of the slack - evenly
The next step is we want to continue to take up any of the remaining slack, evenly across all of the spokes, as again, chances are good the rim itself is close to round and laterally true, while keeping equal tension across all spokes until it’s time to do rounds of truing will help to keep everything consistent without having to chase down grossly different tensions at each and every spoke.
Go ahead and mount the wheel in your truing stand if using one, using whatever hub adapter is appropriate for your hub and stand. It helps for consistency purposes if you always mount the higher tensioned side to the same side on the stand - not required but can reinforce good habits. If not using a stand, you can do the next step with the wheel free.
You can use your fingers on each spoke to determine how much slack remains on each spoke, while remembering that adjusting a single spoke will have an impact on the other spokes, meaning tightening one will tend to also increase decrease slack (or increase tension) on the spokes across from it, while also adding some slack/lower tension to it’s immediate ‘neighbor’ spokes right next to it, and vice versa for loosening.
What this really means is simply - be careful and don’t try to tighten too much at once in order totake up the remaining slack, as it has impact across the wheel, and if you go too tight, you may need to go back and loosen it back up. At least for your first builds, assuming all spoke nipples are just covering the spoke threads, starting at the valve hole and going either clockwise or counter-clockwise, tighten each spoke a half turn, then move on to the next until you’re back at the valve stem hole.
Hub adapter for mounting wheels to the stand
Depending on the length of your spokes and the hub dimensions and rim ERD, you may already be at a consistent ‘no slack’ state with the spoke threads just covered, or anywhere between 1/2 turn all around the wheel to around 3 full turns on each spoke. ANy less and your spokes may simply be too short - you want to have the spoke ends once fully tensioned (not yet..) reach up into the spoke nipple at least 1-2mm past the outside rim bed into the spoke nipple head. If more turns are required to simply take up slack, your spokes may be too long, which may still be workable depending on nipple type, but be aware overly long spokes can effectively ‘bottom out’ the spoke threads and effectively reduce the number of threads engaged between the spoke nipple and the spoke, leading to a less strong connection - sometimes usable, but less than ideal.
Again - do not overtighten. You’re looking to bring the spokes to the point of feeling a bit of resistance, and the spokes should ‘ping’ or make a sound when plucked (like a guitar string) or tapped near the spoke nipple, but they should not be tight. The final round in taking up the slack may be as small as 1/4 turn, although sticking to 1/2 turns is less likely to add unwanted tension at this point.
If you find the nipples becoming too tight as yougo around the wheel, take a piece of painters tape and mark the last spoke tightened, then go backwards (opposite of the way you were rotating the wheel when tightening) and undo the last round of tension added (which should be 1/2 turn) by working backwards back to the valve stem hole and call it good.
Let’s take it for a spin - and check lateral trueness
Before we can start really adding tension to the wheel, we’ll want to do a few sanity checks. Spin the wheel slowly with any truing stand calipers well away from the wheel, and see how it spins. If you have tightened all spoke nipples equally and only taken up the slack at this point, the wheel should generally spin close to true, meaning without much side to side wobble or moving up and down.
If this isn’t the case, you probably over-tensioned when taking out the slack in the preceding slack and/or didn’t really bring the spoke nipple/spoke threads to a common starting point. It’s also possible you mixed up spoke lengths if your build required two different length spokes for left and right sides. Some minor deflection is OK, but more is worth re-checking if all nipples are threaded in equally, and possibly going back around the wheel, this time loosening all spokes by a half turn and checking again.
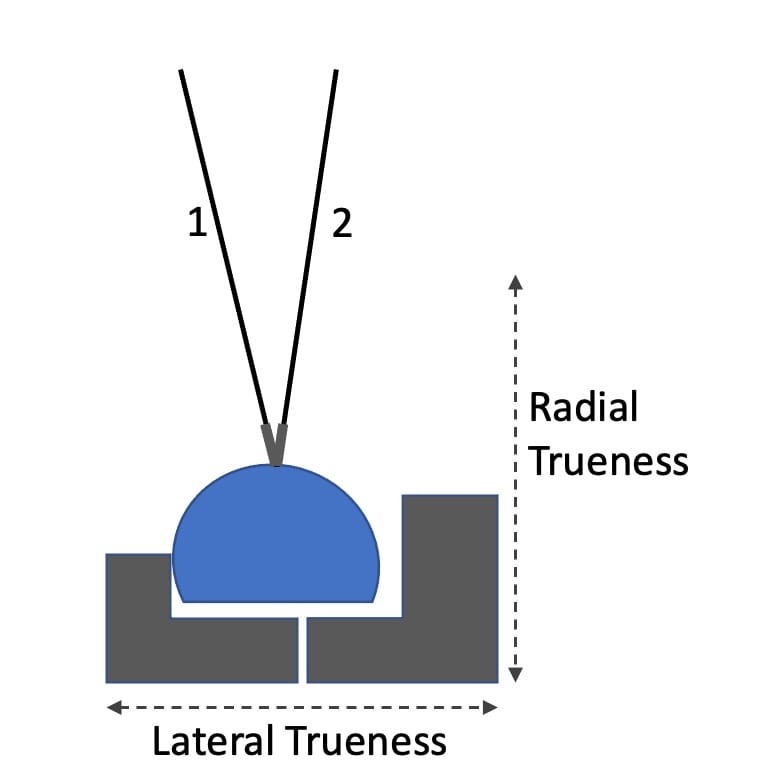
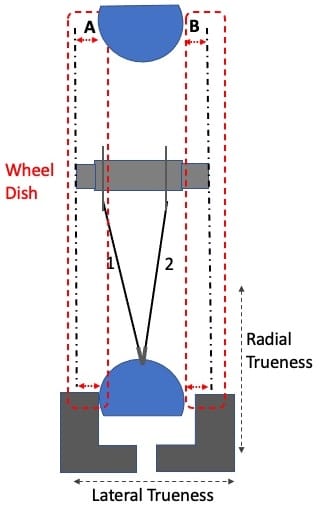
My not-to-scale diagram at the right shows the different types of trueness - lateral is from side to side, and radial is up and down.
For starters, we want to get the wheel more or less laterally true first, so it has minimal side-to-side wobbling as it spins. This is ‘rough’ tuning at this point, so at this point I try to keep it within 1-2mm of side to side movement. You can go beyond this, but other adjustments will tend to have side-effects, so it may amount to extra work.
It’s wobbling - now what?
Look at the diagram above, and you’ll see the left hand side is right against the side, while there’s a gap on the right hand side. This is presumably a single point in the rim, and your truing stand if you have one, may only have a caliper on one side, which is fine. What you want to do is first attack the biggest offenders, meaning the sections of the rim moving the most to one side. Without the caliper(s) tight, just spinning the wheel will give an indication of whether the biggest ‘outlier’/lateral movement is on the left or right side of the wheel, so start there and bring the caliper to just touching/tapping while the wheel is moving.
Slow the wheel down and turn it slowly until it just contacts the caliper, and put a finger or piece of tape on that spoke. Continue to move the wheel to identify where the out-of-true ends or becomes much less. Sometimes you’ll have a one-to-couple inch ‘bump’ and others may span multiple spokes. Note the ‘ending’ spoke or add another piece of tape.
Now look back at the trueness diagram. In this case, some portion of the rim on the left side is out of true laterally. With a tight, tensioned wheel, you could either loosen spoke #1 (sometimes with other spokes on the same side as spoke 1, depending on how long the ‘bump’ is), or tighten spoke #2. Either of those actions would shift that portion of the rim over to the right. If you’re ever confused about which ’side’ to tighten, grab a pair of spokes on one side near an out-of-true bump, and squeeze them towards each other - this will have the same effect as tightening those spokes, so if for example you grabbed spoke #2 and one of it’s neighbor spokes on the same side (going to the same hub flange), you’d see the rim shift over to the right.
Considering at this point, we have only barely removed most of the slack, loosening may not have any impact, so we’ll want to tighten to shift the rim. Depending on the length of the ‘bump,’ a single spoke may do it, or multiple may be involved. If a bump is spanning multiple spokes, sometimes you’ll want to ‘distribute’ the correction, or ‘feather’ it, by tightening (or loosening) the spoke(s) at the center of the worst part most, then tightening (or loosening) the spokes on either side fanning outwards in decreasing amounts. This also helps to keep spoke to spoke tension closer, which is a good thing for whele longevity. You can also tighten one side and loosen the other at the same time, but again, for now, let’s focus on tightening.
How much do I tighten to correct lateral out-of-true?
This solely depends on two things - how tight/tensioned the spokes and the overall wheel already are, and to a lesser degree, the DS of the wheel which gets higher final tension will tend to have more effect on a nearly-tensioned wheel than the NDS. The actual angles formed by each side of the spokes and hub, and their relationship to each other, determine how much difference there is, but it’s not uncommon to see 1/2 turn on the NDS be equivalent to 1/3rd of a turn on the DS for trueing effect.
For now, we’ll keep it simple and assume your ‘units of measure’ are either 1/2 turn or 1/4 turn. When the wheel is under final tensioning, we’re unlikely to even use 1/2 turns at all, but for now, let’s use 1/2 turn or 1/4 turn only.
This may take a bit of effort the first few times, but you’ll get a feel for it over time. Find the largest issue area, correct it slowly, then locate the next one, generally moving the caliper or guide inwards as you progress. Don’t worry if the first few attempts you make it worse, just go slow and undo the changes just made ‘between the tape flags’ (remember I said to mark the area for any issue spanning multiple spokes?), and try again, maybe moving down to 1/4 turn increments. Remember if using a nipple driver or nipple wrench instead of a spoke key/wrench, it’s clockwise to tighten, but vice versa if using a spoke key/wrench.
Go around the wheel until within 1mm or so on both sides focusing on the worst side to start will help to get this done, then switch the caliper to the other side, flip the wheel in the stand or engage the caliper for the other side until done, then - let’s move on!
Radial Trueness
Now we want to get the radial trueness within 1mm or so, which is done similarly to the lateral truing in the previous step, but tightening and/or loosening isn’t focused mostly on spokes on the same hub flange, but independent of the flange in order to move a section of the rim ‘up’ (from the caliper)/towards the hub by tightening spoke(s), or letting it move ‘down’/away from the hub by loosening. Unlike for lateral trueness where you are generally working on spokes on a single side (or in some cases of larger variances, tightening muliple on one side and loosening on the other), radial trueness involves adjustments to spokes on both sides of the dip or high spot. Due to the tension differences in DS vs NDS sides, you may need to tighten the NDS spokes slightly less than the DS spokes by a fractional amount.
Remember to go slowly, again using 1/2 or 1/4 turns, and attack the largest issues first, move the caliper(s) or guide to just touch/tap the rim, correct the issue by tightening one or more spokes (feathering still applies here as well for larger issues). if you have a flat spot pulling away from the caliper or guide, loosen the spokes, if you have a dip tapping the caliper or guide, tighten them until within 1mm or less.
Tension Equalization
So with the preceding steps done, we now have a wheel (or two wheels, depending on how you prefer to build your wheels - I bring both/all wheels to the first round of slack removal and then bring them both/all to the truing stand, complete one, then mount and complete the next, etc.) that is more or less round and not egg-shaped, and doesn’t wobble side to side. Each spoke when ‘plucked’ near the spoke nipple should make a sound at this point, just like in prior steps. This is all a good start, but we’re not quite there yet.
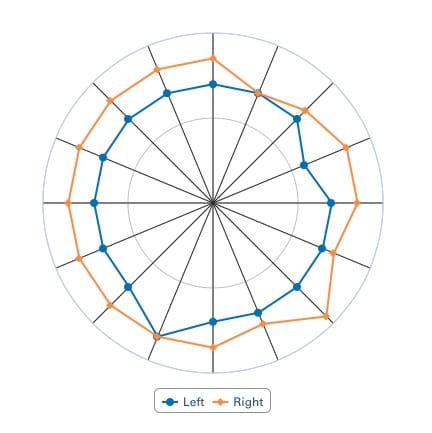
We still need to do a few more things. Now, this part changes whether or not you bought, own or borrowed a wheel tensionmeter, or not. The goal right now is not to bring the wheels to final tension targets, but to bring the spokes on each side close to equilibrium with other spokes on the same side. You can do this by sound to some extent, plucking a spoke on one side along with it’s neighboring spokes on either side, and tightening or loosening to get them making similar tones. A tensionmeter makes this - easier, but what we’re really looking for at this point is more about gross differences, e.g. one spoke over-tightened with spokes before and after it on the same side being much lower, or vice versa.
A useful tool in general is the Park Tool Wheel Tension App, which can let you set various parameters, as well as has an online conversion for their tensionmeter, which reads from 0-50 or so but represents a range of tension from ~50kgF to 200kgf or so, and requires a lookup table along with your primary spoke size (e.g. a 2.0-1.8-2.0 butted spoke would be selected as 1.8mm as that’s where you would be measuring it).
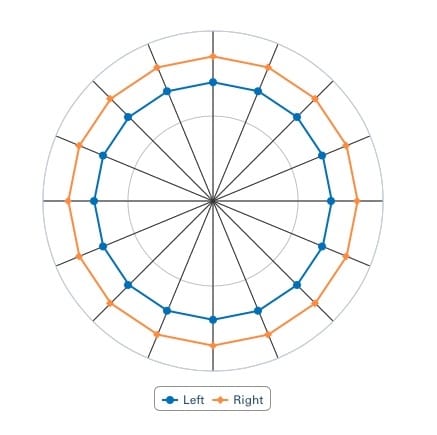
Even without a tensionmeter, you can compare the two images to the right - the first one is a theoretically ‘perfectly’ tensioned wheel, where the right side (assume this is a rear wheel, so DS/cassette side) is higher tensioned than the left side, but spokes on each side are tensioned the same. In reality, most wheels won’t wind up so perfectly tensioned, as variances in material across the rim, welding or joints and minor imperfections can all lead to some variance from spoke to spoke as it is trued, but the spikes and valleys or dips in the ‘spiky’ image - are too severe to ignore and not improve on. The WTA has a default tolerance of 20% variance allowed for tension on a given side, but this can be user-set to 15%, 10% or even 5%. If you have a tensionmeter, even if it’s not a park tool model, it may be worth using the WTA. Select spoke diameter (usually 1.8mm but not always), material (nearly always steel), and shape as round or bladed (for aero spokes, e.g. Sapim CX-Ray, DT Aeros, …), and enter in 16 spokes per side.
Note that as wheels are ridden on, spoke tensions actually change while riding, with the bottom of the wheel slackening and others tightening - these are transitionary temporary changes, not permanent, but you can understand the importance of starting at as equal tension as it possible.
If you have a tensionmeter, use it, starting on one side (let’s start on the right - making sure the higher tension side/DS in mounted on the right hand side of the truing stand), and measuring 2 inches or so down from the spoke nipple, record your value from the tensionmeter (lookup and conversion not needed; the WTA will do it for you), and then go clockwise or counter-clockwise and measure the next, record, and cotninue until you’ve measured all spokes on that side. Repeat for the left side spokes, then hit ‘update’ and the graphs will be drawn, along with a callout for anywhere out of the selected tolerance. To match up more easily with the drawn graphs, I use my guide/key spoke as spoke 1 on the right, and then go clockwise so the graph can be directly referenced to my wheel.
If you don’t have a tensionmeter, you can go by sound as mentioned - pluck around the wheel spokes on one side to get an idea of the ‘average tone,’ then pluck a spoke and compare to it’s neighbors on either side. A lower tension spoke will have a deeper, duller sound while higher tension will have a higher pitched sound.
Regardless of method, go around the wheel a couple of times, and look to match tone reasonably closely, or get within 10-20% of measured converted values, again looking primarily to correct for the big spikes or dips, and recall that after tighening one, you may need to adjust it’s neighbors as well.
Don’t obsess on this, but do go slowly and consider what changes you are making - you don’t want to end up just ‘moving the spikes’ around the wheel; very often it’s a combination of small changes across 3 spokes, a larger change in the center, then smaller changes on it’s outer neighbors (on the same side). Use 1/8th and 1/4 turn changes here. If you find a low tension spoke, try raising it 1/4 and lowering it’s pair of neighbors by 1/8th, and re-measure. If you find a high tension spoke, try lowering it by 1/4 and raising it’s pair of neighbors by 1/8th, and re-measure.
If using a tensionmeter, I usually set my allowed variance to 10% here and at future measurements.
Once done or calling it ‘good enough,’ do another quick check for lateral and radial trueness - if you did the spoke equalization well by distributing the change across more than single spokes, you shouldn’t need much correction and can use 1/4 turns for these minor corrections.
Wheel dish
What is Wheel dish?
Wheel dish is a visual effect based on the bracing angles of the spokes. When a front wheel has rim brakes and is laced and tensioned properly, you can have equal angles on both the left and right side spokes, forming an squilateral triangle with the hub, left and right spokes and their entry into the rim.
However, on most modern bikes, both disc brake rotors as well as multi-speed rear cassettes reduce the ability to maintain equal spoke angles on each side, where one side or the other will have a steeper angle than the other, giving a sort of ‘dish-like’ appearance to the wheels. This is also why the DS and NDS sides of a wheel have different tension numbers than each other, due to differences in spoke bracing angles and in order to keep the wheel centered or dished properly. (This is also something improved by wider hub widths, e.g. Boost, as well as asymetric or offset rims tend to improve - at least on the spoke tension difference front).
For purposes of modern wheelbuilding, with the exception of some speciality offset frames, we want the centerline of the hub to be in line with the centerline of the rim. This results in a wheel once mounted which is centered in the chainstay without rubbing, and with the best relative tension across both sides within the constraints of the rim/hub designs.
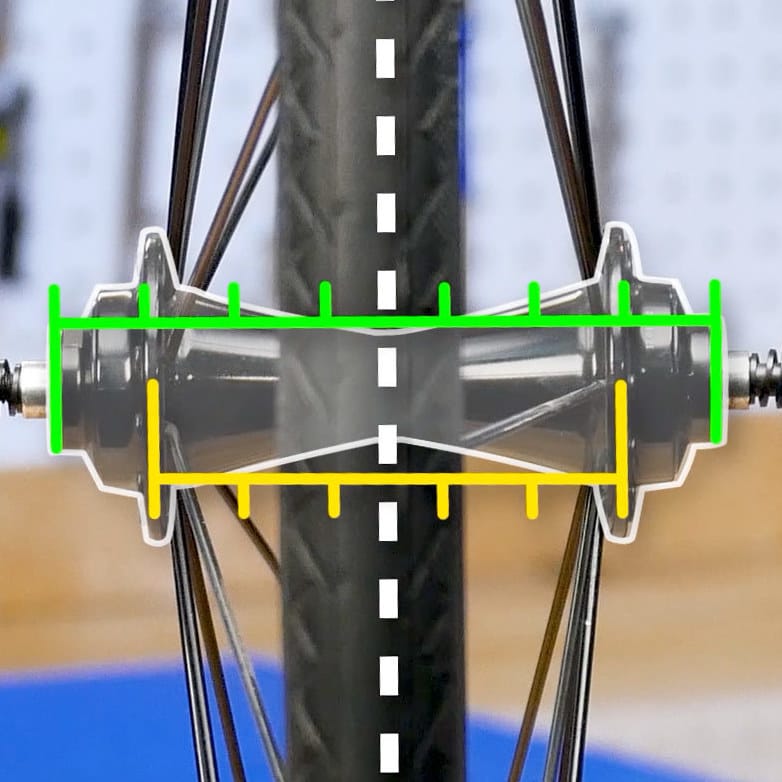
Lots of words there, but to simplify it, we just want things centered, and there are a few ways for us to measure or check this. Take a look at the diagram to the right - when the measurements of A and B are equal, the wheel is ‘properly dished,’ or centered between the hub center and the rim center. Besides my diagram attempt, you can look at the next picture for a properly dished front wheel (rim brakes in this case but it’s the same idea regardless).
When checking dish, we’re looking to be able to measure a straight line from the hub’s contact points with the frame (for some/older bikes these are the locknuts but in most cases, the axle endcaps for the hub), and the distance from that straight line to the outer edge of the rim. Thus in the preceding diagram, measurement A should be the same on a given side regardless of where it’s measured (recall we did lateral truing in the previous steps, so this will be true, or very close), which also should be equal to measurement B.
How can we measure it?
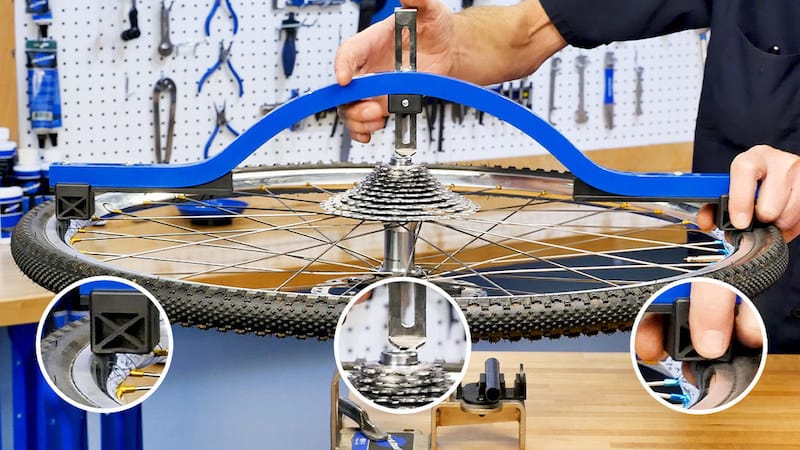
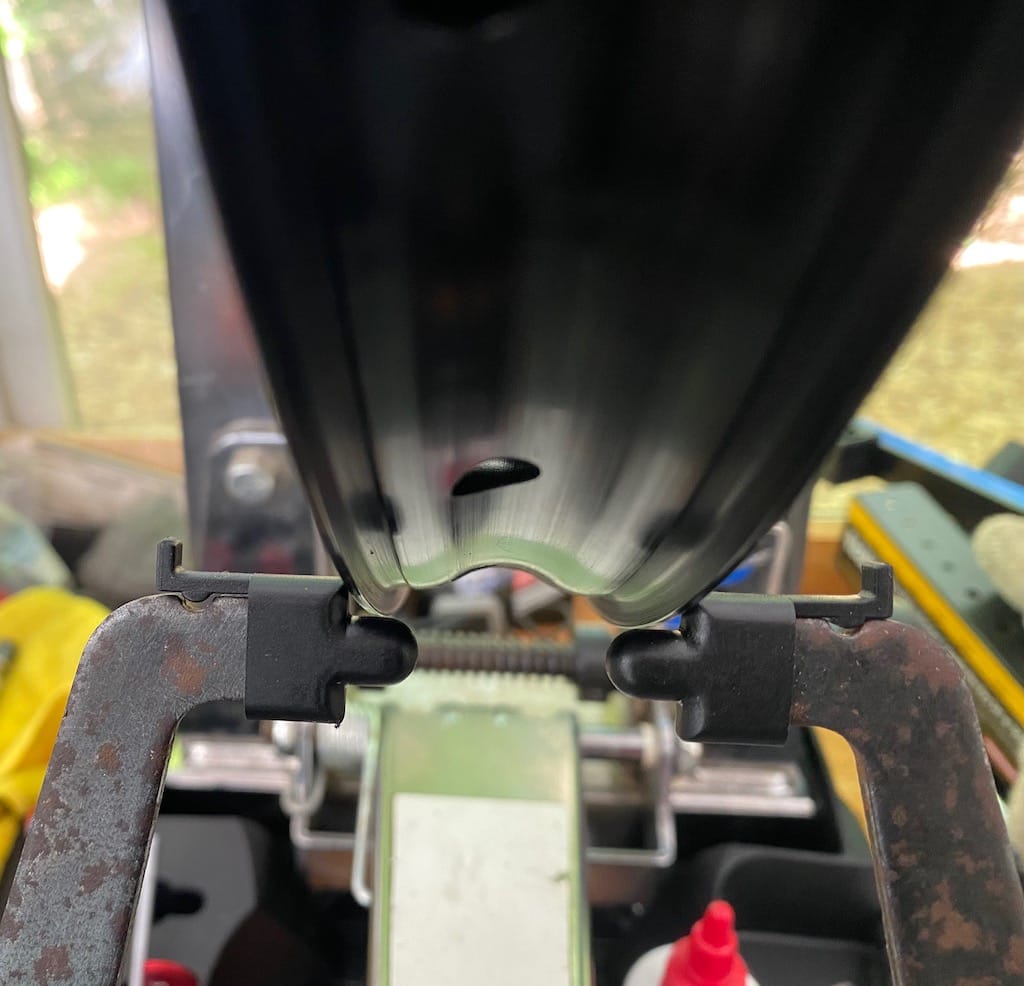
You can buy a specialty tool like the Park Tool WAG-4 for $50 or so, shown in the pic to the right. There are some plans out there to make your own, usually from plywood and a metal ruler or angle. If your truing stand is properly and completely centered, you can also use that, even if you only have a caliper on one side, as you can measure then flip the wheel to compare the two sides. You can use a bike fork with a zip-tie, and again, measure and flip the wheel. If the distance to the rim on a mounted wheel is the same on both sides - it’s centered.
If using a dishing tool, you set the ends against the rim (make sure it’s not sitting on a tire if a tire is mounted), loosen the center metal slide, then slide the point down to the hub contact point (hub end cap), lock the metal slide in place, then flip the wheel and the tool should make contact at all 3 points - the rim on each side and on the center hub end cap. You can usually but not always use the dishing tool with the wheel mounted on the trueing stand.
If there is a difference, determine which side has the gap (both sides can not or the center slide wasn’t locked in the proper position, or it slipped). If one side is ‘negative’ meaning you can’t get all 3 points of contact because the hub will be blocking the center slide from going down, reset the tool (loosen the center slide, push or pull until it’s just contacting the hub contact point, then tighten) to this side of the wheel, and then look at the gap on the other side of the wheel.
I see a gap - how do I correct it?
This one can confuse some people, but our ‘trick’ on squeezing a pair of spokes on one side to see which way the rim moves - can help here as well. If you have a gap on one side of the wheel, you need to tighten the spokes on the opposite side to close the gap.
The amount the rim needs to move over is 1/2 the size of the gap. You can keep the dishing tool on the wheel on the side with the gap, and grab a pair of spokes on the opposite side to squeeze them if you need a sanity check as to which side needs to be tightened.
Of course, you can also loosen the ‘gap side’ to correct dishes in some cases, but as we’re not yet dealing with a fully tensioned wheel, we’ll go ahead and tighten the other side instead. It’s common to have anywhere from 1mm to a few/even 5mm dish at this point, and it’s ok - we have mostly evenly threaded spokes at this point, with fairly close tension levels across spokes on each of the two sides, but this is where differences in spoke lengths across sides, e.g. 273.8mm for the right, and 273.1mm on the left, can lead to having a dish at this point in the build. So, we’ll start at the valve stem and going in one direction, tighten the side opposite the gap - tighten in small increments of 1/2 and 1/4 turns, equally, across every spoke on the non-gap side until you make it back to the valve stem hole. In a way, this is really ‘taking up the extra slack’ due to differences in spoke lengths and hub geometry side to side. Measure again after one time around, and continue if needed. In some cases, you may have gone too far, and the ‘gap side’ of the wheel now has a ‘negative gap’ and can’t touch all 3 points of contact on the tool. If this is the case, reset the tool on the other side of the wheel, check the gap, then tighten in smaller than previous increments ‘on the other side of the gap’ until dished equally/centered across both sides. Ideally we’ll keep this to within 1mm variance, as even that 1mm is really split across both sides when mounted to 1/2mm off ‘per side’ which is fine.
Wheel Stressing
No joke - we’re almost there. You should now have a wheel or multiple wheels that are laterally and radially true, dished/centered properly at this point, with some base amounts of tension in the spokes and no slack spokes.
Before we continue, we want to ‘stress’ the wheel a bit, or in reality - stress-relieving of the components, which will help to do some ‘final alignment’ of the spoke heads, nipple to rim positioning, and also helps a bit with spoke and spoke elbow fatigue. We’ll do this a few times as we progress through final tensioning, and the intial couple of times may have some minor impact on lateral or even radial trueness, but we’ll look for and correct those as we go.
There are a few ways to do this - from putting the wheel down flat (if you do this, support the hub caps with soft material or even a 2x4 with a hole to not put pressure on the hub endcaps!) and leaning on all of the spokes, then flipping and repeating, with some even standing on the wheel - again, see comment about not putting pressure on the hub end caps, as you can technically damage the bearings, or the same idea but leaning on different areas of the rim and them flipping and repeating, or, well, you can use your hands, preferably with some canvas or leather gloves. You’ll wind up with your preference over time, but do note the warning about potentially damaging the hub by putting too much uneven pressure or putting all of the pressure on the end caps. These methods can be done safely, but do require proper support of the hub so the hub flange and not the end caps are what the pressure is being (evenly/equally) distributed against. YMMV.
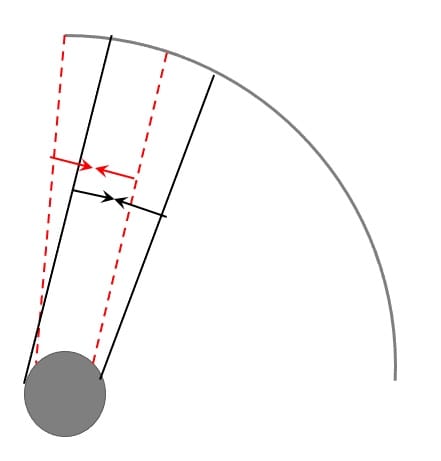
The by hand method of wheel stressing/relief
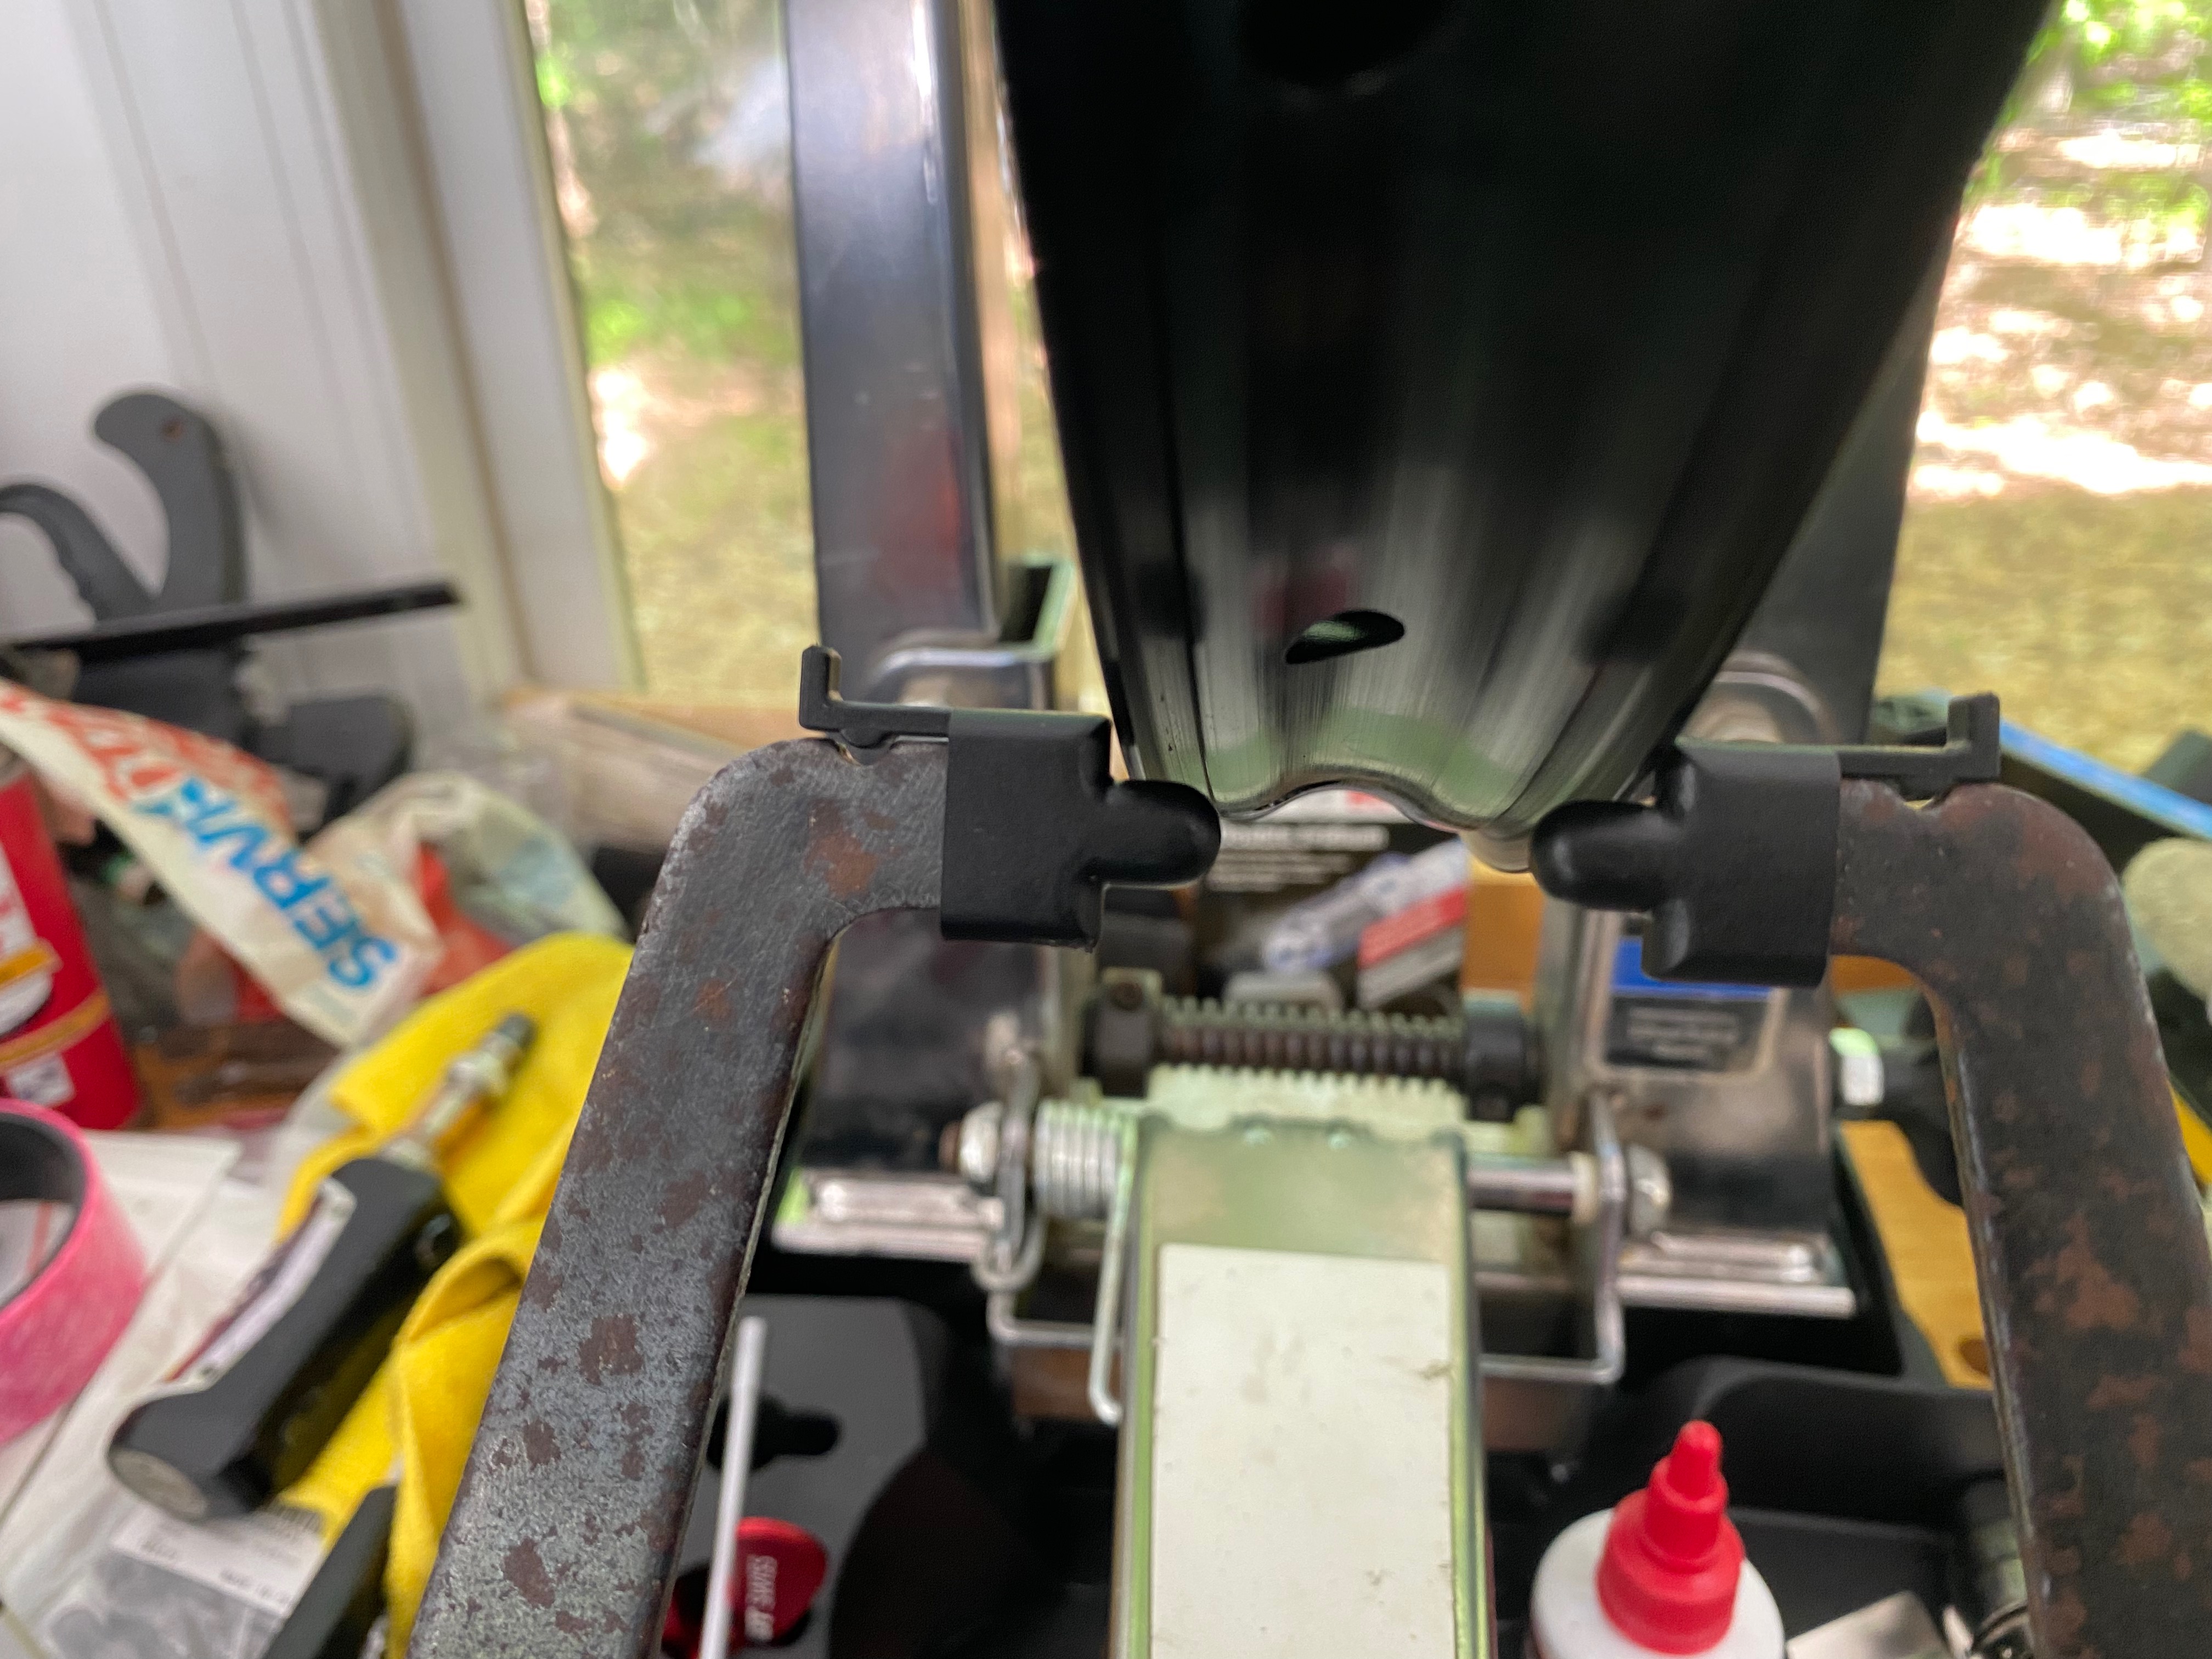
Depending on your trueing stand or other arrangement, you can do this in the stand or out of the stand, whichever is more convenient. Look at the diagram to the right - we’re going to want to grab ‘spoke pairs’ on each side of the wheel, and squeeze them together, but not ‘random’ spokes. Looking at the wheel, you’ll find pairs of spokes nearly parallel to each other on each side of the wheel - those are the pair of spokes we can to grab and squeeze together, with the left hand grabbing 2 spokes on the left side of the wheel(black spokes in the diagram), and the right grabbing 2 on the other side (red spokes in the diagram).
We’re going to be putting a fair amount of pressure on the spokes- not trying to wreck the wheel (you probably couldn’t) but you want to at least feel the spokes ‘flex’ and come closer together as you squeeze. You can do this bare-handed, but it can get your hands sore pretty quickly, so wearing a pair of leather, canvas, or even motorcycle or garden gloves can help.
Starting at (can you guess yet?) the valve stem hole or guide spoke, grab a pair of parallel spokes in each hand which are nearly opposite each other, like the 2 pairs in the diagram, and squueze together with a bit of force until you can feel the spokes coming closer together a bit. You may hear a few ‘pings’ or other sounds - this is ok, in some cases it’s spokes ‘unwinding’ (we’ll discuss in a bit) or otherwise just settling into place. Grab, squeeze and hold for a second or two, then move on to the next set until you’re back at the guide spoke or valve stem hole.
Go around the wheel once or twice, then check and correct trueness if needed
Unless you had a bunch of spokes sitting at really odd angles, this shouldn’t require major adjustments, probably using a very small number of 1/8th and 1/4 turn adjustments. Note you make hear some tinkling or pinging sounds when stress relieving - this is ok, as it’s forcing any twisted spokes to unwind, although it’s more likely to occur as we put more tension on the wheels, and if using ‘spoke flags’ at final tightening(covered shortly), the sounds should be minimal.
You want to get the lateral and radial trueness as good as you can as we’re about to move on to final tensioning, which at least initially, will be moving all spokes the same number of threads. Our final goals are to keep the wheel’s lateral true within 0.2mm, radial true at or below 0.5mm, and dish within 1mm, ideally but not always possible to have each side’s spokes at within 10% tension. We’ll have some more opportunity for fine-tuning, but the higher the wheel tension gets, the more involved it can become to make larger corrections, so try to get these 3 as close as possible, and in general - check and correct in the same order; laterally, then radially, then dish adjustment if required (although it’s very unlikely for dish to have moved at this point).
Final Tensioning
but first, let’s talk about spoke twist
We’re in the home stretch here, but need to cover one more thing - spoke twist, or spoke windup - this is important to understand in order to build stable, reliable wheels. As the spokes go under more and more tension, there is a point at which the spokes will have enough friction between the spoke threads and spoke nipple threads that the spokes will want to rotate, or twist, as you tighten them - at first it may be a small amount, then as final tension is neared or exceeded, they may effectively ‘lock’ with the spoke nipple and turn 1:1, and/or squeak as you are trying to tension the wheel.
Some builders claim once a spoke is twisting ~1/3rd of it’s diameter a wheel has reached it’s maximum tension (or gone slightly over), and this is probably a decent general guideline but may vary on the lube or spoke prep being used as well as spoke nipple and spoke thread ‘clean-ness’(or out-of round, slightly off threads, etc.), so I prefer a tensionmeter or comparison to a known properly tensioned similar wheel and ‘by feel’ comparing the two. Of course, either way, assuming you use libe on the nipples/threads, once you’re starting to feel and hear spoke twist starting, you are nearing final tension in general, and small turns at this point can have a large impact to tension.
Using a tape flag on the spokes can help determine spoke windup during final tensioning
Ok, so what do we do about it?
For now, simply be aware. As we tighten the wheel, you can keep a finger on the spoke being tightened, and once you feel a spoke rotating or making sounds when tightening, tear off a small bit of painters tape, put it on the spoke (I usually set mine to 90*/perpendicular to the wheel face), and do your tightening amount on that spoke - watch the ‘flag’ rotation, go ahead and do your planned amount of turn (e.g. 1/2 or 1/4) but watch the flag, and if it ends in a more clockwise (looking from the top of the rim, assuming you are tightening spokes up top), you’ll want to then back off (and note how far you back off) until the flag is back in it’s original position. Alternately, you can also go a bit beyond your prescribed 1/2 or 1/4 turn to compensate for the twist, then back off, again ensuring the flag is then pointing in the same direction. If you’re building with bladed spokes, it’s pretty much a requirement to use a special tool that holds the spoke blades to prevent spoke damage and excessive twisting. There are also some ‘spoke pliers’ available intended to hold a spoke tight without damanging the finish - it may become more ‘required’ doing straight-pull spokes. I have a pair but haven’t needed to use them so far.. IMO, they’re not required with good quality components and good practices, at least for J-bend spoke wheel builds.
When you do start to see spoke windup/twist, it’s important you continue to be consistent in applying the same effective amount of turn/threading per spoke - once the spoke is rotating or twisting, however far the spoke twists is not tightening the spoke at all for that amount of rotation, it’s just locked to the nipple anmd rotating along with it. Thus the importance of noting how much you’re backing off to get the flag pointing back to the same spot/un-winding the spoke. If spoke twist is not addressed during the wheel build, the first rides will likely lead to various sounds from the wheels - pinging and twanging, tinkling sounds, as the spokes will find their own way to adjust and unwind themselves, which may lead to bring the wheel a bit out of true. So, we’ll just deal with it and adjust for it properly as we go.
It’s worth using a flag on a spoke or two as we get started, just to confirm IF you already have any spoke twist. Once you start to see, feel or hear it, you can move the flag around from spoke to spoke - generally spokes close to each other will tend to have similar twists at the same tension, but not ‘wrapping’ the flag around the spoke and just attaching it on the flat makes it easy enough to brg the ’spoke flag’ with you from spoke to spoke.
Let’s get to it - final tensioning
One last minor detail and we’re off - I like to go ahead and add a small drop of lube to each spoke nipple at the head inside the rim before final tensioning. It’s not mandatory and may be un-nescessary, but the longer we can go prior to hitting windup, the smoother things go. Of course, if you’re using a spoke prep or locking compound, don’t do it, or use the same thing as your prep. YMMV, but I just use lube.
We’re going to go around the wheel starting and ending at the valve stem hole or guide spoke, turning each spoke in turn a fixed amount, de-stress the wheel, then check and correct for lateral trueness (it’s unlikely to see radial trueness waver at this point uless you have spokes tightened unequally, but you can/should sanity check it regardless).
Also, for dished wheels (nearly all modern wheels and certainly for disc brake multi-speed wheels), the DS (cassette side in rear and the disc side up front), the higher tension (DS) side and lower tension (NDS) will wind up at different tensions (and need to), depending on their relative spoke angles - this means in reality there will be a point where you may, for example, turn the DS side spokes 1/2 turn and the NDS side spokes slightly less, perhaps 3/8 of a turn.
There’s a bit of leeway here, as well as experience and spoke lengths coming into play. If you have a tensionmeter or a ‘comparison wheel’ to judge tension on, you may have a better idea of how much more tightening is required.
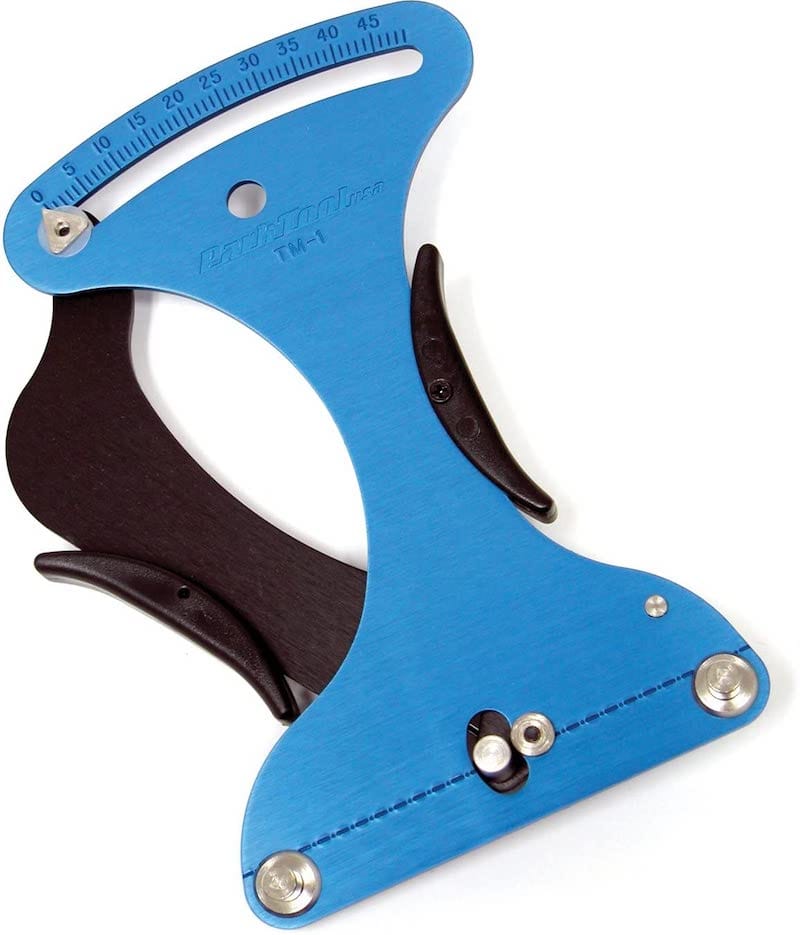
If not, no problem. We’ll make sure the wheel is mounted DS-side to the right, and we’ll start by confiriming the max wheel tension for your rims, which are published by the rim manufacturer, but for most MTB-style rims, a taget tension of 120-130KgF is usually at or near the maximum(although many modern rims are overbuilt and could likely go higher - although there may be minimal gains). If you’re using a Park Tool tensionmeter, or other, you’ll want to check the conversion from what the meter reads to it’s equivalent in KgF, which is based on the spoke gauge/width and type. For example, using a Park Tool TM1, you can look in their conversion chart for your spoke type - in my build, it’s for steel 1.8mm spokes (Alpine IIIs are 2.3 elbow - 1.8mm to 2mm at threads), which the Park Tool conversion chart has values from 14 through 25 with a range of 53-173KgF. You might also notice on the chart that the difference of ‘1 point on the meter’ can equate to a 30KgF difference in some cases, or more, while using the chart for a 2.0mm steel spoke accidentally instead of a 1.8mm could leave us under-tensioned. Just make sure you check the chart a few times, and have a general target in mind for the DS/higher tension side. In my case, I could target a reading of 23 for a value of 131KgF, slightly higher than the 125KgF I’d normally aim for, a tool reading of 22 which would give a value of 117KgF, or I could extrapolate and assume a reading of 22.5 would give a tension of ~124KgF, which sounds just right.
For the non-drive-side, it will realistically end up where it does once the wheel is tensioned and kept true and centered, but looking at my spoke calculator results, I can see the front wheel should have ~88% tension NDS vs the DS at 100%, so 124 * .88 gives us 109.12, while the rear wheel at 84% NDS tension vs the DS would give us 124 * .84 = 104.16. Doing a quick lookup in the Park Tool table, this would be a reading of 22.5 for the DS and right around 21 for the NDS. As we go through the tightening process, we’ll stop after each round of tensioning and do a sanity check on a few spokes and we’ll want to do smaller increment turns tightening as we come close to our target number on the higher-tensioned DS. We can also spot check the NDS spokes, but again, it’s mostly academic if we have a properly tensioned DS set of spokes that is centered and true.
One tip if using the Park Tool TM-1 and likley for others - the tool is nicely anodized, but isn’t always as easy to read as it might seem from a picture - a tiny bit of glare or the wrong angle will have you looking for the numbers. You can rub some chalk or even paint or marker into the grooves and the numbers, then use a rag with cleaning agent to clean off the face, leaving the grooves and numbers more clearly visible.
Park Tool Tensionmeter conversion chart - link to full-sized version

Park Tool Tensionmeter TM-1
Back to the wheel. I’ll do a round of half turns on all of the ‘high side’/DS spokes only, starting ad the valve stem hole and working clockwise, pulling the wheel ‘down’ towards me, and keeping a finger on each spoke, both as a mental check that I’m in fact tightening the right side spokes only first, and to also start to get a feel for how much tension is being added by the half turn, and finally to be able to start to feel when spoke twist may be starting or getting ready to. After that, I’ll do around 3/8 or 7/16th (a half turn minus a small amount) on the left/NDS spokes, starting at the valve stem. Then let’s spin the wheel slowly, and check for lateral and radial trueness. We also want to confirm the dish remains centered - if not, we may have turned the low/NDS spokes too little (if dished to the right/DS) or too much(dished to the left/NDS) and will want to adjust how much we turn that side on the next round.
Go ahead and stress relieve the wheel again, then we’ll check and adjust any trueness and dish adjustments now, then go ahead and get a few spoke tension readings on the DS (or compare to a known properly tensioned wheel). We’ll repeat this process until we’re closing in on target tension and then make smaller incremental adjustments (e.g. 1/4 turn then even 1/8th turns per spoke), or until we start to feel or hear spoke twist, and then we’ll use the ‘flag’ method to add into the mix, turning our amount + the amount the flag rotates, then unwind so the effective threading with the spoke unwound again was our target (1/2 turn, 1/4, …). Check trueness and dish after each round of githening DS, then NDS spokes, in one full trip around the wheel. If you had to adjust the NDS side turns to be more or less due to the wheel dishing, assuming you adjusted in the right amount dish shouldn’t be changing after the first 1 or 2 times around the wheel.
If you literally have no proper wheel to use for comparison, and no tensionmeter or a way to borrow one, you can use the aforementioned ‘trick,’ keep going until you are seeing spoke twist to 1/4-1/3rd of a turn or so, making sure you unwind it to no twist, and call that tension level good o nthe high side. This is still done regardless in increments of one trip around the wheel from valve stem tightening DS spokes, then NDS spokes, then checking trueness and dish, and repeating.
In the case of this particular wheelset, I think I wound up in total adding another 2-3 turns in total in getting to final tension, and brought the spoke tension variance below 10%. I keep using the ‘from the top’ spoke driver for as long as possible, only transitioning to spoke wrench (remember it may feel ‘reversed’ when switching for tighten/loosen directions!) on the last round of tensioning (1/8th turns) and final trueing check.
As you’re tensioning, if your spokes are on the longer side, and depending on your choice of spoke nipples, the spokes may start to come up to and through the slot of normal nipples - this is ok, although it generally means your spokes were a bit longer than they should be, and there are limits as as some point you will run out of spoke threads, and continuing to screw in beyond that point will start to ‘dull’/damage the lower threads of the spoke nipple (brass and aluminum as much softer than the steel). Squorx nipples have an additional 3mm of thread above the head where the squorx/Torx head is, and can generally be screwed in to just below the top of the head before the spoke threads bottom out. One or two turns past may not be too detrimental, but you are reducing spoke thread engagement and strength at that point - if it’s more, it may be time to consider ordering shorter spokes, or alternately, you can consider adding washers under the spoke head (making sure they match the rim bed, e.g. don’t use curved washers on a flat rim/spoke nipple bed).
If your spokes are too short, you may be able to use a driver for more of the process, but you do want to make sure the spoke threads at the very least make it through the rim into the spoke nipple head, or wheel stresses may cause nipple and/or spoke breakage over time. You can also concisder going to different spoke nipple lengths if your spokes are a bit short, but note there are differences between e.g. 16mm DT Swiss and Spim spoke nipples - Sapims will let you run slightly shorter spokes, or compansate for them while DT’s don’t. Regardless, it’s not really ideal if the spoke thread end isn’t at least making it into the rim bed.
Finishing the wheel
Keep going on your ‘round’ at a time - tension/tighten DS, tighten NDS, de-stress, check true and dish, check tension on DS, and adjust how much the next round (if any) are, and use ‘flags’ (and be aware you should be nearing final tension in most cases using round spokes) to avoid windup. Depending on how slack/loose or tight the wheels are, you can skip a few rounds of de-stressing, but make sure to do it at least a few times and de-stress when you’re at/near final tension.
Finally, let’s check all spoke tensions on the high side using the WTA app or just ensure you’re within 10-20% of target across all DS/high side spokes. If you find any high side spokes way out of range, it’s usually the combination of one too tight with the surrounding same-side spokes too loose - these should have been caught and corrected already, but do a final check, then check for any high/low on the NDS, not targeting tension there but just spoke average tension without large dips beyond 10-20% spoke to spoke, then wrap on lateral then radial truing and final dish check/correction (all spokes on a side for dish correction).
Your final truing and dishing should hit the targets of tension within 10-20%, lateral within 0.2mm to max of 0.5mm deviation, radial <= 0.5-1mm, and dishing <= 1mm of a difference or gap side to side.
Congratulations - you have a rideable wheel(set)!
You’ll need to mount tires, and for most cases, I’d highly suggest considering going tubeless - you can check out that writeup here, mount your disc rotors, and rear cassette and you’re ready to mount and ride.
On your first ride, you may hear some pinging coming from the wheels - this is effectively the spokes unwinding that weren’t in the prior series of de-stressing. If you used the spoke flags, lube, didn’t go crazy on tension and stress relieved several times, it should be pretty minimal (like a few wheel rotations at most) and then stop. This could have been avoided by more or more complete de-stressing during building, but it’s not the end of the world. On this particular wheelset, I had a couple of small pings then done after a wheel revolution or so on the bike riding.
It’s well worth recording your build details - all components, ERD measured, spoke lengths, and final tension measured if applicable, as well as if your spoke lengths were spot on, or on the short or long side as you may build another in the future, as well as simply wanting to keep the spoke information handy in the event you eventually break a spoke or two and need to replace them.
It’s worth paying attention during the first couple of rides - you shouldn’t need to adjust anything, but it’s worth checking tension and observing if lateral trueness is more or less being kept (you don’t need to pull the wheels at this point, flip the bike or put on a repair stand and spin the wheels. Unless you’re seeing significant issues, at most you may need to do a few minor lateral corrections then short of wheel damage or extreme incidents you generally shouldn’t need to touch the wheels again if properly built. Note that tension may drop once tires are mounted and pressurized - this is fine; don’t try to increase to match the original target, just make sure no spokes went way out of tension vs the others. I check my wheel trueness and tension at season end and season start as a pre-cautionary measure, but otherwise just ride after the ‘few ride check-in.’
Final round of truing at DS/high-side target tension
New wheelset with tires read to go (minus rotos and cassette)
Congratulations - you’re now a wheel builder!