E-Bike Tools for Maintenance and Repairs
Tools needed to work on e-bikes are fairly basic but there are both some bicycle and e-bike specific tools for some jobs. There are links to each of the tools mentioned. I’ve worked on vehicles, motorcycles, and done carpentry, plumbing etc. for a long time, but even when I worked as a paid mechanic couldn’t stomach the Snap-On truck pricing, so my specific selections will range from some higher-end to ‘good enough to get the job done and be reliable.’ Life’s too short to deal with tools breaking when you need them most..
I’m including an introduction to what each of the tools are for, along with an indication of ‘level’ of Basic, Intermediate, or Skilled. In my opinion, everyone should have tools to cover at least those marked as Basic.
One thing worth noting - just like most vehicles, most fasteners on bikes and ebikes today are metric.
E-Bike Tools list
You’ve got to hold the bike somehow ...
Repair stands - Intermediate
Using a stand makes life easier, or simply possible, for many bike maintenance and repair tasks from spoke tightening to simple chain cleaning and lubrication. I’m marking this one as Intermediate only because some may be physically unable to lift and clamp a bike into a stand. If this is the case, I would still highly recommend getting the tools listed as ‘Basic’ throughout the rest of the article.
I have the Park Tools PRS25 which is one of their higher end options. I do like it as it folds up well for storage and has a quick engage/disengage option for the clamp.
You can also go with the Park Tools PCS-10.3 or Park Tools PCS-9.3.
Also, the Bikehand HD repair stand is effectively a clone of the Park stands. Be aware there are numerous cheaper stands out there, but most have a weight limit of 40-50#, with nearly all ebikes being 50# or higher. A good repair stand should last for decades, so it’s one of those things I choose to invest in once.
A set of bar holders to keep handlebars from moving around when on the stand makes life a bit easier when working on the bike. I have both Park Tool models but the Park Tool HBH-3 is so much more useful than the HBH-2 as it doesn’t move around when rotating the bike on the stand.
There are a number of accessories available for some of the stands. The only ones I particularly care for are the Work Tray and the Paper Towel Holder add-ons, as they’re just convenient in general, and I always keep a magnetic cup in the stand for loose bolts, nuts and screws as I’m working on the bike.
Wheel stands
You can do without if your bikes have kickstands but are convenient, and are pretty much required for mountain bikes without kickstands. I keep one in the back of the car when we’re putting the bikes on the hitch and driving to a ride spot..
Folding Wheel Stand - accepts (most) fat tire bikes and plus tires
Folding Wheel Stand for standard road and MTB tires
If you have heavier cruiser-style or multiple bikes, something non-portable may be a more stable option, although I’ve used the Fat Tire option for my 75+ lb Fat Tire bike.
Stash Floor Stand

Basic hand tools
Allen/Hex and Torx bits
Nearly all fasteners on bikes today are (metric) Allen/Hex head or Torx bits.
Further, it’s in your best interest to make sure you don’t tighten everything ‘by hand feel’ unless you are a very experienced mechanic - I’ve worked on cars and motorcycles since I was a teen, and still use a torque wrench on bikes as most fasteners are fairly low torque and it’s easy to over-tighten things. There are plenty of ‘mechanics’ who have managed to strip alumunium thu-axles or brake caliper mounts - it really is worth picking upa torque wrench for most.
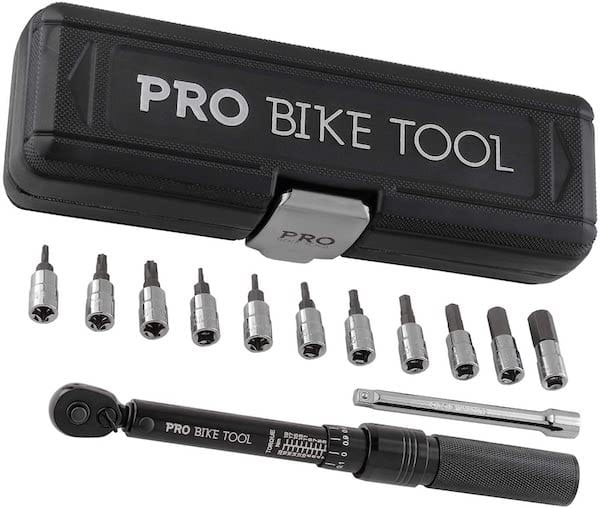
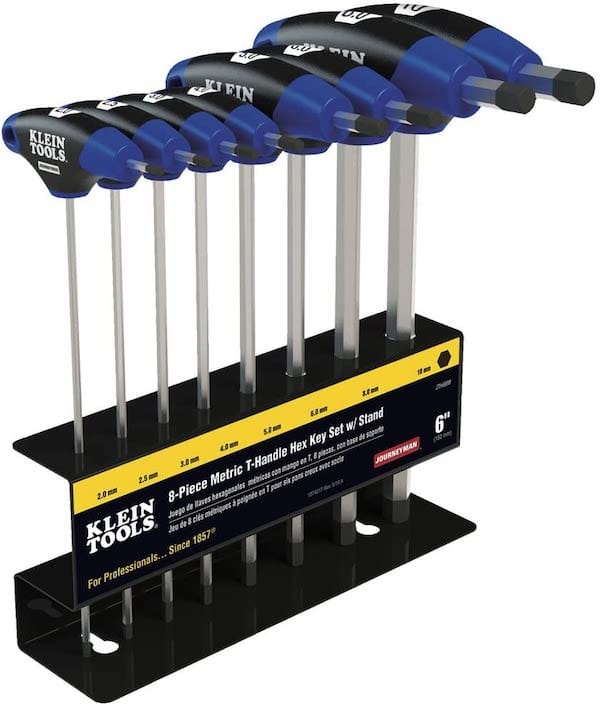
I’d suggest getting all 3 options listed below - the torque wrench set I link to includes a decent set of Torx and Allen bits, while it’s more convenient doing pre-ride or removal with a T-handle set and the multi-tool should pretty much live with your bike on rides. Most fasteners are between 3-6mm Allen heads, but brake calipers are Torx T15 or T25, while suspension and axles are usually larger Allen sizes. Some derailleurs are hex and some are Phillips head, so including a decent multi-screwdriver in the list. It’s tempting to buy cheap, but life can suck when you have a bit snap on you trying to do some basic maintenance, so - these are what I use today, a mix of mid-level but reasonably priced with a few higher end in the mix.
Pro Bike Torque Set - including both Allen/Hex and Torx bits
Klein T-Handle Allen Set - you can spent less, but also a lot more. Klein Tools are US-made and have been in business for some time.
T-Handle Torx Set
Torx set
Multi-tool - this one even includes a chain breaker and should go in your pocket or bike pack on every ride!
6 in 1 Y wrench - these are neat to have on hand in general and slightly more hand-friendly than the multi-tool but without as many functions. You can pick up one of these and the torque set to get started on the cheap.
Other basic general-purpose hand tools
You may have some of these already. Personally, I like to keep a set of tools for oone purpose together in their own box or in a section of my toolbox drawers to avoid chasing down ‘where is the one tool I need?’ that my wife may have ‘borrowed’ but YMMV.
Some handlebar attachments and some derailleurs may use Phillips or even flathead screws, so a good general purpose screwdriver is worth having.
Klein multi-screwdriver
needlenose pliers
magnetic cups help to not lose screws and bolts and are inexpensive.
Wheel, Tires and Chain
Wheel and Tire Maintenance - Basic
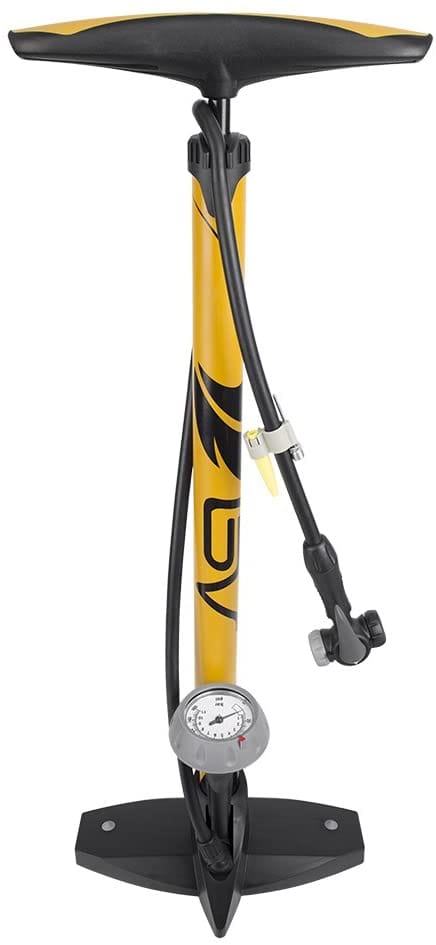
For the basics, you’ll want to make sure you’ve got an air pump of some kind, with a head matching the type of valve you have - Presta valves are narrow, and you unscrew the end of them to add or remove air, while Shrader valves are just like those on your car tire. You can also get a Presta to Schrader valve adapter cheaply, although they can be a bit fiddly with some valves in my experience. There are other types of pumps available, such as ‘charge pumps’ for tubeless tire conversion, which I’ll cover elsewhere, as well as on-bike or in-pack small pumps meant to be brought with the bike. If you have a compressor already, you can also use an air chuck, from a cheap version to a pretty expensive Park Tool version. If looking into compressors and you don’t run air tools, a small compressor with small air tank can be used for many things or you can get a more tire-focused version. Air Compressors by themselvers are worth a separate page - if you buy one and it’s mostly for tires and such, I recommend one with at least a small air tank, as eventually you’ll want to do more than inflate tires with them, and the tank will allow you to build up pressure then release - useful if you later decide to convert to tubeless tires.
Digital Pressure Gauge - works with both Presta and Schrader valves
For basic tire maintenance, you should also have a valve core tool, a spare tube if running tubed tires (almost all are as coming from the factory/manufacturer), and a tube patch kit.
valve removal tool - this one can remove either type of valve
spare valve cores - Presta or Schrader
Note - you can also get some combo kits that ccome with removal tool and some presta and shrader valves
Tire levers - to get the tube out, you’ll need to at least get one side of the tire off the rim. It’s not difficult, and this set of 4 locks together - not a bad idea to keep 2 of them with the bike!
These Granite Tire levers are also a clever smaller option to put into your on-bike kit and can hold a few master links inside as well as providing chain pliers. A bit more fiddly than the individual tools, but usable on the road or trail and pack up nicely.
Tube patch kit - keep with the bike along with a set of levers and portable bike pump
spare tubes - check the size for your specific tires! Tubes are easier fixes than patching tires, but neither one is difficult other than getting the tire off the rim. I keep one tube with me in my pack when riding, and a patch kit for tubed wheels, or an in-bar plug kit or simple plug kit for tubeless.
spoke wrench - you can get a lot fancier here with individual wrenches, but starting out, at least pick up one like this to ensure it fits your bike’s spokes
Spoke tension meter (optional) - Advanced
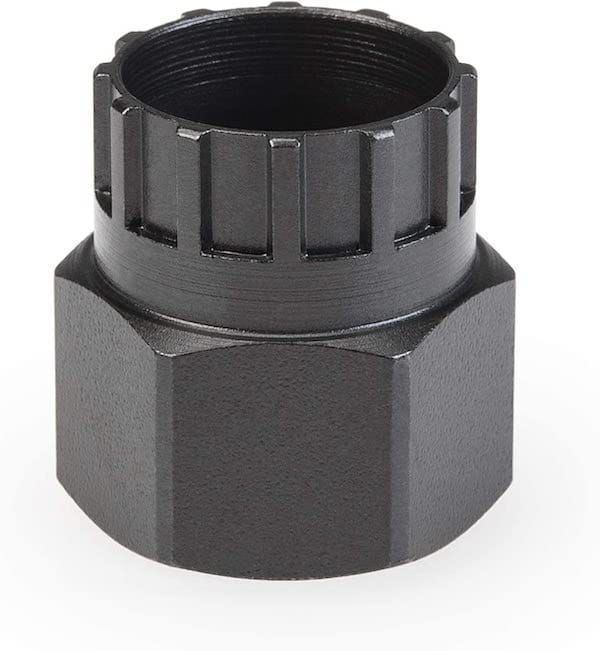
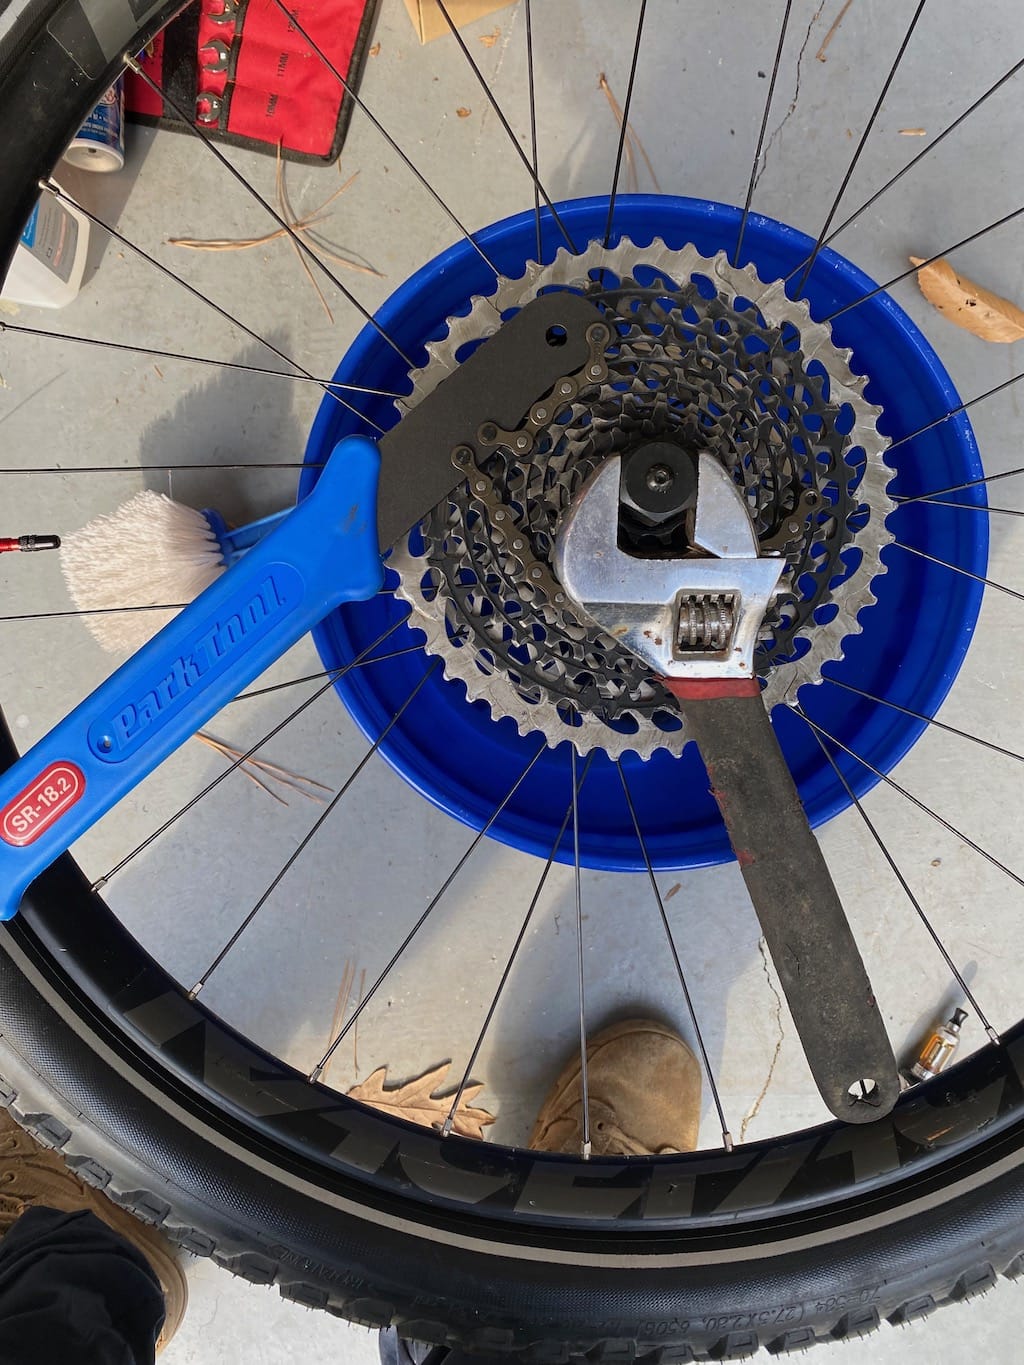
Changing Rear Cassette - Intermediate
Changing the rear cassette out as it wears will require a cassette whip and socket for cassette removal, while you should at least periodically check spoke tension. You can go large with a spoke tension meter, or at least by hand ensure all spokes seem to be similarly tight, and tighten with a spoke wrench if/as needed. This is especially important on new bikes/wheels as everything gets stressed on initial rides, then afterwards should become part of routine periodic maintenance to check by grabbing a couple of spokes by hand (or with the tensioner tool) and checking for similar tension across all spokes. All of these are ‘Intermediate’ level tasks - pretty simple, but maybe a bit more work than basic cleaning and lube of chain and checking fastener tension.
Cassette whip - you need this to hold the cassette from moving
Cassette removal socket - this one will work for all cassettes. If you’re positive you have a thru-axle bike, this one’s slightly nicer and less likely to slip out, but it’s a luxury and not really needed.
Derailleur Hanger Alignment - Intermediate
One other wheel-related thing to consider isn’t really for the wheel, but the derailleur hanger. These can get bent out of shape either over time or being nudged riding trails, or even hopping a curb if you’re unlucky, making your shifting problematic. This is another ‘optional’ tool, as it costs a bit but can also be done by your local bike shop pretty quickly and at relatively low cost.
Park Tool Derailleur Hanger Alignment Tool
Other options:
Park Tool DAG-2
CycloSpirit Alignment Tool
Cables and Chains - Basic to Intermediate
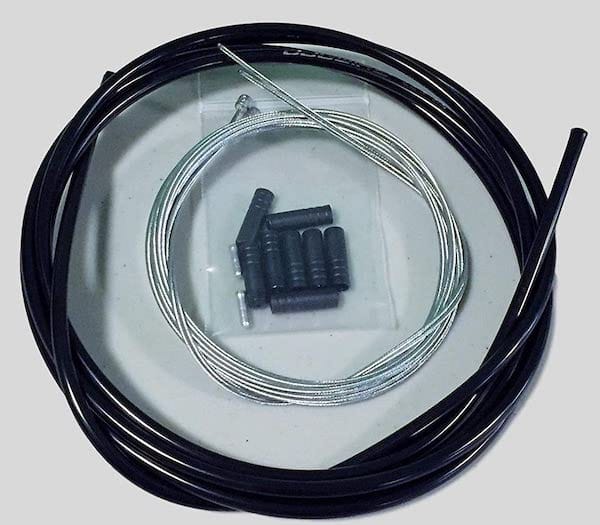
Cables
Cables are a way of life on bikes - yes, there are some super-expensive wireless shifter/derailleur options out there, but most of us aren’t spending that kind of $ today.
A few tools make dealing with them a lot saner
Cable and Housing Cutting pliers - no, not inexpensive, but most other quality tool manufacturers are similar. I initially had tried to do without, but even good lineman pliers don’t do as good of a job and can lead to frayed cables...
Third hand cable stretcher - it’s convenient but a luxury, IMO - used to take up slack in cables while clamping them down, e.g. for derailleur cable replacement. If choosing between this or the Cable and housing cutters above - get the cutters.
Jagwire shift cable kit - worth having a full set on hand. Cable-only options are available for a bit less $, but never know when your cable housing is going to get nicked up etc. Unlike the cables coming with some shifters - these cables have been long enough for all of my bikes. Check the cable sizes for both MTB and road kits - they’re usually the same.
Jagwire Cable end crimps - the shift cable kit comes with 2 cable end crimps, but they’re easy to lose, and doi occasionally come off. Cheap insurance to have on hand to avoid frayed cables IMO.
Cable Lube - you don’t need much, but it’s worth a few drops of lube on installation and now and then. People will have near-religious wars, and there are ’special’ cable-only products out there for (surprise) more $, but a decent dry lube like Finishline (can also be used for chains) should do for most bikes IMO, or Tri-Flow if you prefer wet.
Chains and related - Basic
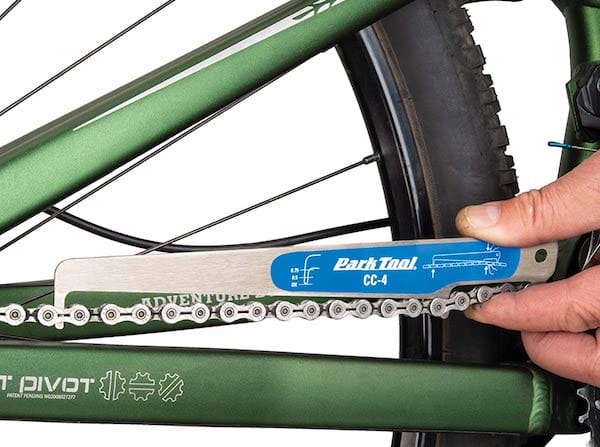
Chains stretch over time and occasionally break. As they stretch out, they also wear the rest of your drivetrain more and more (cassette and chainring). It’s not uncommon to be able to go through 2-4 chains before needing to replace a cassette if the chain is maintained (cleaned/lubed) and replaced when it should be. -bikes in particular can be tougher on chains, so most recommend replacing the chain once it reaches the .5 wear mark on e-bikes- as measured with a simple chain stretch measurement tool.
Park Tool CC4 Chain Wear Gauge - works for all speed chains 5-12, simple to use. You can find slightly cheaper as well as more expensive but - why?
Chains are put together with a ‘master link’ - while the other links are solidly fixed to each other, this link is remove-able, although sometimes single-use, and when a chain needs to be shortened or lengthened, or simply repaired from breaking, a master link is used. The master links are different by # of gears/speeds on the bike as are the chains, so make sure when ordering master link spares or chains you get the right ’speed’ chain. Chains are generally available in different link lengths, so it’s worth confirming if you need the ’standard’ ~114-118 link chain or a longer one. Most fixed suspension (no rear shock) can use the standard chains, and some bikes with rear shocks can as well, or you can always order a longer one and match to your existing chain, and use a ‘chain breaker’ to match the length. Trailside or on the road, having a replacement chain (of the right speed and length) is nice but also adds weight, so at the very least, keep one or two space master links and a pair of link pliers and chain breaker (like the ones on the multi-tool mentioned previously) on hand.
spare master links - confirm the number of gears your bike has when ordering
link pliers and chain breaker - you can buy these separately and spend more, but this combo kit is reasonably priced and includes both. Even if your bike is 11 or 12S, get the kit, just don’t use the spare links included.
spare chain - make sure you order the right one for your bike!
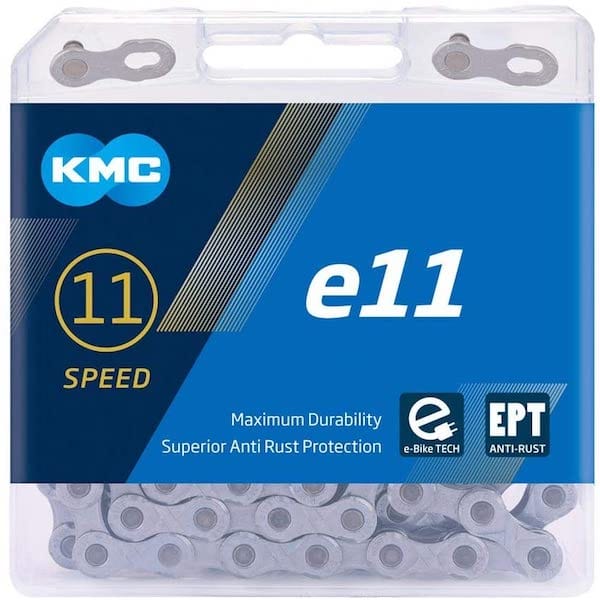
A note on chains - there are a lot of different chains out there, and even within a given brand there are different variants like the
SRAM XX01 top-end with hollow pins versus their mid-range chain. There are also a growing number of ‘e-bike specific’ chains like the KMC E series. The jury’s still out on if the expensive ‘special’ chains are indeed worth it or not, and the short answer is this - stick with brand-name chains from Shimano, SRAM or KMC, make sure they’re not hollow-pin (these are for light-weight racing bikes, not e-bikes!), clean/lube often (after every ride to few rides), and replace when you hit the .5 mark.

Greases, Lubes and Misc
The following are generally worth having on hand for bike maintenance, and buying once in general will last you for a very long time.
anti-seize - for pedal threads and things like axles you want to ensure don’t seize up
general purpose lube - Tri-Flow with Teflon
FinishLine Teflon dry chain lube - using it, like it.
Muc-Off Dry Chain lube - also have used it, also works fine
Boeshield waterproof lubricant - was turned onto by a friend, in proces sof trying, but neat history of coming from Boeing in the Aviation field and he swears by it. Also comes in a more standard dropper bottle style.
dielectric grease - used to coat the outside of e-bike connections to keep seals weathertight
Silicon grease - useful for various rubber bits including gaskets, prevents dryout and helps seals. Similar to and can also be used as dielectric grease.
carbon and alloy assembly grease - useful to improve grip on seat posts and stems
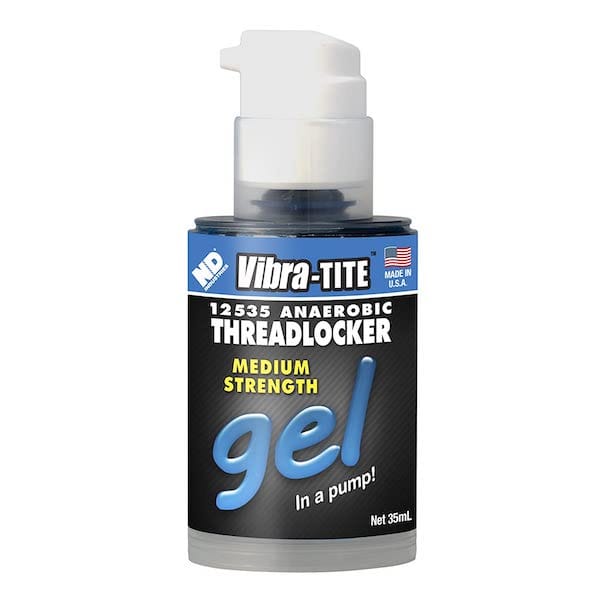
Blue Loc-Tite medium strength - useful on bolts and screws like chainring, suspension bolts, and more
Medium Strength Locking compound Gel - similar to the preceiding but in gel form, a bit lessy messy especially for smaller bolts/screws
Miscellaneous
Park Tool Chainring Nut Wrench - eventually you’ll need, or want to change your chainring under the pedals for different gearing or just due to wear. This is the ‘right tool’ for those fiddly backing nuts - can be done without, but does help on properly tightening them and stopping them from spinning.
Crank Arm puller - for removing crank arms (pedals and motor attach to these ;) ) sanely, and inexpensive. Works for most bikes incluing Bafang, Shimano, etc.
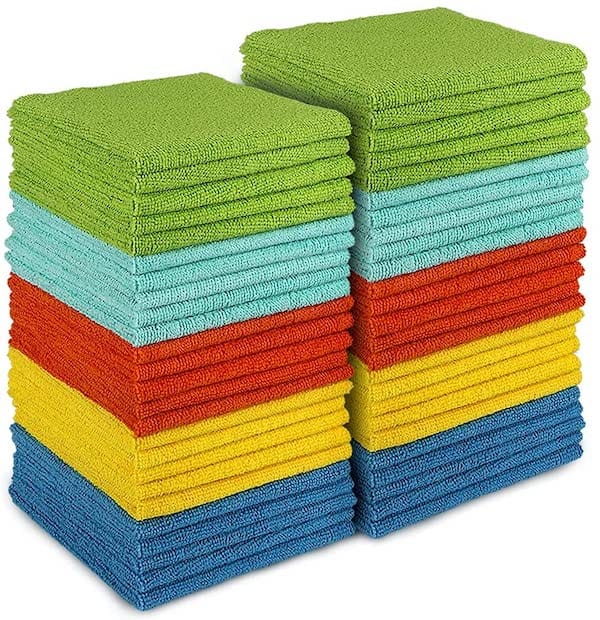
microfiber cloths are good for bike cleaning (as well as for cars) - most can be washed and re-used for some time. I always keep at least a bag of these around.
Zip ties are useful for cable cleanup/neatness as well as keeping a few on the bike or in your pack for trailside repairs. You don’t need a bunch of different sizes if you don’t want, but something like an 8” length is good for an all-around size, and you can always string several together if needed.
Micro-cutting pliers to cleanly cut zip ties flush
Hand cleaner - because even with gloves, life can get greasy.. :-/
Latex or nitrile gloves make life as well as cleanup easier, as do mechanix type work gloves. I generally use the thin latex or nitrile gloves for bike work, and mecahnix gloves for car and motorcyclwork but YMMV.
File set - Not usually needed but good for deburring surfaces. Reasonably cheap, and has held up so far for bike and non-bike work.
Bike Cleaning
Another subject for all kinds of online debates, but the reality is, you do NOT want to get electric and electronic components with water forced into them, or sitting inside a motor. I have a commercial pressure washer - and do NOT use it on the ebikes. You could probably use some normal car detailer spray, but some of the below will help reduce the workload.
A decent compartmentalized box for small parts
Bike cleaner - self explanatory but spray on, and wipe off with a wet microfiber or sponge.
Cleaning kit - You may have some of the bits here, and possibly better quality, but for the price, this is a decent kit and gives you a chain cleaner, cassette cleaner and more. Even if you also doa chain cleaning kit - some of these brushes become disposable over time.
Chain cleaning kit - these are a bit hit and miss, some love them, some don’t. You can also use a toothbrush or rags, or a brush like the one included in the general cleaning kit above. Either way, be careful when re-lubing your chain to not spray wildly, most importantly to not contamintate your brake rotors (or pads).
Alcohol pads - cheap enough to use to occasionally clean your disc brake rotors + throw into a first aid kit. Also useful for cleaning laptop screens, electronics, etc.
Pedal wrench - Bike pedals may use a thin 9/16” open ended wrench or Allen keys. If they’ve been on a for a while, the pedal tool can help by giving much better leverage, but you can generally do without it.
Scale - mostly for those building a complete DIY bike conscious about weight. You can spend much more, buy a fish scale, or - don’t worry about it at all. Absolutely not needed by most.
Suspension
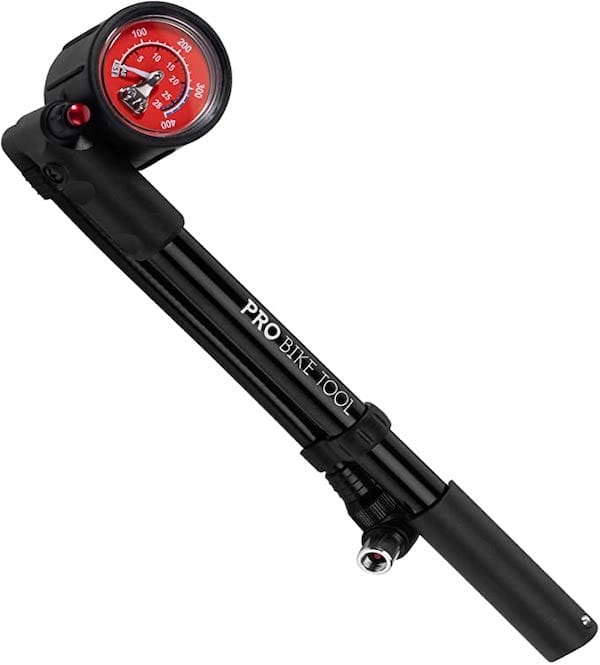
I’m going to save shock and fork internal servicing for a different writeup, but if you have a rear air shock, or front air forks, these work at much higher pressure than a standard tire pump can provide (100PSI+), so you’ll need a shock pump. They’re all pretty similar at this point, so I’ve used the (cheaper) DNM for some time without issue, but even Fox’s isn’t much more $.
Wheel Building and Truing Stands - Advanced
Trueing stands are used for when a wheel becomes out of round, or ‘wobbles’ from side to side. One indication of the latter is you may hear your brakes making noise but not constant - as the wheel is ‘wobbling’ to one side, it’s hitting the brake pads. This one takes some skill and some $, while a local bike shop can probably true and check/correct tension for you for $50 or so. It’s worth having a spoke wrench in your toolkit for minor tightening and correction, but most don’t ’need’ a trueing stand. If you decide you want one, or might - you can use zip ties on your chainstay or seatstay (or fork) to check for lateral true-ness/wobble, and with some cleverness also for out of round, or you can get a simple attachment for Park Tool stands, or one of these options below. I’ll be posting an article on wheel-building in the future. If you do decide to buy a trueing stand, make sure it will fit, or with an adapter will fit your specific wheel size (e.g. 20/24/26/27.5/29” and width, QR vs thru-axle, etc.).
Options:
Park Tool TS-25 Truing Attachment for Park Tool Repair Stands - inexpensive if you have a PT compatible stand, although only can work a single side of the wheel at a time.
Bikehand Professional Truing Stand - this is a near-clone of the TS2-2P and will accept some to most of that stand’s attachments - for a bit less money.
Park Tool TS-2.2P Professional Truing Stand - pretty much the standard
Park Tool TS-4.2 Professional Truing Stand - so special (and $$) Amazon doesn’t even list it.. ;)
One callout is before starting a wheel build - make sure your stand arms are centered properly. Will cover once I post the wheel buildout...

Special Tools
This section is mainly for myself and for Bafang motor-powered e-bike owners as there are some speciality tools involved. Will add to as I may need to dig into my wife’s Bosch motor as well.
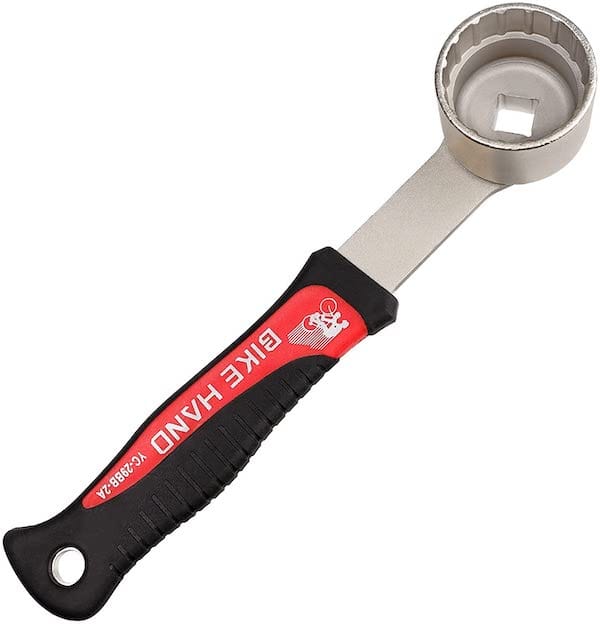
The Bikehand BB Tool works to remove Shimano 44mm hollow cup BBs, 16 notch rotor lockrings, and at minimum the Bafang M600 chainring retaining nut.
Closing Thoughts
For someone just getting into bike repair and maintenance - there’s a lot there above. Don’t worry about it - buy the basics for fastener torquing/checking and chain lube and replacement, and the rest can wait, or you decide on what you want to do yourself versus bringing to a bike show. There are tons of videos on bike maintenance from Park Tool and others on YouTube, and most things really are not that difficult, and get easier once you’ve done it the first time.